Thursday, November 2, 2017

Battenberg Cake - No Eggs In the Cake

 I seem to have fallen into a pattern of neglecting this space and giving excuses for that. However, my husband and daughter do not agree and push me hard enough to post here once in a few months or so. They try hard to coax me to make an attempt to keep this going.
 My daughter, especially, goes that extra step to persuade me by sharing her cooking and baking. This is one such post that was 100% hers. She baked this cake a few days ago for their weekend snack and shared her photographs. They were so eye catching that I asked her to make a blog to be put up here.
 She said that when they moved to the new city and she was still getting her home in some order, she wanted to do something enough to break the boredom. While she was looking through recipes to bake, the Battenberg cake caught her fancy. Since they both like chocolate and the flavour of coffee, she alternated for the traditional bright colour layer with the brown checkers.
 Known by many names, like church or chapel window cake, chequerboard cake and domino cake, the Battenberg cake is said to have been named in honour of the marriage of Princess Victoria, grand daughter of Queen Victoria to prince Louis of Battenberg in 1884. However, there are some early examples of this that go by a variety of names. The Neapolitan roll, a similar cake contains more squares than four.
 The American version of the battenberg cake is the checkerboard cake that gets the name because while sliced it resembles the board of the game. a typical one alternates vanilla sponge and a chocolate cake and is covered with rich chocolate buttercream icing.
 My daughter made the cake as well as the marzipan without eggs. For the cake, she followed this recipe posted here sometime ago. she used the recipe for one cake but divided it in two half cakes to make the layers. She had used parchment to separate the cake batters and baked them in one cake tin. She said she was not able to take pictures of the process.
I found Traditional Battenberg in Mandi Mortimer's Blog very descriptive, with pictures of how to bake, layer and roll in the marzipan, the post is very helpful.

Battenberg Cake - No Eggs Recipe


The following is my daughter's mail that I have copied verbatim

This recipe is a twist on the traditional Battenberg cake, which is usually made with an almond white cake, and the pairing sponge is a pink one made with a couple of drops of red food color in the white cake batter. I didn't want to be using artificial food coloring, hence the dark chocolate cake. 
You can use any cake recipe you'd like - as long as you can get the size of the cakes right.

Ingredients: 
For the cakes:
All purpose flour - 200 grams.
Cocoa powder - 2 tablespoons. heaped
Sweetened condensed milk - 1 tin (13.6 oz)
Butter - 100 grams
Baking powder - 1 teaspoon
Baking soda - 1 teaspoon
Aerated soda - 150 ml (reserve an extra splash to slacken the chocolate batter if needed)
Almond extract - 1/2 teaspoon

For the marzipan:
Almond flour/meal - 2 cups
Granulated sugar - 1 cup
Icing sugar - 1 cup 
Splash of milk (approx. 1/8 cup) to bind

To assemble:
A jam of your preferred flavor 

Method: 
- To start, make the marzipan. Sift into a big bowl, the almond flour and icing sugar, to get rid of lumps. 
- Add the granulated sugar and mix well 
- Add the milk and knead till the dough comes together
(The marzipan may be quite sticky - if so, add a little more almond flour as you knead) 
- Store in an airtight container in the fridge until you are ready to use

Making the cakes: 
- Preheat the oven to 350F and grease an 8in square tin. Fold a long piece of parchment paper in half along its width, and form a pleat the same height as your tin, to partition your square tin into two equal rectangles. You will be able to bake both cakes side by side.
- In a big mixing bowl, beat together the condensed milk and the butter. 
- Add the almond extract 
- Sift together the flour, baking powder and the baking soda 
- Add the flour mixture and soda alternatively to the beaten butter and condensed milk, beating well after each addition 
- Separate the mixture into two equal parts - use a weighing scale to do this accurately, so that your cakes are even when baked 
- Fill one half of your prepared tin with the white cake mix 
- To the remaining half, fold in the cocoa powder. If your mixture feels a bit stiff, add a little splash of the remaining soda to slacken (you could also add a tbsp. or two of espresso instead, if you'd like - dissolve instant coffee in hot water and add it once it is cool)
- Fill the second half of your tin with the chocolate mixture 
- Bake the cakes for 45-50 minutes, until a skewer comes out clean 
- Cool the cake slightly in the tin, and transfer on to a wire rack to cool completely 

To assemble the Battenberg:

- Trim the cakes, and stack them one on top of the other. 
- Using a serrated knife, slice the cakes along their lengths into batons. Depending on the size of your tin, each cake can be sliced into 2 or 3 pieces 
- Line up the batons, alternating the colors to form a checkerboard, and stick them together with a slathering of the jam 
- To roll out the marzipan, sprinkle your work surface generously with icing sugar, and roll into an approximate rectangle. It needs to be wide enough to cover the length of the cake, and long enough to wrap completely around. 
- To ensure the outside of the marzipan is clean and free of icing sugar, once rolled, I flipped it over so the sugar dusted side is on the inside of the cake 
- Place the cake in the center, and slather on more jam, to help the marzipan to stick 
- Bring the marzipan up from both ends, to meet at the top of the cake, and join the ends. 
- Trim off any overhangs, and flip the cake so that the seam is at the bottom. 
- And you have a beautiful checkered cake with a mildly sweet marzipan icing.
- The cake is best stored in the fridge, and will keep well for about a week in an airtight container.

Enjoy the cake with your favourite cup of tea.


Wednesday, August 16, 2017

Ready To Make - Moar Kuzhambu - Powdered Mix

Sometimes when I travel and my husband has to manage his meals, I try to make it easier for him to fix something, lest he skips his meal. I had tried part cooking and freezing foods which seemed quite handy. Then he found that if I post instructions, that might help him cook a few dishes. Thus, my counter top and refrigerator door would be filled with notes. He had managed very well that he would even grind his batter, make dhal and sambhar.
While I wrote some recipes for my daughter, she still had to juggle time with the demanding coursework and assignments; it was getting harder to cook something elaborate. Soon both of my nephews were also going away from home and were left to manage cooking for themselves.
It was then, my mother tried to coax us to make some ready to cook meals ideas. We had found that making the packaged dosa, upma mixes were easy to make at home. It took us some trials and misses to make them have longer shelf life. Thus, our puliogere ready mix and adai mix took shape. Little more experimenting lead to moar kuzhambu mix and  an 'all - in - one - sambhar mix'. This moar kuzhambu mix is a very quick dish that you cook the vegetable and mix this powder to the whisked curd. Give it a boil and add some tempering. So easy!

Update: (Updated on 7th May 2018)
This powder stays fresh over a year even at room temperature. We had made this batch last year in May and I had carried with me a portion. i just finished my last tablespoon full ready mix powder today.

Ready To Make - Moar Kuzhambu - Powdered Mix

Ingredients:
Makes 5 standard cups of powder
200 ml / heaped 3/4 cup+1 tablespoon fresh grated coconut
125 ml / heaped 1/2 cup raw rice
250 ml / heaped 1 cup / 250grams pack channa dhal / Bengal gram / split chickpeas
250 ml / heaped 1 cup / 250 grams pack thuvar dhal / split pigeon peas
70 ml / heaped 1/4 cup cumin seeds
30 ml/ 2 tablespoons coriander seeds
16 -20 dried green chillis* (1&1/2 inches long and slightly high on heat)
60 ml / level measured 1/4 cup salt
5 ml / 1 teaspoon asafoetida
About 1/3 cup dried curry leaves**

Method:
*To get dry green chillis, wash them, remove the stem and pat them dry. Spread them on a very flat dish / paper / cloth and leave them to dry for a few days. Once they are dry, they become brittle, but the green colour is just about faded. They stay well for over a month and will retain the spice level.

** The curry leaves can be dried after separating them, washed and spread between layers of cloth in the sun. Or you may choose to oven roast dry leaves until they are brittle.

To make the powder, dry roast over a low the coconut until the moisture is gone and the coconut is dry. Do not roast it to turn shade over the white. transfer to a dish and allow to cool.
Then dry roast separately over low - medium heat  the dhals, rice, coriander seeds and cumin seeds until they are just about hot. Take care that they do not over roast. (When grinding for moar kuzhambu normally the ingredients are soaked and ground raw, so we do not over do the roasting here).
Transfer them to another dish.
Finally roast the sea salt until it turns pink and transfer to this dish.
Allow them all to cool.
Pulse all the said ingredients leaving out the coconut until they are a coarse powder, add the coconut and grind further to a powder that is not very fine.


Cool this and store in airtight containers. You may refrigerate this powder if the quantity is more. Usually, the mix stays well for two moths outside of refrigeration.

To make Moar Kuzhambu:
2 tablespoons of above powder
3 - 4 tablespoons thick, slightly sour curd
Vegetable of choice
2 teaspoons ghee /coconut oil for tempering
1/2 teaspoon mustard seeds
Few fresh curry leaves and fresh coriander leaves

Cook the vegetable and keep ready.
Mix the powder to the curd and whisk to blend them. Add another 1/3 cup of water.
Add the cooked vegetable and bring the moar kuzhambu to a boil.
Remove from the stove.

Heat the ghee / coconut oil in a small pan and add the mustard seeds. Allow them to crackle and add the tempering to the moar kuzhambu.

Let the kuzhambu cool down a bit before adding the curry leaves and the coriander leaves.
Enjoy the kuzhambu with steamed white rice or as a side dish for ven pongal.


Monday, July 24, 2017

Pachchai Milagai Elumichchai Chutney

When we intended to have a garden in our home in Coimbatore, we arranged with a landscape outfit to help us. Once we had put some plants and a small vegetable patch, we were enjoying some home grown beans, greens and few other vegetables. Soon we moved to a project in Qatar and hence hired a gardener to take care of the garden. Just before leaving home, while emptying stuff I dropped some chilli seeds from the pack of dry red chillis I had, in a small patch. Those have grown and were yielding when I visited last month. I plucked out about half of a kilo of green chillis.


After sharing some, I wanted to bring them and use here.
I shared some pictures on Instagram and took suggestions from friends on many ways to use them. Pickles seem to be a favourite. I made the milagai gojju and some pachchai milagai chutney.
While I spoke to my mother, she gave me this simple recipe for a chutney that did not need a curing period more than a couple of days. She suggested that if I had some limes in brine, they can be used for immediate use. Otherwise, it takes about three days when the lime pieces absorb the flavours and the chutney can be used.
This is a very simple recipe that can be combined in few minutes.

Pachchai Milagai Elumichchai Chutney
Makes about 150 ml


Ingredients:
30-35 fresh green chillis
6 small size limes
1/3 tablespoon salt (to be adjusted according to heat of the chillis)
1 teaspoon sugar

Method:
Wash the chillis and dry them on a towel. Remove their stalks.
Cut the limes and partly squeeze their juice into a bowl. Add the sugar and keep aside.
Cut the limes in small bits and mix the salt.
Blend the chillis in a blender to a smooth paste using the lime juice.
Transfer to the bowl and add the lime pieces to this.
Mix well and store in a clean glass or ceramic jar.
Keep the chutney at room temperature for a few days, giving it a stir twice or thrice a day.
In a couple of days, the lime bits will soften and lose any bitter taste.
The chutney is ready to serve.


This stays well at room temperature for about a week, in refrigeration for a month.
This can be served as pickle with rice or as chutneys with idli, dosai and such.

Notes:
If you have available some lime/lemon that has been cured in salt, you may substitute them for the lime bits. Thus, the chutney can be enjoyed immediately.
The heat and humidity in my country is high this summer that the chutney was fermenting by the fourth day even as the limes were still crunchy. I had to refrigerate the chutney then.


Tuesday, July 18, 2017

Besan Laddoo

The first time I had tasted besan laddoo was when, for my daughter's school International Fest, we had to represent India by displaying our culture, history and food. We prepared a few dishes that other parents, teachers and the students can sample. One of our friends had then made besan laddoo.
At home, we only made the boondhi laddoo which also has the same ingredients but prepared differently in an elaborate process. That has to be another post in future.
The other day, my friend mentioned that she made besan laddoo as her daughter wanted to learn to make it. Then I requested that she makes for me and I shall put a post on the dish.
July, in my home, is a month dotted with frequent occasions to celebrate, through the month. It happened to be my daughter's birthday on the weekend and my friend suggested that we can celebrate with the sweet. We drove down to their home and after a leisurely meal, she set out to prepare them while I only watched. It seemed easy enough to prepare, the hardest part being roasting the chickpea flour/ besan in ghee until it is aromatic and shining without allowing it to burn. That takes quite a while and after that it the mix has to cool sufficiently in order that the sugar will not melt while added to it. She made it seem easy as she rolled out about 25 laddoos in minutes.They are mildly sweet and fragrant from the ghee and the roasted flour, a good sweet dish to prepare anytime.

Besan Laddoo
Recipe: Lalitha Burde


Ingredients:
Makes 25 ping-pong ball sized laddoos.


4 cups besan/ gram flour / chick peas flour
2 cups sugar (we have used very fine granulated sugar as is. You may powder the sugar, if desired)
                     ( Usually Boora sugar /Tagar is favourable)
1 cup melted ghee
2 - 3 tablespoons mixed, slivered nuts ( We used almonds and pistachios)
2 teaspoons cardamom powder
Few strands of saffron, slightly roasted and crushed

Method:
Sift the flour and removes the grainy lumps.
Reserve a little amount of ghee and heat the rest in a heavy bottom wide pan.
Add the sifted flour and on low heat roast it in the ghee. Initially the flour mix may seem to be dry.
Keep roasting the flour and carefully break any lump that forms. The flour has to lose the raw taste and get very aromatic.
Halfway through the roasting add mixed nuts, cardamom and the saffron. Mix well and continue to cook. If you find the mix dry, add the reserved ghee.
As it cooks, the flour will blend with the ghee and become a mass that will have a shiny coat of ghee.
Remove from the heat and allow the flour mix to cool down.It has to be warm to touch but not hot that you cannot hold.
Add the sugar or powdered sugar and mix thoroughly.
Pinch out small portions of the dough like mix and roll them in a smooth ball.
Arrange the rolled out laddoos on a dish slightly apart from each other.


Cool and store them.
The laddoo may feel sticky on the day of preparation and be very soft. The ghee gets absorbed and the laddoos also firm up by the next day.
They taste good whether served warm or stored.


Sunday, July 9, 2017

Sundaikkai Gothsu - Turkey Berries and Onions Stew

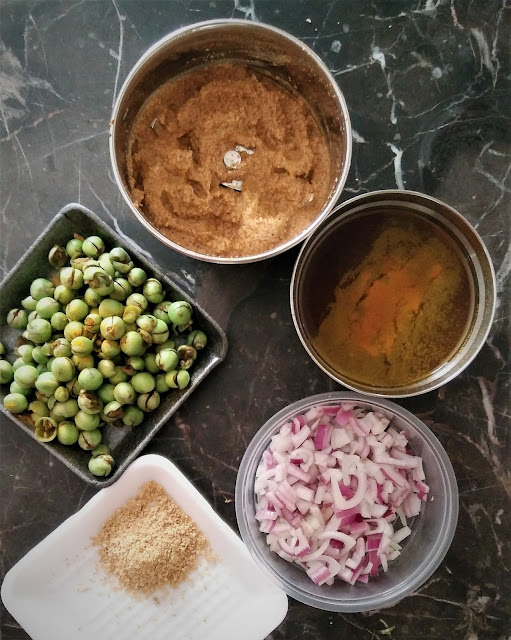
It had been many years ago that I may have last tasted some of the vegetables that we had often been given in our childhood and until little older too. Most times greens, spinach and few other vegetables were grown in the home garden. Some yielded abundantly and my grandmother would share with the neighbours. They encouraged us to help around; we have helped making trellis for the beans and spinach, water the plants and such.The home patch yielded few varieties of vegetables that were locally easy to grow and many flowers. It now seems like ages ago and I had lost touch with such pleasures. Once we had a huge turkey berry plant and I remember that my mother cooked the berries in a stir fry kind of dish with lot of coconut and condiments.
When we set our house in Coimbatore, we laboured a bit and have a garden to show. The area has fertile soil and hence the garden thrives. few of the neighbours have fruit trees and flowering plants all in their glory. One of them has the turkey berry planted nearer to their front wall and thus as we pass by we get to see bunches of them in the plant. They have generously shared those with any of us who would cook them.
During the few months, I slowly settled in, the neighbours have pampered me to the point of being spoilt. Sometimes, most unexpectedly, someone would send me piping hot food just so I can cook only rice and such. That was when one of them sent me this tangy and spicy stew. It was lip smacking, finger licking delicious.
You might well imagine my delight when the other evening I spotted in the shop assistant's trolley these small packs of these berries labelled green eggplant. I read up later that these are the same family.


I picked up one pack and soon as I reached home, I shot a message to the lady to share her recipe. She promptly messaged the next morning and I waited for today to cook them.
I was chatting with my mother and gave her the small details in the recipe. she then informed me that her grandmother would cook the berries in similar dish adding her touch. That has to be another day and post to share that.

Sunadaikkai Gothsu
Recipe: Mrs. Padma Balu, my neighbour 


Ingredients:
Serves 4

1 cup / 250 ml Turkey berries/ Sundaikkai
1 cup finely chopped onions
6 tablespoons thick tamarind extract
Salt to taste
1/2 teaspoon turmeric powder
2 tablespoons coriander seeds
1 teaspoon cumin seeds
6-8 dry red chillis
4 tablespoons fresh coconut scrapes
1&1/2 teaspoon powdered jaggery
1&1/2 teaspoon white sesame seeds
3 tablespoons gingelley oil or any cooking oil (divided)
2 teaspoons mustard seeds
Few fresh curry leaves
Coriander leaves ( I did not have any, so had not added)

Method:
Wash the turkey berries, place them in a plastic bag and give a few vigorous taps with a rolling pin. Alternately, place them in a stone mortar and crush the berries. they will break open and few seeds will be strewn. transfer the berries to a colander and clean wash the seeds away under running water.
In a heavy pan, dry roast the sesame seeds until golden brown and they start to pop. Cool and make a fine powder. Keep aside.
In the same pan dry roast the red chillis, cumin and coriander seeds until well roasted.
Add this to the coconut and grind to a slightly coarse paste. Keep aside.


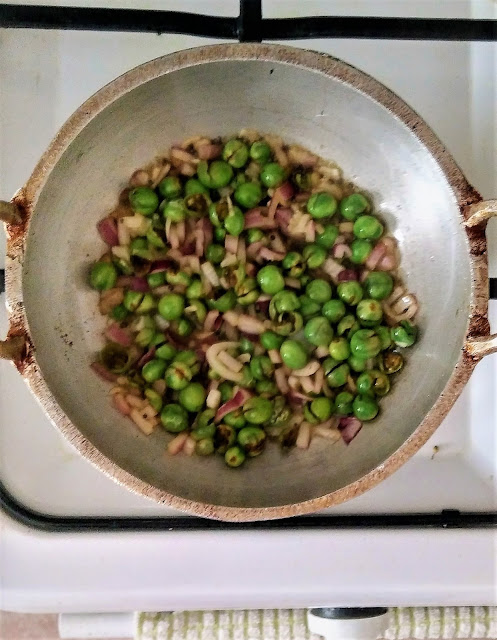
Keep reserve about 2 teaspoons of the oil for the tempering. Add the rest of the oil to the cooking pan and heat. When the oil is hot, add the sliced onions and the berries. Cook them until the onions are transparent and the berries change to a pale green colour. Add the salt and turmeric powder and cook a bit longer.

Add the tamarind extract and cook on low flame until the raw taste of the tamarind subsides.
Add the jaggery and let it cook fora further 3 minutes.
Dilute the ground paste with some water and add to the stew.
Mix well, adjust the water and cook until a thick gravy is obtained.
Transfer to a serving dish.
To temper heat the reserved 2 teaspoons oil, add the mustard seeds and allow them to crackle. Toss the curry leaves and add the tempering to the gothsu.

 
Sprinkle the roasted sesame powder on top. This enhances the flavour.
Garnish with curry leaves and coriander leaves if you have  them.
serve the hot gothsu with steamed rice. It makes a good side for adai and venpongal also.


Tuesday, June 27, 2017

Red Currant Thokku

There is so much joy to see your garden bloom and yield. During my recent visit to my home in Coimbatore there was a large bunch of bananas which my gardener said would ripen during the month. Few days later, I was already back in Doha while he informed me that he had removed the bunch and distributed the fruits to my neighbours in the community. There were also green chillis that  I have plucked and shared with my mother and my sister.
My daughter also has a good area of patch in here home and grows a variety of flowering plants and seasonal vegetables and fruits. She grows herbs, beans, peas, beets and more some of which are feast for the squirrels that lodge in their fence. She had to recently, remove a small branch from her red currant plant which was bowing down owing to the weight of its produce. These were unripe and green. Usually she gives away the ripened fruits not being aware of how to use them. These, she wondered were not going to fetch the same appreciation.


She shared photos with me and while chatting we wondered if they are good for pickling. When my mother saw her pictures, she said they can be substituted for lime in lemon rice, the squeezed juice can be substituted for tamarind extract and some more ideas. We tried few of such and gauged the tartness of the unripe fruits. Then finally, the idea of making a thokku came in.
I detailed her how we go about the gooseberry thokku and she went by her instinct for measurements. I woke up to her pictures and mail this morning and thus this post.

Red Currant Thokku
Following measures make about 150 milil litres Thokku


Ingredients:
Unrepentant red currants 3 US standard cups
Gingelley oil 1/4 cup
Salt 1 tablespoon
Turmeric powder 1/4 teaspoon
Red chilli powder 1 tablespoon
Mustard seeds 1 tablespoon
Asafoetida powder a generous 2 pinches - about 1/8 teaspoon

Method:
Rinse the berries, and drop them in a pan of hot water for a few minutes.
Drain and spread them on a dry cloth to dry.
Heat oil in a heavy pan and add the mustard seeds. Allow them to crackle and add the turmeric powder, asafoetida powder and the red currants. Cook the red currants until soft and mushy. You may press them down to mash.
Add the salt and red chilli powder.
Cook the pickle on medium heat until it reduces to a thick pulp and most moisture has been evaporated. The oil will separate and the pickle would leave the sides off the pan.
Remove from the heat and allow the pickle to cool before storing.
This thokku can stay good for a few weeks only.
This tastes good with the sour, salt and heat blended well with the oil and makes a great side dish for curd rice.


Monday, May 1, 2017

Maa Inji Oorugai - Pickled Mango Ginger

One can put it very generally that Indians love pickles, no matter which part of India one is from and this may be true also. With seasonal produces and a combination of spice blends pickles seem to form an essential part of a meal. They can be had with any dish if one chooses so.While I do not recall my mother going on a pickle curing ritual, I know my aunt does, each year after one. As I type this, I am wondering if she has already done with her vadu mangai, avakkai oorugai for this summer. If mangoes are for summer winter brings a whole variety of other produce. Though nowadays pickles can be picked up from any store, home made pickles have their charm.
I have a vague memory of walking down the streets in the evening with my uncle in Trichy to pick up tender Makali Kizhangu, which it is famous for. There would be vendors who spread their ware over neatly placed gunny bags in mounds. the light from a petromax lamp will light these mounds in a warm glow. In the later years while the scene has only slightly changed, I have been enchanted with the trade in Mylapore market in Chennai.
My mother always made the elumichchangai oorugai, Indian lime pickle at home. When on rare occasions we did get good quality gooseberries they were also done. Otherwise we had those 'ready to use immediately' manga oorugai mostly. Very rarely did we get the manga inji in our town and whenever we did, my mother treated it as a rare find. She would scrape the peel with the blunt edge of a small plate so carefully that the fleshy immediate part will not be wasted. She was disappointed once when I used a peeler and shaved off a bit of the ginger along with the peel.
Between my husband and myself, we are not keen on pickle. If we can put it on a scale I would fare under 4 and his would go in the negative. I keep stock of one tiny bottle purely not to disappoint someone who would like to have with their meal. However, I may have been dreaming pickle when I spotted fresh manga inji in the store the other day. I picked up some and the fresh peppercorns. Now they have been pickled, though in quantity they will last a week. Thus, they are not made with utmost care to last over many days. This is almost for instant use.
Mango ginger, is a part of the ginger family and related to turmeric.The rhizomes are similar to ginger and these have a milder mango like taste. they have some medicinal properties as is common with herbs. These can be made in a variety of pickles. The pickle i have put here today can stay good for a week at its maximum and needs refrigeration.

Maa Inji Oorugai - Pickled Mango Ginger


Ingredients:
Makes 2 cups

A dozen mango ginger rhizomes of 2" length each
1 &1/2 teaspoon crystal sea salt
1/4 teaspoon turmeric powder
1 tablespoon lime juice/ juice from one large lime
1/2 teaspoon asafoetida
1 &1/2 tablespoons gingelly oil
1 teaspoon mustard seeds

Method:
Wash the mango ginger clean. Remove the peel. If the ginger is tender, I have been able to just slide my hand over giving some pressure and it peels off.
Cut thin slices and place them in a glass or ceramic bowl.
Add the turmeric powder and salt.
Squeeze the juice out of the lime and add to the bowl.
Heat the gingelly oil in a pan, add the mustard and allow them to crackle. Switch off the heat and mix the asafoetida.
Transfer this tempering to the pickle.

With the tender ginger the pickle is ready to consume immediately.
Allow a few minutes for the flavours to blend and serve.
Refrigerate after use.
Stays well for a week.
I add it to my salads and thus it gets consumed quickly.


Wednesday, April 19, 2017

Pudina podi

My parents and grandparents were not in the habit of having breakfast in the true sense. A second dose of filter coffee around 8 A.M. would help them go until their 10 o'clock lunch time. It was not a practice to make breakfast, lunch and dinner everyday. This was a practice for adults and the children were fed rice before school, pack a tiffin box with rice for the noon and ate rice in the night too.
Mostly all the cooking was done in the morning in quantities to suffice for the dinner too, but rice. Rice would be cooked just before dinner for the night, but the sambhar, rasam and other accompaniments would have to make do. Most times there is a shortfall of these and the stock of various podis come handy. It is very likely that there will be a good sized jar with paruppu podi is available in the pantry. Thengai podi does not store for long so it shall be consumed quickly. When in season, mint and coriander are available in abundance, we make thokku, thogaiyal and podis.


Mint is one of those herbs that has high antioxidant properties and has health benefits ranging from oral health, skin care, digestion to prevention of cancer. It is widely used in many cuisines. Mint is used in ice creams, chocolates and in beverages. It is common to find chutney with pudina in many households in India. Typically, we make thogaiyal, chutney and pudina podi with lentils in my home.
This podi stays fresh and flavourful for weeks together at room temperature and since it is dry does not require refrigeration. Give it a try with hot steamed rice and a generous spoon of gingelly oil or ghee.

Pudina Podi
Makes 200 ml in volume


Ingredients:
3 cups packed mint leaves (stalks removed)
1/4 cup urad dhal
1 tablespoon channa dhal
8-10 dry red chillis (adjusted according to heat an d taste)
1/4 teaspoon asafoetida (optional)
2 teaspoons oil to roast the ingredients
Salt as required (I use crystal sea salt and measured 1 &1/4 tablespoons)

Method:
Wash the mint well and pat them dry before separating the leaves from the stalks.
Dry the leaves between two layers of cloth until moisture has dried. Measure the leaves. From a very large bunch of mint, I got 3 cups of leaves.
Heat the oil in a heavy and large pan.
Add the chillis and roast for a couple of minutes.
Add to this the channa dhal and continue to roast.
When the chillis are slightly brittle, add the urad dhal, salt and asafoetida. Roast until both the dhals are golden brown and crunchy.
Put the mint leaves in and keep tossing them around until the leaves are wilted with the heat and turning just about dry.
Cool the mix. transfer to the jar of a dry grinder and grind to a coarse powder.


Transfer the podi to a dish and allow to cool.
Store in clean, tight lid jars to use when required.
Serve with hot rice and oil to mix.
The same can be ground with enough water and be made as thogaiyal.


Wednesday, April 12, 2017

Thai Roasted Butternut Squash Soup

Soup is my go to dinner option on days I feel lazy to even consider other options. But my husband's choice of vegetables are limited and thus restrictive to try more adventurous versions. Sqaush and melons are not  his favourite choices. On the other hand my daughter and son-in-law are very exploring in terms of other cuisines. They often pick up fresh vegetables whenever they have the farmers market in their town and cook dishes looking up cookbooks or the internet.
Few days ago she had bought these young tender butternut squash from the market and had shared the picture on her instagram account. 
 
 
Later while chatting she mentioned that she had the idea of making a soup with Thai flavours using those. On a follow up she suggested that it was a great tasting soup and asked if I wanted to share the recipe. She sent me the following recipe and the pictures too so I can post it here.
The sweet nutty taste of the squash blended well with the flavours of the Thai ingredients and the lemongrass. Roasting being one of the most common cooking methods to use this vegetable, this soup also calls for roasting the vegetable.
This squash has a good amount of fibre and other nutritional value. So the soup makes for a sumptuous wholesome meal by itself of as a starter course for an elaborate meal.

Thai roasted butternut squash soup 

 
Ingredients:
Serves 2 people 
Recipe as shared by my daughter
Butternut squash - 2 small young ones (or 1 large mature one)
Thai red curry paste - 2 to 3 tbsp. divided (Look out for the ones which are vegetarian friendly)
Onion - 1, chopped finely (optional - I didn't put it in today)
Ginger - to taste, grated
Garlic - 3 cloves, chopped finely
Cumin seeds1 teaspoon
Coriander seeds1 teaspoon
Chili flakes - to taste
Lemongrass - 3 sticks, about 5in long (This one can be decreased to taste)
The juice of 1 small lime (again, to taste - as my lemongrass had good strong flavor, I didn't put this in today)
Coconut milk - to drizzle on top of the soup, in the bowl
Cilantro - a good couple of sprigs, for garnish

Method:
Prep the butternut squash - peel, deseed and slice them into cubes.
In a big mixing bowl, mix the squash with a couple of teaspoons of oil, some salt and a tablespoon of the red curry paste
While this mixture sits, line a baking tray with aluminum foil and preheat the oven to 400F/200C
Tip the squash into the prepared tin, and roast for about 40 minutes, till soft
Once cooled slightly, blend to a puree with a little water in a blender
In a dutch oven or any heavy pan, heat a little oil
Sauté the onion, garlic and ginger with the cumin and coriander seeds, till the onion is translucent
Add a tablespoon of the red curry paste and cook for a minute or two, till everything is coated.
Tip in the pureed squash, and top up with water to thin it. Add enough to bring it to a consistency you like.
Using the back of a knife blade, bash the lemongrass sticks to bring out the aroma. 
Add this to the soup with the chili flakes. 
 
 
Check the seasoning - you may only need the last tablespoon of red curry paste, if the flavour isn't strong enough for your tastes.
Heat the soup through
To serve, top the soup with some chopped cilantro, a squeeze of lime, and a drizzle of coconut milk

It seems like a lengthy procedure, but it was a simple enough soup to make, and was really worth it! 


Tuesday, April 4, 2017

Kaima Rotti - Bread Upma dressed up

About three decades ago, when my hometown was only part of the larger Salem district, my father would travel often to Salem to appear for his clients in the higher courts. There used to be a particular favourite shop from where he could purchase for us candies and dry fruits. Those days we were very fond of the coin size coconut candy wrapped in a transparent paper with Parrys written in white on it. Those and dried apricots were mostly in stock at home.
He would also visit the famous bakery there and bring large loaves of soft white bread.
Bread was not part of regular meals in a family that ate rice for every meal. We, him, three of us, his daughters and my grandmother  were all fond of bread that two large loaves can be finished quickly.  On some rare occasion all the bread is not consumed by the 'sell by' date and we have a day or two old bread threatening to go stale. My mother would quickly get into action giving it a makeover with the bread upma and save it.
Sometime ago I had purchased a good 9"X5" loaf tin and my daughter gifted me a bread baking book at the same time. I had wanted to put both to use and baked a regular white bread with a recipe in the book. It turned out well with just an ugly gash like cut in the crust. I wondered what could have gone wrong when I followed the recipe fully and even liked that I kneaded it well. I put out a query in the We Knead To Bake Group and friends had suggested possibilities. So, I baked yet another of the same with these tips, thus having on hand two loaves, which possibly between the two of us, would last longer than I might relish. My one option was to follow my mother and get the upma done.
Bread upma being somewhat staple in my home, I needed to make it more interesting. I had a good stock of my thakkali vengayam chutney in my refrigerator; that gave me the idea to make the Kaima rotti. With few ingredients and leftovers that need attention, this is a good recipe to go for it.

Kaima Rotti


Ingredients:
Serves 4
12 slices of a day or two old bread
2 tablespoons butter to pan toast the bread
2 medium red onions sliced finely
4-5 green chillis cut finely
1/2" ginger chopped
1/2 cup thakkali vengayam chutney or anything that may add flavour to the bread
1/4 teaspoon salt
1/4 teaspoon turmeric powder
2 tablespoons cooking oil
2 teaspoons mustard seeds
1 teaspoon channa dhal/ Bengal gram
Few curry leaves
A little amount of water for sprinkling as required
2 tablespoons fresh coriander leaves for garnish

Method:
Apply butter on both sides of the bread slices. Toast them slightly until just about crisp in a pan.
Generously spread the thakkali vengayam chutney on the slices.
Cut about an inch square cubes of the bread.
Heat 2 teaspoons of oil in a large, heavy pan. When heated add the tempering ingredients - mustard seeds, channa dhal, ginger and green chillis. Add the salt, some more of the oil and the sliced onion. Cook until the onion is transparent.
Toss them well and then add the rest of the oil.
Reduce the heat to medium and drop the cubed bread pieces.
Cook them together tossing them well until the breads absorb the flavours. Sprinkle a teaspoon or two of water at intervals to make it moist.
Turn and toss gently so as to not break the bread or cook it to a mash.
The bread will just about get moist and combine well.

Take it off the heat and transfer to a serving dish.
Garnish with fresh chopped coriander leaves.
Serve warm with hot coffee.


Wednesday, March 22, 2017

Beetroot Chappathi

A throwback from the past, on beetroots, is having a glass of beet juice. I used to live with my uncle and aunt for a few years. Every time that she cooked beetroot, she would reserve the cooking liquid and have me drink it. I am sure I drank it without much ado though I am not able to recall that I relished it then. However, beetroot has otherwise been among other favourite vegetables that I choose to cook it often.
 At home we cook it dry in poriyal, in the form of kootu with some legumes, pacchidi and even beetroot rice. I had on a whim tried adding left over beetroot kari to the grinding batter and have made beetroot pesarattu also. The beetroot with tomato soup is another dish we relished much.
Given that these are such versatile vegetables, it was not surprising when my daughter sent me photographs of beetroot chappathis she made one night for dinner. She has been urging me since to post it here. I was sifting through the pictures folders and her colourful pictures just popped on the screen and here I am hoping to do justice  by posting.
You do not have to meticulously measure out ingredients and for most of us who make chappathis regularly it is all eye ball measures. Still I think that it is good to be a bit precise and am putting down a list of ingredients and a preparation.
Beetroot Chappathi


Makes 8 chappathis
Ingredients:
250 ml/ 1cup whole wheat flour
1/3teaspoon salt
2 teaspoons ghee/ sesame oil
1 slightly large beetroot to make 1/3 cup of puree
1 &1/2 teaspoon red chilli powder
Water as required to mix the dough
More flour for dusting
Ghee/ Oil to cook

Method:
Wash the beetroot and peel. Boil it in water until soft enough and puree adding the chilli powder and salt to a smooth texture. Add just small quantities of water to grind lest it is too runny.
Take the flour in a large bowl and mix the 2 teaspoons of ghee or oil.
Add the puree to the flour mixing it  to a dough which is pliable and smooth. If required add flour or some water to achieve this.
Make a ball of the dough, apply a little oil so as to not let it dry on the surface.  Place the dough in a bowl and rest it for about 30 minutes.
Take out the dough and divide in 8 equal parts. Roll each in a ball.


Have some flour in a flat plate to use for dusting while rolling out the chappathis.
Work on one portion at a time while keeping the rest of the portions covered.
Flatten and roll the ball out in  chappathis that are neither too thin not thick.


If you work quickly, you might roll all of the  dough and then cook the chappathis on a griddle.
If you are making more numbers, it will be good to pause the rolling to cook the ones that are ready. Leaving the dough to dry may not result in soft chappathis.
Heat a heavy griddle and place one chappathi on it. Cook on one side until small spots appear. Flip it over and the steam within will puff the chappathi.
Cook until both sides are done well.
Remove and transfer to a serving dish.
Brush some ghee on the surface.
Work with the rest of them similarly and stack up in the serving dish.
Serve warm with any gravy of your choice.


Tuesday, February 28, 2017

Macarons

It has been over a year that I posted last. The year 2016 was a busy year with moving from Lome to  home and again back to Qatar. The whole year went past in a buzz around my head. I began to relax so much that it became habit.
My daughter kept pushing me to keep this space active so much so that she even sent pictures of what she had cooked and further on recipes. she would write it up and tell me all it takes to copy from mail and hit the publish button. I just did not.
She is now visiting us in Doha and has finally succeeded in her mission to get me started back.
From my earlier posts readers may have understood that I do not use eggs in my cooking. I have relished cakes and such, only I am not happy to try handling eggs. I am certain to be a failure with baking with eggs.
This post is my daughter's success in baking macarons, pictures and the recipe below are hers.
She had tried the recipe from the link given here, stopping short at not making sandwich macarons.

Macarons:

Yields: approx. 35 shells (slightly bigger than the original resipe) or about 17 sandwiches


Ingredients:
  • Icing sugar - 150g (5½oz)
  • Ground almonds - 75g (2¾oz)
  • Egg whites - 2 large
  • pinch of salt
  • Caster sugar - 35g (1¼oz)
  • Cardamom powder - a hefty pinch
  • pink, green, yellow or lilac food colouring paste (optional)
Method:
  •  Preheat the oven to 170°C/325°F and line two solid baking-sheets with non-stick baking-parchment.
  • Sift together the almond powder, cardamom powder and icing sugar into a bowl.
  • Place the egg whites in the metal bowl of a stand mixer (or a large metal mixing bowl, if using a hand mixer) and whisk on high speed till soft peaks are formed.
  • Add the caster sugar, a teaspoon at a time, whisking well after each addition. Continue whisking until the mixture is stiff and glossy.
  • Fold in the sifted dry ingredients, using a large metal spoon, taking care to not deflate the meringue. Fold till everything is just combined - do not overmix.
  • Fit a piping bag with a 1cm (½in) plain nozzle. Stick the parchment down on the corners using a little bit of the meringue to prevent it from rolling up or flapping around. Pipe 5cm (2in) discs on to the baking-parchment.
  • Dampen the tip of your finger and gently flatten the top of any macarons that are peaky, then give the tray a sharp tap on the work surface to knock out air bubbles. 
  • Allow the meringues to rest for about half an hour, then bake in the preheated oven for about 9 to 10 minutes.  
  • Cool the macarons on a wire rack. Once completely cool, these can be filled with buttercream, ganache or jam, and sandwiched.
Some notes that she shared with me on her mail:

Make sure, when separating the eggs, to not get any of the yolk in with the whites, as the fat messes up the meringue pretty badly. With the egg whites, I beat them with my hand mixer itself.. make sure to use a steel bowl, not a plastic one - plastic tends to have a film that inhibits the development of the meringue. The same with the folding in process... use a metal spoon, and fold gently, so as to not break up the air we built into the egg whites.
Before the addition of sugar, the egg whites are whipped to soft peak stage. It is a bit hard to tell, because the peaks are tiny. But, when the egg whites begin to look like a fluffy floating cloud, start adding the sugar.. and when it is finally done, you should be able to pick up a big dollop on the metal spoon, flip it upside down and not have it fall back down into the bowl. At this stage, you can fold in the sifted almond powder and icing sugar.. definitely sift this mixture, my icing sugar had little limps in it and the sifting really helped to make the mix less grainy.