Thursday, June 30, 2011

Microwave Potato Cups


This is one quick and easy microwave recipe that I tried when we had few friends for lunch.
These and some nachos with a perfect dip were relished as starters.
Lavanya is hosting this month's Microwave Easy Cooking Event with party starters.
This will be my entry to the event.

Ingredients:
10 medium potatoes
2 carrots grated
1/4 cup frozen green peas
Salt to taste
2 teaspoons Garam masala powder
1 teaspoon chaat masala powder
1 block cream cheese (I used puck brand white cheese)
1 teaspoon oil

For marinating the potatoes:
2" ginger
2 green chillis
4 tablespoons lemon juice
salt to taste


Method:
Place the grated carrots and the frozen green peas in a microwave proof bowl.
Cover and cook on 100% power for 3 minutes. Allow a standing time of 1 minute.
Add the salt and garam masala powder.
Heat the oil in a microwave bowl for 1 minute on 100% power.
Add the carrot and peas and cook on 60% powder for 2 minutes. Remove and keep aside.
Use firm and fairly large potatoes.
Wash potatoes and cut in two halves.
You may peel them before or like I did, peel after cooking them.
Using a sharp knife, scoop a good portion of the potatoes out from the centre, making a deep dent to resemble cups.
Take 1 cup of water in a microwave proof bowl. Place the potato cups in the water.
Place the bowl in the microwave, without any lid. Cook on 100% power for 4 minutes.
Remove from microwave and drain the water. The potatoes may feel very slightly tender.
Return them to the same bowl and cook on 60% power with the lid on for a further 3 minutes.
Now it will be easy to remove the peel.
Grind the ginger and green chillis adding the lemon juice to a paste. Mix the salt.
Apply it over the cooked potatoes and on the inside too.
Place these cups in a flat dish and refrigerate for about 30 minutes.
When you intend to serve, tale them out of the fridge, fill the hallows with some cream cheese.
Top with the grated carrot and peas mix. Sprinkle the chaat masala on the top and garnish with fresh coriander leaves.
Serve as starters.

Xacuti with home made vegetarian 'mutton'


The free spirit mates, having tried egg substitutions in baking and bringing you party starter ideas earlier, bring you jaw dropping dishes that are deceptively non-vegetarian in looks and may be as nearly in taste, this month, though most of us would not know, how close!
It was Dhivya's brainwave that we recreate classic non-vegetarian recipes, making them totally vegetarian or better vegan, if possible. Her conditions were that we make them look as close as possibly non vegetarian, but we were not allowed to use store bought mock meats and such stuff.

Few days prior to that, I had watched on Khana Kazana show, Sanjeev Kapoor cooking the famous Xacuti with chicken. That was a 'Goa special' episode and this dish, captured my attention with the long, complex list of spices used. I was curious to try a vegetarian counterpart using all of those spices listed there.

Later few of my friends on Facebook were discussing another Goan dish, where one of them wanted to know if she can make it vegetarian. The reply was, obviously yes! They suggested the vegetables that can be used too. Also there was a cottage cheese option for the dish, which makes the taste closest to chicken dishes.

Now all this got me into working on the Xacuti. There is also a vegetarian mutton kurma listed under Mangalore dishes in the Preett cookbook. The recipe to make a mutton look-alike was given there. Also there was a comment that vegetarians usually take it for a mutton dish. These gave me sufficient pointers to cook my Vegetarian Mutton Xacuti and I am here sharing the recipe.
Do not be discouraged with the long list of ingredients. The final product is way too good to be intimidated.
The Xacuti gravy recipe has been adapted from Sanjeev Kapoor's website. You may find the recipe here, just a click away.
The vegetarian mutton has been adapted from Preett way to cook - 101 recipes from India and elsewhere. That calls for deep frying the pieces which I have opted to shallow fry. Also I have used whole wheat flour while they suggest all purpose flour.
Hence I discuss the recipe in two parts, one making the veg mutton and then the gravy.
Have this with hot steamed rice or opt to have with rotis, it makes a lip smacking side dish!

Preparation time: about 5 hours
Cooking time : about 2 hours

Ingredients:
For the vegetarian mutton:
1/2 cup whole wheat flour
1/2 teaspoon salt
1/2 teaspoon red chilli powder
1/8th teaspoon sodium-bi-carbonate (cooking soda)
1/4 teaspoon olive oil (for vegan version or ghee for vegetarian)
2 teaspoons oil for shallow frying

How to prepare the vegetarian mutton:
Add salt, soda-bi-carb, olive oil, chilli powder to the flour. Knead to a slightly loose and soft dough adding sufficient water. I use vegetable stock to knead the dough. You may also use whey from making paneer if available.
Keep this in a bowl covered with a damp cloth for 4 to 5 hours.
Make cylindrical rolls of the dough and steam them for about 15 minutes.
Remove, allow them to cool and cut in small size cubes.


Heat oil in a pan and shallow fry these cubes until they are golden. Mine appear red from the stock I have used and the chilli powder.
Keep them reserve until the gravy is ready.
This yields roughly 220 grams of the pieces. (I rounded the spices to 250 grams equivalent)

For the gravy:
(the list was for 1 kilogram of mutton. I have reduced to proportion.)
250 grams of vegetarian mutton pieces
1/2" piece ginger
3 cloves of garlic
1 green chilli
1/2 tablespoon lemon juice
2 tablespoons olive oil
2 tablespoons fresh grated coconut
2 green cardamoms
1/2" stick cinnamon
2 cloves
1/4 teaspoon fennel seeds
1 small petal of the star aniseed
2/3 teaspoon cumin seeds
1/4 teaspoon carom seeds
1/4 teaspoon sesame seeds
1 thin blade of mace
1/4 teaspoon cooking poppy seeds
1/8th teaspoon fenugreek seeds
1/8th teaspoon mustard seeds
4 black peppercorns
2 dry red chillis
1/2 teaspoon coriander seeds
1/4 teaspoon turmeric powder
1 medium onion chopped
1 tomato chopped
1/2 tablespoon tamarind pulp
Salt as required

For garnish:
1/2 tablespoon Fresh grated coconut
1 tablespoon chopped coriander leaves

Grind the ginger, garlic and green chilli with the juice of lime to a paste. Apply this to the prepared mutton pieces and refrigerate for about 30 minutes.
Roast the coconut to a nice golden brown and aromatic with 1 teaspoon of the olive oil.
Dry roast all the spices on a low fire. If you are cooking for a bigger quantity, dry roast each of these separately. I had very little and hence chose to do it in the same pan, taking care to drop the heavier ones first and adding gradually the rest.
Cool the spices and grind along with coconut and turmeric powder to a very smooth paste. Wash the jar of the blender and retrieve the adhering paste too.
Heat the oil in a heavy bottom pan. Add the onions and saute' until they are pink.
Add the prepared pieces. Saute' until the oil separates.
Add the ground masala and on a low fire cook this well until any raw taste subsides. You may not have to do this long as you have already roasted the spices.
Sprinkle water to the cooking mass to avoid burning.
Add the tomatoes and cook until they turn to a pulp.
Add the tamarind pulp and sufficient water. Bring to a boil and then allow to simmer for about 10 to 12 minutes until the pieces absorb the flavours.


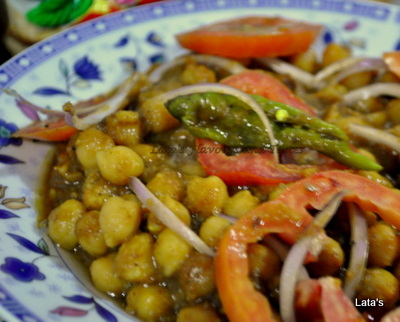
Remove from the heat. Transfer to a serving dish. Garnish with some fresh grated coconut and coriander leaves.


Serve hot with steamed rice. Traditionally, this is served with rice in Goa. However, it does taste good with rotis, naan and phulkas too.
When we discussed this, Deepti googled to find that Xacuti has been derived from Sa-go-thi which is the name for mutton as used by the Marathas. As read on wiki it is known as chacuti in Portuguese too.

I hope you have enjoyed reading this recipe. Now head over to my fellow free spirits' pages to check what they have brought for you. Be warned that you are in for tremendous ideas.

Monday, June 27, 2011

Bombay Jalebi


Whether I shall bake a cake or just have a payasam and a quiet day...was the contemplation I had three days ago. Being my husband's Hindu calendar birthday (the star of his birth - date), I wanted to do something extra. Thus the above contemplation. Then all of a sudden he suggested how would it be to make jalebis! I would do with the GITS ready mix pack, I thought. Then as I was looking up for something else, I came across this recipe in Samaiththu paar book. That tempted me to make it with the ingredients from my pantry, not from a box of ready to make!
I would love to try the jangiri too, but I have to wait to bring a good quality urad dhal from home for that.
Jalebis are different from jangiris in all senses but for the frying and the soaking in sugar syrup.
Traditionally, according to the book and another book, they are done with the aid of the coconut shells to drop the batter in the fat for frying. I had to use the modern aid of a plastic sauce bottle fitted with a nozzle in the lid that came with the Gits pack that I purchased long time ago.
Also, the jangiris are best done soon as you grind the dhal to a batter, while the jalebis are made with a batter fermented overnight in yoghurt.
Now, without further rattling, I shall share the recipe.
I made a dozen jalebis with the recipe I have shared below. In fact, you should get a bit more pieces for this quantity. I was using up more batter for each and hence the numbers were less.


Ingredients:
200ml/3/4 cups (tightly packed and heaped) All purpose flour
350 grams/1&1/2 cup (level) sugar
1 tablespoon raw urad dhal powder (or soak 2 tablespoons urad dhal and grind to a smooth paste)
2 teaspoons rice flour
125ml/ quarter of a cup +1 tablespoon yoghurt (this can be replaced by 4 tablespoons cooking oil)
1 pinch of salt
1 tiny pinch of yellow food colour
Oil/ghee for deep frying
Few strands of saffron
1/2 teaspoon cardamom powder
2 drops of rose essence (optional)

Method:
Mix the salt, food colour, all purpose flour and the yoghurt/oil. Add sufficient water and mix to a medium thick batter. The consistency of dosa batter is optimum.
Close with a lid and leave it overnight.
Next day, prepare the sugar syrup by measuring equal volume of water as the sugar and dissolving the sugar and boiling for about 8 to 10 minutes.
The sugar syrup will be of a very thin string consistency, slightly thicker than that for gulab jamuns.
If held between the forefinger and the thumb, the syrup will feel sticky and if the fingers are pulled apart the thin string will form and break quickly. That is the correct consistency.
Add the essence, saffron and the cardamom powder to the syrup.
Now add the powdered urad dhal (or the paste if you chose to soak and grind) and the rice flour to the batter and mix well.
Fill the plastic sauce bottle with the batter. You may use a thick plastic bag with a small slit in the sharp corner like a cone to press the batter into the fat.
It is best to use a heavy bottomed slightly shallow pan (I use the non stick skillet) to deep fry the jalebis. Deep pans do not work well. The frying jalebis may clog towards the centre in such a pan.
Heat the ghee or oil in the pan. Once it is hot but not smoking, reduce the heat to medium.
Now holding the batter filled press above the oil, gently press the batter out through the nozzle in to the fat. Turn your arms in a circular motion thrice while pressing the batter to form circular shapes. Then run it across over the circles and end it there. Press two or three more as much as the pan will hold.
Allow them to fry for a few minutes, turn them over in the oil to cook on the other side. Remove from the oil with a slotted ladle and gently slide them in the warm syrup.


Allow these to soak in the syrup and absorb the syrup a little bit.
Meanwhile you can proceed with the next batch to be pressed into the oil.
Transfer the jalebis that have been soaking in the syrup to another plate, and leave the fresh batch in the syrup to soak.
As the syrup cools, it might thicken a bit and not soak the jalebis. Return the syrup to the stove and simmer on a low heat until the consistency is achieved. This will not happen when you are making small quantities as this recipe. However, when you intend to make a larger batch, this tip may come handy.
Proceed until all of the batter is used up.
These will absorb enough syrup and the texture will be juicy. Hence you will not have much of the syrup remaining and wasted. The oil though will be left over a bit.
The procedure may seem very difficult and the pressing and turning simultaneously needs a bit of practice. But the jalebis are sure to be a thoroughly enjoyable treat.
On a high note this post happens to be my 250th as the numbers show. It has been a thoroughly enjoyable culinary journey which has been made possible by readers and friends though the blog.
Thank you one and all for making it a beautiful and learning experience thus far and hope to continue in the same manner.
Thank you once again.

Saturday, June 25, 2011

Badami mixed vegetables with vegan yoghurt


As I write this post, I am reflecting on how much my cooking has transformed since I started sharing recipes here, in my blog. It is not a big bang evolution as such, but I have started to consciously cook somewhat healthy and good - to - eat dishes. Earlier also, I was inspired by cookery shows on televisions and recipes featured in cookbooks. But reading a blog and trying dishes has given me more confidence that a recipe shared will work.
Just about few days ago, two friends Jayashree and Vidhya messaged me of having tried and liked recipes I had shared. That was very humbling and a wonderful feeling. Both of you made my day!
The recipe here today is what I watched on television on a Sunday morning and very inspired that I tried it out as soon as the show went off air. This was few months ago, and as you guessed right, it was Sanjeev Kapoor making onion and garlic free dishes. I had all the ingredients on hand that morning and made this for lunch.
Later, Harini the Sunshine mom shared the home-made vegan cashew yoghurt, which influenced me to try it. I set the yoghurt following her recipe and I had a rich and very wonderful yoghurt. To eat it with simple rice would have been a treat, but considering the cost of cashews, I dared not.
I used it in dishes where yoghurt was called for. They turned out richer with the cashew nuts.
I have marinated my potatoes in this yoghurt, cooked some rich gravies and most awesome biriyani with cashew, almond and peanut yoghurt in these past few months.
The other day, I made this gravy dish cutting out the yoghurt and the cashew paste called for in the recipe.
Thanks to two talented chefs, I have a vegan, no onions, no garlic side dish that works wonderful with my whole wheat naans.
Recipe source:
Partly adapted from Sanjeev Kapoor's Khana Kazana. Find the recipe here .
Sunshinemom's vegan cashew yoghurt from her blog Tongue Ticklers.

Ingredients and method to set cashew yoghurt:
25 pieces whole good quality cashew nuts
3/4 cup warm water
10 fresh chilli crowns

Soak the cashew nuts in very hot water for about 20 minutes.
Drain and grind to a smooth paste adding about 2 tablespoons of water gradually.
Transfer this to a ceramic bowl. Add the rest of the warm water to the paste and mix well.
Wash the chillis and pat them dry. Remove the crowns and drop them in the prepared cashew milk.
Cover and allow the yoghurt to set for few hours.
Remove the chilli crowns and the yoghurt is ready for use.


Note: Chillis have to be fresh for them to attract bacteria from the air.
I placed the bowl inside my oven after having baked something. That supplied warmth for the yoghurt to set. The yoghurt set in about 6 hours.
This quantity gives about 200ml yoghurt.

Ingredients:
2 medium carrots cut in medium size cubes
10 french beans cut fine
1/4 cup shelled peas
10 cauliflower florets cut medium
(Any other vegetable that is suitable to be cooked in a yoghurt based gravy will work fine)
2 medium tomatoes blanched and pureed
2 green chillis chopped fine
2 tablespoons
oil
1 teaspoon cumin seeds
2 tablespoons peanuts roasted and powdered
1/4 teaspoon turmeric powder
1 teaspoon coriander powder
2 teaspoons Kashmiri red chilli powder
2 teaspoons garam masala powder
1/3 cup cashew yoghurt
Salt as required
2 tablespoons freshly chopped coriander leaves

Method:
Place all the vegetables in a microwave steamer and steam for 5 minutes on maximum power.
Add the turmeric powder and salt to the steamed vegetables.
Heat oil in a pan. Add the cumin seeds. Allow them to crackle. Drop the chopped green chillis in.
Add the steamed vegetables and saute' for a few minutes.
Whisk the roasted peanut powder to the cashew yoghurt.
To the vegetables in the cooking pan add the coriander powder, garam masala powder and the red chilli powder.
Pour the pureed tomatoes and allow to cook further.
Finally add the cashew yoghurt, reduce the heat to the lowest and simmer the gravy for about 5 minutes, adding some more water. Stir continuously to avoid burning.
Remove from the stove. Transfer to a serving bowl and garnish with fresh coriander leaves.
Serve hot with naan, rotis or phulkas.


The addition of cashew nuts gives the dish a very creamy texture. You may choose to reduce the quantity of yoghurt used to have a slightly dry, less of gravy dish. I have made it more gravy based as we like it thus.
I shall share other recipes where I have used such non-milk based yoghurt dishes. Depending on the nuts you use, the taste differs. The peanut yoghurt gives you a whiff of peanut oil while the almonds are very rich as are the cashews. I have not tried the soy yoghurt so far. I guess that soy yoghurt would make a very protein rich base for gravies.
Hope you enjoy the dish!

Monday, June 20, 2011

Mini savoury toast


Sometime ago, I purchased one mini loaf tin. This bakes four mini loaves.
I tried Dhivya's white dinner rolls recipe from Chef in you.
I used herbs from my garden and made the savoury version in mini loaves.
They were perfect as such, though my husband liked them with a potato masala sandwiched in the loaf.
Later, I toasted the slices an made pretty shapes off a cheese block and enjoyed that too.
This recipe has been a wee bit altered as I was making them savoury. The recipe makes 8 mini loaves.

Ingredients:
3 cups of All purpose flour
2 & 1/4 teaspoon active dry yeast
1/4 cup warm water
1 &1/4 cup milk
3 tablespoons butter
1 tablespoon sugar (I reduced the sugar and added some more salt in this)
1 teaspoon salt
4 green chillis
10 oregano leaves
15-20 mint leaves
1 teaspoon oil


Method:
Add butter to the milk and warm it to a moderate heat until the butter melts in the milk.
Take the yeast in a bowl, sprinkle the sugar and a small amount of the flour. Add the luke warm water to it.
Cover and let it stand for about 15 minutes to become frothy.
Pulse the herbs in a mixer. Add this to the flour.
Add salt and the proven yeast to the milk.
On the kitchen counter or on a big bowl, take the flour and make a well in the middle.
Pour the milk , butter and yeast mixture in this well. Gently incorporate the flour in.
Knead the dough well. It will feel sticky, but as you knead the dough will gather well in a very elastic texture.
Knead well for about 15 minutes. The dough will feel just short of sticky.
Grease a bowl with 1 teaspoon oil and place the dough in the bowl, cover and allow it to double. This may take about two hours.
Transfer the dough to the counter and knead again dusting the floor of the counter/ board occasionally.
Then roll in a small rectangle and divide in eight parts. Place them in the mini loaf tins, cover with a damp cloth. Allow this to rise again.
Meanwhile, pre-heat the oven to 180 degrees Centigrade.
Using a tooth pick, punch tiny holes on the surface of the dough, just until the tip of the pin.
Bake for 25 minutes.
Remove from the oven and allow to cool on racks.
Your mini loaves are ready.


When completely cool, slice them.


Using a cookie cutter, cut out shapes off a block of cheese and place them on toasted bread slices.


Friday, June 17, 2011

Idli sandwich


There are days that I am bored with my cooking. Repeating the same dishes often gets mundane and I look to give them a twist just to make something appetizing. This was one such experiment I made for my breakfast. This morning as I was planning the day's breakfast and lunch, I decided that I would make just enough idlis for packing my husband's snack box and plan my breakfast later.
I steamed my idlis in small individual cups and made myself the sandwich idlis with some raw and some steamed vegetables filled in it.
You can use your own innovative ideas for the filling. I have used regular coconut chutney for spreading and the vegetables. Had I planned ahead, I could have added some sprouts and crumbled paneer to the vegetables and some interesting chutney. Nonetheless, this sandwich was delicious enough that I chose to share.
Ideally the idli batter that is a day old in the fridge works well. The fresh batter usually gives super soft idlis that may crumble when you cut in the cross section. Hence I use the batter on the third day after grinding for such experiments.

Ingredients: (makes two medium sandwiches/ serves one person)
3 big ladles full idli batter
Few drops of oil to grease the cups

For the filling:
1 tablespoon chutney of your choice (I have used coconut chutney)
2 tablespoons of freshly grated carrots
1 tablespoon steamed green peas coarsely mashed
1 tablespoon thinly sliced green bell pepper strips steamed
5 slices of tomato
salt to taste
2 teaspoons ghee for grilling

Method:
Grease two small bowls with oil.
Pour the idli batter into these until half filled.
Steam these in a steamer for about 7 minutes.
As the idlis are being steamed, prepare the filling. Mix slat to the vegetables and keep them ready.
Remove the cups from the steamer and allow to cool. Remove the steamed idlis from the cups.
Allow the idlis to cool completely. Using a sharp knife, slice the idlis in two sections.


Heat the ghee for grilling in a pan. place the idli sections and allow to be grilled or toasted for a few minutes. This step is entirely optional. You can avoid the ghee/oil and just enjoy plain sandwich idlis too.
If you are grilling, just do thus for one side of each section.
Spread a little quantity of chutney on one side of each slice.
Layer two of the sections with the vegetable filling.
Place the other two sections on top of the above.
Garnish with sliced tomato and coriander leaves and serve.


You may choose to make the colourful idlis and sandwich them as prepared above to just make it more interesting for kids.

Srivalli is hosting a Sandwich Mela where these idli sandwiches are being sent to her to be shared.

Wednesday, June 15, 2011

Bangalore Iyengar Bakery Style Khara Biscuits


Having heard from many of my friends about these biscuits, it was time the members of the Indian Cooking Challenge tried these at our homes. Srivalli asked Champa to share the recipe for us and we were pleased to have found a very work-able recipe which I am about to share in this post. You may find the recipe shared by Champa in her blog Versatile Vegetarian Kitchen.

The recipe is quite simple and I wondered at the fact that it does not use any baking powder or bi-carbonate of soda. The biscuits turned out crisp and totally addictive. As I was baking in my microwave oven in the convection mode, I needed to increase the baking time by a few minutes. The preparation time also is not much, so you can actually bake them if you have a sudden craving for some spicy snack along with your tea in about 45 minutes time including the baking and cleaning up too.

Ingredients:
250 grams All purpose flour (2 cups loosely spooned)
4 teaspoons sugar
80 grams butter softened at room temperature (1/3 cup)
1 teaspoon salt
6 green chillis chopped finely (adjust according to heat required)
2 -3 tablespoons fresh coriander leaves chopped
2 -3 table spoons yoghurt (2 tablespoons to start with and increase if necessary)
1/2 teaspoon carom seeds (ajwain/omam)


Method:
Pre-heat the oven to 160 degrees Centigrade/325 degrees Fahrenheit.
Line your baking trays with grease proof paper or parchment. Or you may use an aluminium foil that has been lightly greased with butter.
Sieve the all purpose flour and salt together. Whisk that a bit to incorporate some air.
In a larger bowl, cream the butter and the sugar until light and creamy.
Add to this, 2 tablespoons of yoghurt and cream further. Add the chopped chillis, carom seeds and the coriander leaves.
Now add the flour mix and with your hands gather the flour and creamed mixture. Handle the dough gently.
If it feels very dry add the extra 1 tablespoon yoghurt. The quality of the all purpose flour plays a role in the recipe so, depending on that you may require this extra yoghurt.
The dough will at no point be a wet dough. It has to be stiff and very lightly crumbly.
Roll the dough on a board and cut cookie shapes.
Place the shaped dough on the lined tray and bake for 18 to 20 minutes.
Take them out once and reposition the cookies the down side facing up and continue baking.
Once done, cool completely and store in airtight jars.
Soon after the cookies are out of the oven, they tend to be soft. They acquire the crisp upon cooling.
These stay well at room temperature for four days and up to a week if refrigerated.


These make a great combination to have with tea, especially on a grey day when the skies are threatening to drench you.
I have halved the recipe and baked 10 biscuits, so there was no question of them staying for longer than that very day I baked....oh yes, I kept some over for the next day!

Tuesday, June 14, 2011

Thengai Podi


Most summer holidays through my school years, were spent at our maternal grand parents' home in Gobichettipalayam. As was the case then in many Tambram families, it was lunch at 10 AM in that household too. Breakfast was unheard of. But the children were always fed left over rice at around 8 AM. They used to cook extra rice in the night and keep it over for us to eat with curd. Being summer curd rice was mandatory. To go with the curd rice there would be pickles and milagai gojju or thengai podi.
As my grandfather would perform an elaborate pooja every morning, whatever was cooked that day was kept for neivedhyam (offering). Hence we were not allowed to partake any of the food being freshly cooked just then. We would eat that for our mid day meal, a full course with vegetables, sambhar and rasam and all.
We were of course, allowed to snack in between on a whole mango or some fresh nungu or some fruit. Biscuits and candies were strictly not to be had.
We would grudgingly eat the meal in the morning because, we always equated that to leftovers. Little did we know that it was meant to be. The many pickles that will be available might be lime, vadu maanga, maagani kizhangu, dry narthangai etc. giving you plenty to choose from. The thengai podi can be had with plain rice drizzled with some oil or as a side for any rice dish too. I favoured this podi to oorgai. The same is true even to date.

Ingredients:
1 &1/2 cup freshly grated coconut (Ensure that the coconut is ripe)
10-12 dry red chillis
1 table spoon channa dhal
1 tablespoon urad dhal
1 teaspoon asafoetida powder
1 small marble size tamarind
2 teaspoons oil
2 heaped teaspoons sea salt (adjust as required)


Method:
A ripe coconut will be best to prepare this. It ensures shelf life of about a week to 9 days at room temperature.
Scrape the coconut and obtain evenly grated coconut.


Traditional coconut scraper


Heat the oil in a pan and roast the two dhals separately until golden brown.
Remove them from the pan and roast the red chillis, tamarind and the salt.
Next on a low fire, roast the coconut scrapes until they are evenly light brown and aromatic.
Allow all of the above to cool.
Transfer the roasted dhals, spices and the asafoetida powder to the jar of a spice grinder.
Pulse for a few seconds and add the coconut to the jar. Grind to a coarse but combined powder.
Remove from the jar, allow to come to room temperature and transfer to clean, airtight storing jars.
Enjoy with rice.

Sunday, June 12, 2011

Thakkali vengayam chutney - Tomatoes and onions chutney


I have been wanting to write this recipe for quite a while now. Though I often make an elaborate sambhar and chutney combination to go with idlis and dosais, the tomato onion chutney is the best loved one. Given a choice, my husband would opt to have the thakkali vengaya chutney.
The other day, when I was chatting online with Madhuri, she was making her post on the chutney and urged me to post mine also. I put it in drafts and had forgotten about it all together amidst the house shifting and such.
Today, when I was planning to schedule a post for a later date I found this in my drafts and hence, I am sharing here.
You can actually get very versatile with this chutney. There is no set number of tomatoes or onions that have to go into it and such. What I have given can be used as a base to build on. I drop a few spoons of urad dhal and channa dhal sometimes and other times add some fresh coriander leaves or mint as I work on it in the kitchen.


Ingredients:
3 medium tomatoes
1 large/ 2 medium onions
4 dry red chillis
1 tablespoon urad dhal
1 tablespoon channa dhal
A thumb nail size tamarind
Salt to taste
1/4 teaspoon turmeric powder
2 tablespoons oil

For the tempering:
Use 1/2 teaspoon oil from the above and 1 teaspoon mustard seeds

Method:
Chop the onions and the tomatoes.
Heat oil in a pan retaining 1/2 teaspoon for tempering.
Add the chopped onions and saute them until they are slightly done. Add the red chillis and channa dhal and allow it to roast until golden. Add the urad dhal and roast it also to a golden colour.
Add the salt, turmeric powder, and the tamarind while on a low flame.
Finally add the chopped tomatoes and cook until the tomatoes cook in a soft pulp.
Cool this mixture and grind to a paste in a blender.
Heat the reserved oil in a pan and add the mustard seeds. Allow them to splutter and add this to the chutney.


The consistency can be adjusted to your preference. I usually grind it to a smooth paste a habit that my husband cannot shake off. A slightly coarse textured chutney goes well with dosais and the smoother paste like chutney can be had with idlis.

Saturday, June 11, 2011

Channa Masala - version 2 from an old cookbook


I have this cookbook from my mother-in-law. I do not even remember when the brand Preet Pressure cookers existed. My mother in law had one pressure cooker which, for a long time, I assumed, was the later model of Prestige 12 litres cooker. All I recall is a very sturdy saucepan that she was very fond of and used to tell me that she has been having that ever since they moved to their own house in Ciombatore which means since the year 1967. (She had been using it until my last visit to her home.)

Years ago, when I stayed with them until I secured a transfer in my job, I chanced upon this book inside one of the table cupboards in my husband's room. The book is titled "The Preet way to cook" 101 recipes from India and elsewhere. It is an instruction manual combined with a cookbook, and with my sister-in-law's name labelled in it. I asked to have it and she had no objections in giving the same to me.
It does have recipes from all over India, some vegetarian and some non vegetarian. I have tried few of those vegetarian recipes. This one is a simple version of the Punjabi chole. I made it for dinner last night and thought that I shall share the same. Though I have not followed the recipe to the letter, I can safely say that this recipe has been adapted from that book.

I have altered the recipe to suit my taste and availability of the masala ingredients in my pantry. Also I have made it for just two people.

Ingredients:
1/2 cup Kabuli Channa (garbanzo beans)
2 small onions
2 large tomatoes
1 small piece of ginger
4 pods of garlic
1/2 teaspoon pomegranate seeds
2 teaspoons garam masala powder
2 teaspoons red chilli powder (1 teaspoon chilli powder and 1 teaspoon Kashmiri chilli powder)
1/2 teaspoon turmeric powder
1 teaspoon crushed jaggery (optional)
Salt to taste
2 tablespoons oil

For tempering and garnish:
1 teaspoon cumin seeds
1 large green chilli
Few sliced onions
Few sliced tomatoes


Method:
Wash and soak the chick peas overnight.
Drain the water and add 1/4 cup of fresh water to the chick peas.
Pressure cook the chick peas until very soft.
Remove from the cooked peas about 1 and 1/2 tablespoon and keep aside.
Add salt to the rest of the chick peas. Retain the cooked water also.
Chop the onions, peel the garlic and ginger.
Drop the tomatoes in warm water and peel the skin gently.
Grind the onions, pomegranate seeds, garlic and ginger to a paste adding to them the chilli powders and the turmeric powder. Grind this to a smooth paste adding little water only. Transfer to a bowl.
In the same blender jar, puree the tomatoes. add this puree to the cooked channa.
Take the reserved chick peas and blend to a smooth paste.
Heat oil in a heavy bottomed pan. Add the cumin seeds and the slit green chillis.
After a few minutes, add the blended masala paste. Cook this on a low fire until the raw taste is lost and the oil begins to separate. Now add the tomato paste and the chick peas. Add the garam masala.
Allow to simmer for at least 15 minutes to infuse the taste to the cooked chick peas.
Finally add the jaggery and chick peas paste to the simmering gravy. Allow this gravy to thicken.
When done, remove from the heat and add the garnish to the channa masala.
Serve hot with rotis, phulkas and such.

Friday, June 10, 2011

Vaazhaikkai Podimas


Vaazhaikkai podimas is a variation of the usual plantain dry curry.
This preparation is just as simple as we cook the regular vaazhaikkai kari, yet an interesting change to the usual.
I usually prepare a normal stir fry or the crunchy roasted vaazhaikkai kari. Once in a while, though, it is good to alter course, isn't it?
The recipe given here serves two people.

Ingredients:
2 medium raw bananas
1/4 teaspoon turmeric powder
1/4 teaspoon asafoetida powder
Salt to taste
2 teaspoons oil

To be dry roasted and powdered coarsely:
1 teaspoon coriander seeds
2 teaspoons channa dhal
2 or 3 dry red chillis
3 teaspoons freshly grated coconut
Just about little salt to add to the powder

For tempering:
1 teaspoon coconut oil
1 teaspoon mustard seeds
Few curry leaves


Method
:

Cut a little off the edges of the bananas. Retain the skin and cut the bananas in two. Depending on the size of the banana, sometimes I boil it as a whole.
Drop the four pieces in hot water and cook them just until the peel can be easily peeled off.
Take care not to cook the banana until very soft.
Peel the skin off and with a vegetable grater, grate the bananas.
Heat the 2 teaspoons oil in a pan, add the turmeric powder, asafoetida powder and the salt along with the grated banana.
Sprinkle water off and on and cook the bananas until just about soft. Remove from the pan and keep aside. When it is cool fluff the cooked vegetable with tips of your fingers or a fork so the grated pieces are separate.
In another pan dry roast the ingredients listed for powdering. Allow to cool a bit and powder coarsely.
Once the powder is ready, heat the oil for tempering and add the mustard seeds. Allow them to crackle.
Add the curry leaves and toss for a minute before adding the cooked banana and the spice powder.
Toss them together for a few minutes and remove from the heat.
Serve with rice and sambhar or rasam as a side for the rice.

I am sending this to Krithi's Kitchen who is hosting Siri's Healing Foods event with Bananas this month.

Thursday, June 9, 2011

Maanga Pulisseri


One of the Kerala gravy recipes that I had wanted to try for sometime now was the manga pulisseri.
I had it in a friend's place while in Bahrain. I had not noted the recipe then.
Last year another friend who travels to Ghana during her school holidays, mentioned this recipe to me. I remember trying out soon after.
I had been wanting to write it in the blog, but kept putting it off so much that I had almost forgotten the recipe.
When I found my Bahrain friend online, I was reminded of the pulisseri recipe and asked her to give me the same. As we chatted, she wrote the recipe for me.
I copied it to my notepad and this very morning tried it.
As I started off with this post, we had heavy thunderstorms and my internet was down.
However, I thought I can compose and post it later in the blog.
I have cut and pasted the recipe from our conversation. Just the ingredients part I have had to make a write up. The method, which appears below is verbatim of our conversation.

Ingredients:
1 small raw mango (the semi sweet and sour variety works best)
2 green chillis
1 dry red chilli
1 tablespoon scraped coconut
1/4 cup yoghurt
A generous pinch of turmeric powder
Salt to taste

For tempering:
1 teaspoon oil
1/2 teaspoon mustard seeds
1/4 teaspoon fenugreek seeds
few curry leaves
1 dry red chilli

For Garnishing:
1 tablespoon chopped coriander leaves

Method:

M:Cook the mangoes with haldi and salt.
Grind 2 green chillis, one dry redchilli along with scraped coconut.
Once mango is cooked add yoghurt and mix continuously. Meanwhile, add the coconut paste.
When small bubbles appear in the boiling mixture,the pulisseri is ready.
Me: what is tadka for this? normal kadugu, karuveppila?
M: Temper with mustard, redchilli bit of methi seeds !!!!
If the mango is sweet ..after tadka you can add bit of methi powder for flavour.


This is how you prepare the pulisseri.

I recall the other friend asking me to dry roast some fenugreek seeds and the given 1 dry red chilli and grind with the coconut and green chillis.
She also mentioned that if the yoghurt is not sour enough, it will curdle in a mass and water separated. So in order to keep the binding, add a little quantity of gram flour to the yoghurt.

Living in a tropical country, I had set the yoghurt and left it on the counter allowing it to get a bit sour than my usual requirement. Hence I did not add any flour to the yoghurt.
Serve this with steamed hot rice. It tasted very good combined with coconut rice.