Thursday, May 29, 2014

Mango Sorbet - Giving in to Mango Madness

There are mangoes everywhere, quite a few varieties here, though I am not able to know them by name. The vendors also do not give the name by variety, they are more willing to suggest what will taste better and such. There are two varieties that are big in size, one with a hard rounded stone within and the other contains a thin, yet long seed. Both of these are fleshy enough that when pulped they yield well. These mangoes are certainly not the sweet ones we get back home that we might want to eat them as fruit. I make milkshake or lassi and my husband is more than happy with the sugar there.
The other day when I picked up two and made the mousse, a friend sent us two more only slightly smaller. These had a thicker outer skin and a more yellow flesh. Just then I was putting mail in folders and Tarla Dalal recipe links were in a folder. I got into going through the mailers and this mango recipes links mail appeared, flashing some nice pictures. Reading through, the sorbet seemed easy to make with very few ingredients and not much work to be done. So sorbet it had to be with the mangoes that we did not consume. They needed the make up to be relished.

Mango Ginger Sorbet
Adapted from Tarla Dalal : Mango ginger sorbet


(Made with pulp from two large mangoes- yield filled a 1 litre Icecream tub)
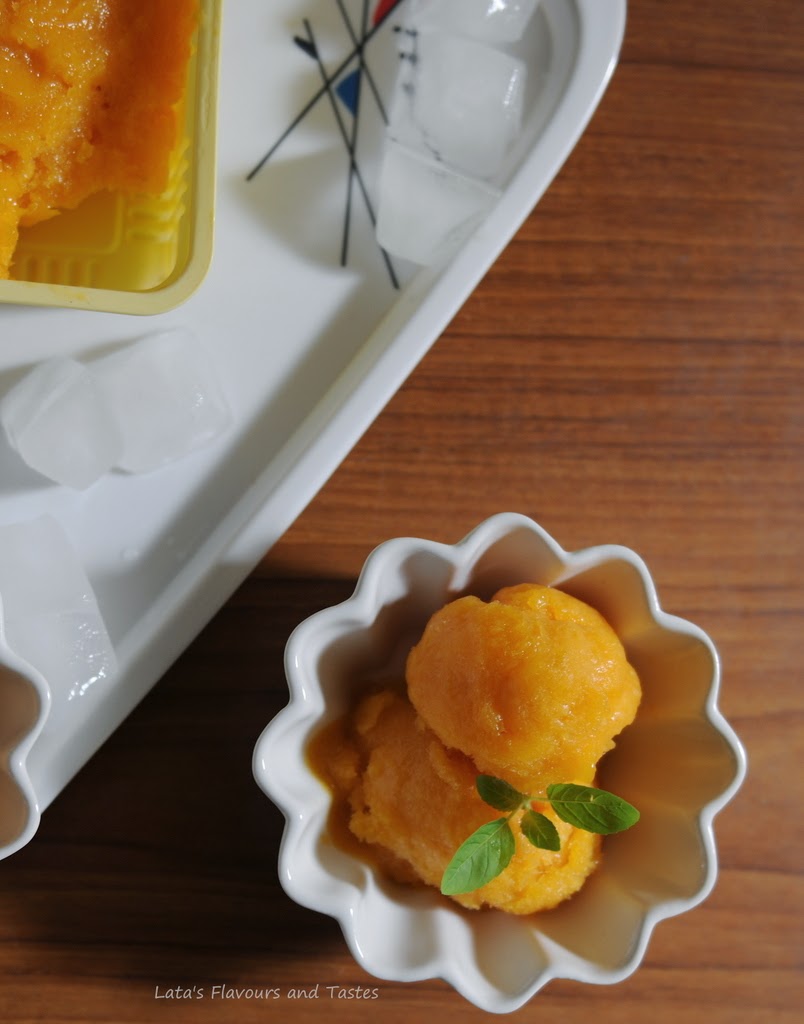
Ingredients:
Approximately 850 ml of pulped mango
1/4 of a cup sugar (measured and then powdered)
2/3 cup water
3 tablespoons lime juice
1 tablespoon rind of lemons
1 to 2 tablespoons grated ginger (optional)


Method:
The above measures are approximate and can be adjusted to taste and the sweet content in the fruit.
Adding ginger is optional, but I recommend as it adds a nice flavour to the otherwise very sweet fruit sorbet.
Wash and peel the mangoes. Slice them.
Dissolve the sugar in the water and when it is boiling add the ginger. Allow the ginger to cook in the syrup for a few minutes. Remove from the fire and allow to cool down to room temperature.
Place the sliced mango in the jar of the blender and adding the sugar -ginger solution, blend them well.
Transfer to a freezer safe container.
Add the lime juice and the rind of lemons. Mix well.
Place it covered in the freezer for 4 to 5 hours.
After five hours, take out the sorbet and whisk to break down the ice crystals.
Return to the freezer. Repeat the process twice more after an hour or two.
Few minutes prior to serving, place the container in the refrigerator section.
Scoop out into individual cups and garnish with cut mango pieces if available.


A very refreshing cold sorbet can be just the thing you might want on any hot summer's day.

Monday, May 26, 2014

Calzone for Bake your own Bread - We Knead to Bake 14

Going back to the Group's February assignment, where members chose to bake a bread of their own choice, I decided to go with the Calzone. This is an Italian bread, a filled and folded one at that, originating from Naples. The name possibly comes from the looks - the dictionary defines it as shoe. More nearly a stuffed stocking or a trouser's leg.
A typical one is filled with salami and cheese, while there are regional variations that include pizza toppings. The smaller calzones are sometimes deep fried in olive oil too. I thought it would work with a vegetarian filling too.


Aparna has done this with onions, peppers and paneer filling. We had tried that sometime last year when my daughter wanted to bake. We had liked them then and hence I did them again for the WKtB 14 bread.
I had plenty of tomatoes from which I could make home made marinara sauce to go with the bread.
I kept the dough recipe as given in Aparna's post and did the filling with hung curd crumbled, bell peppers, tomatoes, olives, and onions.

Calzone


Ingredients:
Makes 8 large calzones
For the outer dough:

2 cups all purpose flour
1and 1/2 teaspoon active dry yeast
1 teaspoon sugar
1/2 teaspoon salt
1/2 teaspoon oregano
1/2 teaspoon dried thyme
1/4 teaspoon dried basil
1 and 1/3 tablespoon olive oil

For the filling
1 cup crumbled hung curd
1/4 cup tomatoes chopped and liquid drained
2 large bell peppers chopped
10-12 numbers olives
2 large onions sliced
2 teaspoons red chilli flakes
Salt to taste
2 teaspoons olive oil to sauté the vegetable

Method:
Place the active dry yeast and sugar in a bowl and add 1/4 cup of warm water and allow the yeast to come alive.
You may knead by hand or in the processor. I kneaded by hand.
Take the dough and salt in a bowl. Whisk a couple of times to mix.
Add the yeast mix to the dough and sufficient warm water to knead. Knead well, adding the olive oil and the herbs, until a soft and elastic dough is achieved.
Once the dough has been kneaded to required consistency, roll it like a ball and place it inside a bowl lightly coated with oil.
Turn the dough over in the oil to coat the surface too. Cover and leave aside for it to double in volume. This may take about an hour.
Meanwhile get the filling ready.
Heat the olive oil in a pan, add the onions and sauté. When they have been cooked for about four minutes, add the bell peppers and cover and cook them for a few minutes.
Do not over cook them. The peppers have to hold a bit of crunch.
Just before removing from the heat, drop in the tomatoes, red chilli flakes, salt, and the olives.
Allow this to cool before adding the crumbled curd cheese.
Mix well and keep aside until ready to fill. Roughly divide this in 8 portions.
When the dough has developed, take it out to the working surface. Gently deflate it and divide into 8 equal portions.
Working on one portion at a time, roll the dough portion out in a 6" diameter circle.
Place one portion filling on the rolled out dough to one side (so you may be able to bring the other half over to cover and close), leaving some space along the edges.
Moisten the edge with a little amount of water and close the calzone in a half moon shaped one. Press the edges well with the tines of the fork, running it along the edge to seal.
Repeat this with the rest of the seven portions of the dough.
Keep the prepared calzone covered while working on the others.
Place them all on a greased baking tray and rest them for about 10 minutes to puff up. They will puff well.
Pre heat the oven to 180 degrees C and bake the calzones for 20 minutes until they are brown.
Serve them hot with marinara sauce and/or a drizzle of herb infused olive oil.
We had them for lunch along with sauté ed vegetables.


You might want to check out what other members had baked for this assignment in February. Have a look at this post where you might find links that lead you to beautifully baked breads.


Saturday, May 24, 2014

Petit Pains au Lait - We Knead to Bake 17

Shaped and pretty looking breads are a joy to try. Added to that, if the texture of the bread is also great, there is nothing more to stop one from baking; right? So, this month, we baked the beautifully golden on the outside and almost flaky on the inside Petit pains au lait were the choice Aparna made.
Well, I was still catching up with the breads I did not bake, and almost missed this one too. There were other members who kept posting their beautiful looking breads' pictures in the group, that kept reminding me of the same. Then almost to the date of posting, ie. today, I baked this bread two days ago. It was one of the easy recipes yet a very soft and wonderful bread we had tried.
The dough for the pains au lait is a bit rich, though not as that for brioche. The liquid used in this is milk, no water at all and a generous amount of butter, not too much either.The decoration is by patterns that can be cut with scissors on the top of the bread; the other good thing is that the dough can be shaped in any pattern of your own choice.


The pains au lait are best consumed the same day though baking them ahead and storing them to be consumed for breakfast is also possible. I baked them the evening before and had them for breakfast in the morning. You might like to warm them just a bit before serving.

Petit Pains au Lait (French Milk Bread/ Rolls)
(Adapted from Gourmet by Kat - Click here for the link.)

The recipe makes 10 Petit Pains au Lait


Ingredients:
2/3 cup warm milk (I used a little more about 20 ml more, possibly because I had bread flour on hand and it needed more milk)
1 teaspoon instant yeast
1/4 cup sugar
1 & 2/3 cup all purpose flour
3/4 cup bread flour*
1/4 teaspoon salt
60 grams butter, softened and at room temperature
Extra milk for brushing
Pearl sugar for topping**(optional)

* If bread flour is not available, you may add 2/3 teaspoon of vital wheat gluten to all purpose flour. For this, place the vital wheat gluten in the measuring cup that reads 3/4 cup, and top it up with all purpose flour.
If vital wheat gluten is also not available, just replace bread flour by 3/4 cups all purpose flour.
** I used sugar decorations that are used for cakes. You may choose not to use or opt to use granulated sugar or large crystals of sugar.

Method:
You may knead the dough by hand or use a processor. I have used the processor with the kneading blades.
Whisk both the flours and the salt to combine evenly.
Add the sugar and instant yeast to the warm milk, in the processor bowl and pulse for a couple of minutes to mix.
Drop the flour mix into the bowl and run the processor until they all come together in crumbs.
Now add the butter and knead the dough until a soft, elastic and smooth dough that is not sticky is achieved. You might find the dough dry, add more milk in very small quantities for the required consistency.
Shape the dough in a ball and place it in a lightly oiled bowl, turning the dough over to coat the oil over it. Cover and allow the dough to double in volume. this may take about an hour and a half.
Turn the developed dough onto the working surface. You will not need any flour dusting as the dough will be easy to handle. However, if you must, dust your palms with flour and gently deflate the dough.
Divide the dough in ten portions. rest them for about fifteen minutes. Work on one portion at a time. Roll each portion of the dough in a 4" diameter circle. Roll this like you would for swiss rolls from one end and style into a cylindrical shape.
Pinch the seam closed well and place the roll on greased or parchment lined baking tray, seam side facing downwards.

Repeat this with all the dividends.
Cover them loosely and let them rise for an hour until they look almost double in their size.
Brush the top of the pains with milk lightly. Use a pair of sharp scissors, snip the dough on top forming cuts on the surface. Take care not to cut very deep, just slight cuts to bring out patterns.
Sprinkle the pearl sugar on the top.
Bake for 15 minutes in a pre-heated oven at 200 degrees C until the tops are nicely golden.
Remove from the oven and cool them on wire racks.

Serve them warm with coffee and tea or chilled flavoured milk. They make for good breakfast or when fresh, to pack in children's snack boxes.

These were easy to bake rolls and do take a look at Aparna's post here, and check out other members' breads. you may find their links at the end of that post.


Friday, May 23, 2014

Bitten by the mango madness bug - Mango Mousse

Mangoes and summer go together and in India, we try to make the most of it. In the Southern part of India, we get varieties that spoil us for choices. During summer holidays, my grandmothers used to buy a whole basket from the vendor who would sell them on streets. This ensured that we ate one whole mango in a day. We have never thought of making anything with them; eating them whole, licking off the juice that drips to our elbows and trying to shave the stone within clean with the teeth was such pleasure. Only later, we found that there were other varieties and large in size mangoes that were pulped to juice and served as a refreshing drink in wayside stalls.
Here in Africa, there seems to be no specific season. I have seen trees laden with fruits even as late as November.
Come April, every other vendor seemed to be stocking the mangoes and offer you for cheap prices that you cannot deny them. However, I try to keep their pressure well contained, explaining that we are a small family and we can come back to them to replenish supply. These mangoes however, come not even close in taste to the ones I am used to. They are very good for juice, lassi and other such servings - to eat them plain is just about okay, nothing to yearn for.
We picked up two large fruits after much persuasion from the vendor and recommendation from my driver. I planned to make sorbet with them for guests who dropped in for dinner. Plans did not work well so I had them sitting on my counter. That is until I read three posts that made me opt to try mousse or panna cotta. I chose to make the mousse.
I used hung curd and agar agar in the recipe. There are recipes that use gelatin, greek yoghurt and such. I do not get greek yoghurt here and thus chose to make hung curd.
The measures are very approximate as I had no clue how much agar agar will be needed and went by intuition. Also how much sugar depends on the sweetness of the mangoes.So read the ingredients list and use your discretion if you choose to make them. It really does not change that it is one thoroughly enjoyable treat for those who love mangoes.

Mango Mousse
Makes 4 sumptuously large servings

Ingredients:
550 ml mango pulp (two large mangoes, skinned, stone removed and pulped in the juicer)
1 tablespoon crushed agar agar
3/4 cup warm water
200 grams hung curd (Hang 1/2 litre curd tied in a cloth to drain liquid)
1/4 cup sugar (measured and then powdered)
200 ml light whipping cream
For garnish:
Few pieces of mango cut in cubes
Few raisins

Method:
Dissolve the agar agar in the warm water for thirty minutes.
Run the mango pulp and sugar together in the blender and blend well.
Remove about three tablespoons of the mango mixture in a bowl and heat over low heat.  Leave the rest in the blender jar.
When the pulp is warm, strain the agar agar solution into it and cook until it thickens.
Quickly add it to the blender jar and run a couple of minutes to combine, before the agar thickens further.
Transfer this to a bowl.
Place the hung curd in the jar of the blender and run the blender for few minutes until the curd has become creamy in it's own liquid.
Fold in this cream into the mango pulp and whisk until the mix is fluffy.
Whip the cream until soft peaks are formed and fold this also into the above mixture. Gently blend them all together.
Transfer into serving glasses and chill them in the refrigerator for few hours.
Garnish with the mango cubes and the raisins.
Serve chilled.


And I did make the sorbet too. So I am really giving in to the mango madness.

Meanwhile, over two weekends my husband decided to pep me up to be more attentive to the blog. On that account he went around looking for making boards for my photographs. He cut the wood and painted them.


He has a few ideas brewing in his head; though I do not know how I may use those if he makes them, for now I am going with the flow. this has been in my mind for sometime now, though I have not been actively posting recipes. Left to me I would have been saying this but would not have acted upon it. Now, I have to respond to this enthusiasm by making it work with my photos.


Saturday, May 17, 2014

Melon pan - We Knead to Bake 15

I know, I am on reverse mode - bread posts are numbered in descending order. I had tried the breads, that the We knead to Bake group baked when I was on a break, and am putting them up, as I bake them. It is time to share the experiment/ experience and be up to date and bake with the group.
In the month of March they had baked this Japanese bread that is a bread with a layer of cookie cover over it - a Melon Pan. Pan is Japanese for bread and since this one with a cross hatch pattern on the top resembles the melon that is thus cut and bent backwards to serve, the name.while we baked them plain, there is also a suggestion that some Japanese bakers do use melon extract for flavouring the buns.


The suggestion of bread and cookie being paired is intriguing and Aparna thought it was unusual enough for her to bake this; so did we. There is also a popular variation to cut the cookie portion in a teddy bear shape or start shapes just for decoration.
The bread dough for these buns are mostly done plain. However, chocolate chips, cream cheese, custard and pastry fillings are all possible and add to the flavours.
Both the bread and the cookie dough use eggs, which can be omitted if you do not eat eggs. That is how, I bake them, without eggs. I have used in both doughs substitutions - yoghurt in bread dough and milk in the cookie dough.The recipe given below makes 8 pans that are considerably big.
We are only two and I wanted to cut it down to bake fewer. I halved the recipe and made just 4 pans.
There is a youtube video on making these Melon pans that may help.

Melon Pan- Japanese Melon Bread
Adapted from A Bread A Day:Melon pan


Ingredients:
For the bread dough
1 &3/4 cups all purpose flour (and a little extra, if required)
2 tablespoons milk powder
1 teaspoon instant yeast
1/2 teaspoon salt
1/3 cup cold water
1/4 cup yoghurt whisked with a tablespoon of water (substitute for 1 egg - beaten)
1 tablespoon sugar
25 grams butter at room temperature

For  the cookie dough
1&1/3 cups all purpose flour
3/4 teaspoon baking powder
A large pinch of salt
60 grams butter, at room temperature
1/3 cup castor sugar
1/4 cup milk ( substituting for 1 large egg)
1/2 teaspoon vanilla extract
1 teaspoon lemon zest
Fine granulated sugar for dusting

Method:
You may do it by hand or in the food processor. Whisk together the flour, salt and yeast.
In another bowl, whisk the yoghurt (or the egg) and the water to combine well.
Add the liquid mixture to the flour mix. Knead gently (at low speed) until they come together, then increasing the speed of the mixer or using brisk hand kneading, until you have a somewhat stiff dough.
Add the sugar and knead well.
Add the butter and knead until you have it fully incorporated in the dough and the dough comes together smooth and elastic.
The dough shall have to be well kneaded for the gluten to develop.
Shape the dough in a round and place it in an oiled bowl, turning the dough in the oil to coat. Allow it to rise to double it's volume, for about an hour or some more.
Meanwhile, prepare the cookie dough.
Sieve the flour, salt and the baking powder together to combile well.
Cream the butter in a bowl to fluffy, add the sugar and cream until the sugar dissolves. When the colour changes to pale yellow/ white, add in the milk (or egg), in small quantities to make it soft and creamy. Add the vanilla extract and the lemon zest.
Add to the above, the flour mix in dividends and beat together until just combined.
Roll the dough in a cylindrical shape and cover with the cling wrap. Place it in refrigeration until required to use.
Shaping it thus will make it easier to roll in circular discs later.
once the bread dough has risen, take it out of the bowl and placing it on a lightly floured surface, deflate gently.
Divide this into eight portions and roll each into a ball shape, like dinner rolls.
Place these on a greased or parchment lined baking sheet. Keep the rest of the divided portions covered while you work on one, so that they do not dry.
Roll all of the eight portions in rounded ball shape.
Take the cookie dough out which by now will be more manageable.
Divide this dough into eight.
Place a plastic sheet and place one portion on it, cover with another plastic sheet and press the dough down into a circle. The dough should be reasonably thin, but not so thin that it may tear.
If the dough becomes soggy, place it in the refrigerator for a few more minutes. Roll all of it in discs.
Now, the bread portions will have risen just about a little. Taking care not to deflate, lift one of the ball to the work surface.
Bring one cookie circle out and cover the bread ball with the cookie dough. this shall cover the top fully and the sides too, leaving the bottom open.
Take the granulated sugar in a flat dish. Holding the bottom of the prepared bread ball, roll the top and sides in the sugar to coat it well.
Place this back in it's place in the baking sheet.
Repeat the procedure for the seven more bread balls and prepare them for baking.
Using a scrapper or the blunt side of a knife, cut through the top of the bread rolls, deep enough that the cuts do not disappear while the bread develops and bakes. Make cross hatch pattern on all of the dough rolls.
Pre-heat the oven to 180 degrees C.
Bake the Melon Pans for about 25 minutes until the tops of the read are just about brown. Too long in the oven, the bottom will burn.
Remove the baked melon pans from the oven, cool on wire racks.
Store these in an airtight container.
This recipe makes eight melon pans.


These are best served the day you have baked them. They do keep well for a day or two. Warm them a bit before serving and they are as good as freshly baked.
You might want to take a tour of all the melon pans that were done in March. It is just a cick away from here to Aparna's post where all of them have been added.


Sunday, May 11, 2014

Parangikottai paal koottu

I did not think it would be harder to get to the 'extras of routine' to fall in place once you have given it a break. While getting back to everyday life after nearly four months of whirlwind activities was necessary, to do more did not seem to happen. For instance, getting back to blogging;  I might happily  call it 'writer's block', which will be blatantly lying. It was not that I had anything more important or attention dividing task on hand; simply that I did not try. But here I am trying to get this blog back in action with a simple recipe.
In the past few weeks, we keep pressing our daughter for updates on her life in her new home. Through the conversations on many of the available sources, we discuss her cooking, other activities and add our inputs. It interests me that she is doing well on her own and wants to have more ideas with cooking certain vegetables and such. Thus I tell her, send her written recipes, through mails. During our last video chat, she told me that she purchased some squash, and wanted to use it. I suggested that she can use it in this koottu with milk. She insisted that I send her a mail. Instead, I hoped to make it at home, and share it here. I had a small pumpkin and this was an opportunity to use it up too.
The recipe is very simple and usually I go by eye-balling the ingredients as there aren't many. However, when I gave my daughter this, she told me that it might help if she knew near exact quantities while making it for the first time. So, I referred to the cookbook Samaiththu Paar by  S.Meenakshi Ammal, and reduced the recipe to suit my requirement. Slight alterations are deliberate to accommodate our taste.

Parangikottai Paal Koottu
(adapted from Samaiththu Paar volume 1 by S. Meenakshi Ammal)
Servings 2 to 3


Ingredients:
2 cups thinly sliced tender pumpkin pieces
1/3 cup milk

1/2 teaspoon rice flour (to mix with the milk)
1 tablespoon sugar
1 or 2 green chillis (according to heat level and taste)
Salt to taste


For tempering:
1 teaspoon cooking oil

1/2 teaspoon mustard seeds
1 green chilli 
1/2 teaspoon split urad dhal
fresh curry leaves


Method:
Cook the sliced pumpkin pieces adding sufficient water, slit green chilli and salt until soft, but not mushy.
If the water seems to be extra, drain a bit and add sugar. Cook for just about two minutes.
Dissolve the rice flour in the milk, and add this to the vegetable.
Stir the stewing vegetable and allow to boil for a few minutes.
Switch off the heat.
Heat the oil for tempering in a pan, add the mustard seeds. When they crackle add the urad dhal and green chilli. Toss until the dhal is golden.


Add this tempering to the stewed vegetable along with the curry leaves.
Serve as accompaniment with steamed rice and sambhar or rasam.
The milk can be partly replaced with coconut milk.
For a vegan version of the same, coconut milk will work well, only take care not to split this while boiling .


Thursday, April 24, 2014

Flaounes - Cypriot savoury Easter cheese pies - We Knead To Bake 16

The past few months have been very eventful for me and my family. We have been busy earlier and reeling in the aftermath of a special life milestone. And that has kept me away from my little space, which seems to have become five years old, however irregular I have been. Through the past year I have not paid much attention to this space. I might have even skipped updating my virtual space, to the point of abandoning, but for the bread baking group with Aparna's guidance and my family's support to keep doing it.
This month, keeping with the Easter tradition, Aparna chose flaounes.
Flaouna or Flaounes (for plural) is a special festive food, traditionally eaten by people in Cyprus during Easter. They are made and eaten as food to break the Lenten fast. Typically made on good Friday to be consumed on Easter Sunday, these are cheese filled pastries garnished with sesame seeds. The cheeses are typically those produced locally and such cheese used in flaounes baked elsewhere are known as flaouna cheese. It is difficult to find the local produce elsewhere and hence a few substitutes are made. The taste and filling are unique of every village on the island depending on the cheese; sometimes each family has their own recipe.
Some of the suggested substitutes include Kefalotyri, Kefalogravier or Kaskavali (Greek and Cypriot cheeses). However, English Cheddar, Halloumi, Parmesan, Pressato, Pecorino and French Cantal can also be used.
I do not get any of the above mentioned where I live and have only found few French cheeses being sold in the local super markets. Moreover, we are not very fond of cheeses. We suffice with the home made cottage cheese and processed cheese sold by popular brands. Also I have removed the eggs from the recipe and have not used mastic and mahleb. Thus, mine are not authentic flaounes, having been filled with very non-traditional cheese mix. I have baked them with some cheddar, paneer and have spiced the filling with chilli flakes and dried mint. Whether traditional or not, these pies were great to bake and consume.


Flaounes (Cypriot savoury Easter pies)

Adapted from The Traveller's Lunch Box
(http://www.travelerslunchbox.com/journal/2010/4/12/finding-flaounes.html)


Ingredients:
For the dough:
 2 & 1/2 cups all purpose flour
3/4 teaspoon instant yeast
3/4 teaspoon salt
1 & 1/2 teaspoon sugar
1/2 teaspoon mastic, ground in a mortar (optional) (it is a dried resin from a bush)
1/4 teaspoon ground mahleb (optional) (dried pits of a wild Mediterranean cherry)
1 egg ( substituted with 1/2 cup thin yoghurt)
1/4 cup milk
60 grams butter, melted and cooled
1/4 cup (or less) lukewarm water (as required)

Oil for greasing the bowl and rolling the dough

For the filling:
1 cup grated cheddar (sharp tasting cheddar adds flavour)
1/4 cup grated mozarella cheese ( I used some processed cheese sold in small packs)
1/3 cups of crumbled paneer
2 teaspoon all purpose flour
1/4 cup semolina
1 tablespoon dry mint
1/2 teaspoon crushed chilli flakes
1/8 cup raisins (optional) ( I have not used)
3/4 teaspoon baking powder
1 to 2 tablespoon milk

Sealing paste and garnish:
1 egg beaten (substituted with a paste made by combing 1 tablespoon flour with some milk, for sealing paste)
1/3 to 1/2 cup sesame seeds (not toasted)
A little amount of milk for brushing on top of shaped flaounes


Method:

Making the dough:
The dough can be kneaded either by hand or in a processor.
Place the flour, yeast, salt, sugar and the flavouring ingredients (if you have them on hand) in a bowl and mix.
Whisk together the egg (if using) or the yoghurt, milk and melted butter separately and then add this to the flour mix.
Knead the dough adding just sufficient water to achieve a soft, smooth and elastic dough. The dough should be just short of being sticky. Add water or flour accordingly and just as necessary. This is important to have the correct texture of the pies.
Apply oil on the inside of a bowl and place the dough in it after turning the dough over in the oil to coat well. Cover the bowl loosely and keep aside for about an hour for the dough to double in volume.
Deflate the dough when ready and place in a large container, cover loosely and refrigerate for about two hours. The dough will develop well in refrigeration, hence remember to use a large bowl.
The dough can stay in the refrigerator overnight also, in case you want to bake the pies in batches.

Making the filling:
While the dough is on the first rise, prepare the filling.
Mix the sealing paste and keep ready.
Mix the rest of the ingredients except the milk, in  a bowl by whisking with a fork.
Since the filling will have to wait for the dough to develop, keep this aside and add the milk only before using it.
The filling shall be somewhat moist and like a stiff paste rather than wet and sticky.

Shaping the flaounes and baking:
Divide the dough in 8 or 10 equal portions, depending on how big or small you want the flaounes.
Spread a little oil on the work surface and around your rolling pin.


Take a ball of dough and roll it to a 6" diameter circle. Keep the rest of the dough covered thus preventing it from drying.
Roll the dough somewhat thin so that the pies are not like thick breads, at the same time not too thin that it cannot hold the weight of the filling in the centre and tear.
Mix the milk to the filling and get it ready.
In a flat bowl or plate, spread generously the sesame seeds. Lift the rolled dough and place it on the seeds, gently pressing the dough to be coated with the sesame seeds.
Take it back to the work surface and place a generous tablespoon amount of filling in the centre.
Spread the filling by lightly pressing it, leaving about an inch thick dough exposed at the edges.
To make the traditional square shaped flaounes, bring two opposite edges over the filling, leaving the centre open. Bring the other two opposite edges in a similar fashion making a square packet with the filling showing in the middle.
Seal the edges well by pressing them down with the tines of a fork and using the paste.
For the triangular shapes bring three edges over the filling, leaving a large portion of  the filling open. Seal the edges in the same manner as above.
Place the shaped flaounes on a greased baking board or on parchment lined one. Place them about 3" apart. Allow the dough to rise for another forty minutes.
Pre heat the oven to 190 degrees centigrade.
Just before putting them in the oven, brush the dough portions with milk and bake them for about 25 minutes until they are golden brown and puffed at the centre filled portion.
Remove from the oven and cool on wire racks to come to room temperature.
These are best served warm.
The above recipe makes 8 to 10 flaounes.
I halved the recipe and made my flaounes slightly smaller to get 6 of which I shaped three each of the square and triangular ones.
The flaounes keep well in airtight containers for two days. I could not use up all the six and put the last two in the refrigerator for another day.
Just warm them for a minute before consuming.
You might want to watch this video showing the procedure slightly differently.
https://www.youtube.com/watch?v=M_dIFIF3pY0

Please stop by Aparna's post for more details on the tradition and for checking those baked by the other members.