Wednesday, August 19, 2015

Kunukku - Version 2

I had earlier shared two versions of  kunukku, or anything for the lack of another name. One was the adaimaavu kunukku made with extra left over adai batter. The other was my aunt's recipe with a powdered mix which can be made and stored to make kunukkus when required.
In my mother's notebook, she had two different versions of this easily favourite snack; my aunt had given her this second version with a soaked and ground batter also. This, unlike the powdered version gives a bit softer kunukku, more like a bonda or quite close to the adai maavu kunukku in texture.
The weather here has been unpredictable and most days are dull and grey. It rains once in a while bringing a torrent. On one such evening we planned to have this snack. I made the mint chutney and there was tomato hot and sweet sauce on hand. It is an unbeatable combination, especially on a rainy day when one craves for bajjis and bondas.

Kunukku with Soaked and Ground Batter


Ingredients:
Serves 4 (about 40 kunukkus)

2 cups parboiled/ idli rice
1/2 cup thuvar dhal/ split pigeon peas
1/4 cup +1/8 cup channa dhal/ Bengal gram
2 tablespoons grated fresh coconut
4-5 green chillis
2" piece ginger minced
1/4 teaspoon asafoetida powder
Few sprigs curry leaves
Salt to taste
Oil for deep frying
1 medium onion chopped finely (optional)


Method:
Wash the rice and dhals each separately,until clean, in a few changes of water.
Soak the rice for two hours and the dhals for an hour.
Drain the water and grind all of the soaked ingredients with chillis and coconut to a coarse batter thar is thick, neither stiff not runny.
To the batter, add the minced ginger, asafoetida powder and the salt. Mix them well.
Chop the curry leaves finely and add to the batter. If you are using onions, add them too to the batter.
Keep the batter aside for about three hours.
Heat the oil for frying in a deep rounded pan.
When the oil is hot, drop small portions of the batter using a ladle or by hand. Put in as many as the oil will hold, with space for the kunukkus to fry on all sides.


Once done well, remove from the oil with a slotted ladle to drain the oil. Transfer to absorbent paper towels.
Serve hot with any chutney of your choice. The mint chutney is a great combination when the weather outside is dull.

Friday, August 14, 2015

Spiced Carrots and Raisins Salad

I said earlier too that I like salads, in fact, I am very fond of them. However, I am not fond of those leafy vegetables in them. I am willing to try any salad that looks colourful and has some interesting dressing. I try making them in different combinations of vegetables, fruits, sprouts and nuts. Likewise, i have found that different dressings are very good too. If you like vegetables with a bit of raw crunch, the options are innumerable.
Around the time that my daughter was suggesting different salads, I found one carrot salad to which raisins were added and the dressing was simple ginger infused honey. That sounded like a good one to have for my mid morning snack.


I made the carrot salad, but, with more vegetables and toasted sesame seeds added. I made a dressing that gave the salad an extra texture with the mint yoghurt dressing along with the honey and ginger. That was one colourful and flavourful platter of vegetables and the toasted sesame added to the flavour.

Spiced Carrot and Raisins Salad

Serves 2
Ingredients:
For the salad:
2 Carrots julienned
2 tablespoons golden raisins (those have a slight sour taste)
8-10 cherry tomatoes halved
10 green grapes skin and seed  removed and halved
Few fresh basil leaves torn in bits
2 teaspoon toasted sesame seeds

For the dressing:
2 tablespoons thick yoghurt
1 teaspoon honey
1/4 teaspoon dry mint leaves crushed
1" piece ginger crushed
1/4 teaspoon ginger extract

Method:
For the dressing:
Whisk the yoghurt well with honey and ginger extract.
Add the crushed mint leaves and the ginger.

For the salad:
Assemble in a salad bowl the vegetables and the grapes, toss the raisins in.
Sprinkle the sesame seeds and drop the torn basil leaves.

Toss the dressing to incorporate.
Serve at room temperature or chilled.
No Croutons Required is an event that is hosted alternately by Lisa and Jacqueline every month. This August Edition is held at Tinned Tomatoes. My salad is being sent to the same.


Tuesday, August 11, 2015

A Learning Curve


One night as I was about to retire to bed, my daughter called and wanted to discuss a bread recipe that we had baked together and was blogged about. While suggesting to her to halve the recipe and talking about it, we both opened the blog on our respective machines and laughed out so loud looking at the picture of the bread - some odd angles, no “set up” so to speak and one loaf where the crust had torn off a bit. The recipe was from a well received blogger, so I am sure the bread must have turned out well and I confidently wrote a blog. Ah, if only the picture did justice!
 
For the next twenty minutes, we kept opening a few of my earlier posts and were commenting on the photographs and content. By God, what ever was I thinking! When I was aware that some people out there were taking great pictures even with their mobile devices, I had a good camera and just did not know how to handle it? I have been shooting in auto mode and still poorly focused photographs, over correction with picasa are all so evident. 


My daughter once set me benchmarks saying that she will accept and credit me if ever I show the quality as few other bloggers. She has not given her verdict yet and it is over three years. That is indication enough where I stand.
I had, without qualms, attached badly focused photos like this one.


Some wrong angles thinking it looked cool. In this picture all you see is a chunky slice of potato and not the bread. How would anyone make out if the bread had turned out soft as I had claimed?


The food is your hero in the picture, but there was nothing but the dish in many.


  In some pictures, the food looks like a small prop, and the furniture and the windows more important?

Speaking of props... oh dear, they were simply arranged to cover the frame. I did not realise that they were so distracting. 
Too much food in one frame, and a crammed post at that. Whoever would patiently read so many recipes?

I also realise, things do improve with patience and practice. If my picture is not to my satisfaction I thrash them, the recipe does not make its appearance until it has a picture worthy to share. I take help from those numerous photographs that appear on Pintest, Flickr and such sites. They help me look at my dish with someone else's perspective. I mentally tally my idea with what I see in those and then work. Attending the food photography workshop that Aparna conducted was a good idea. I see areas I need to improve. Last year's Indian Food Bloggers Meet in August had two sessions on photography. They taught me how to compose, what to focus, what to mute and more.
Looking back at these old pictures, my learning curve is quite evident to us. I still need improving and lack perfection, yet I keep clicking, discarding or sharing. Now, I am more aware of the quality of my photos, keeping a keener eye on tasteful framing, composition, light etc.
It takes just a little learning to get to near good pictures if not truly amazing. I learn a little bit every day with each blog post I read, and each set of photographs I look at. Looking back at old work was eye opening, to say the least and provided a good laugh for the day!
This is not a recipe post, but I needed to ramble off a bit and have a hearty laugh along with you.

Friday, August 7, 2015

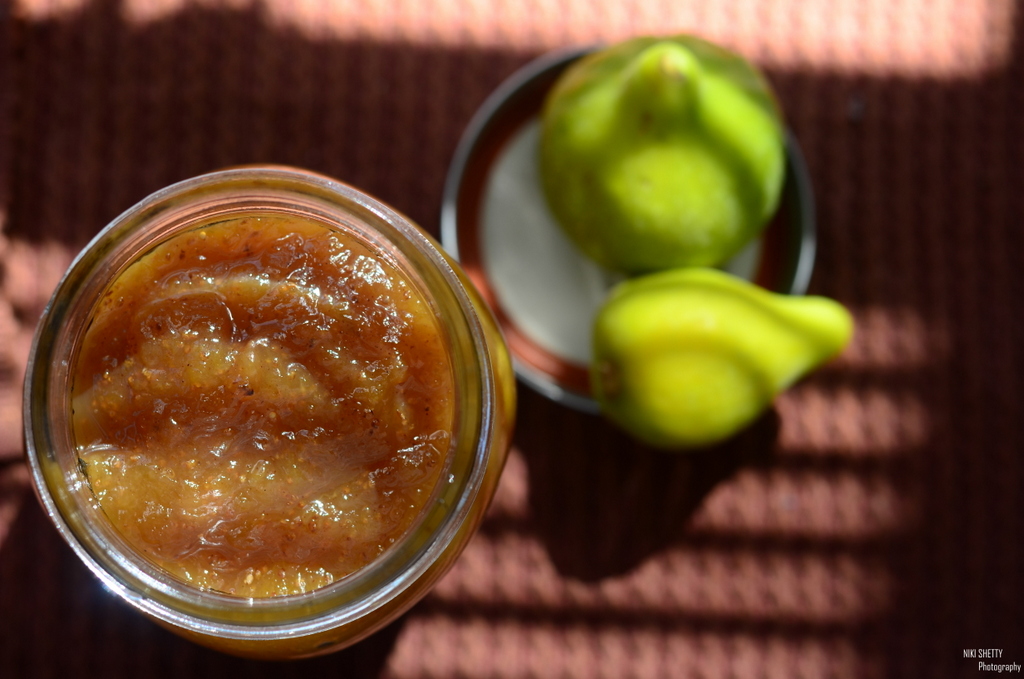
Fig Jam

My daughter has a small home garden that they tend with lot of care. They grow, in a small space, many rose plants, few vegetables according to the season and berries in their garden. The kitchen herbs are in small pots. They have cherries and figs all growing in small trees that may someday be really big and bear lot of fruits. She just sent me a picture of the lavender that she removed from the garden.


The fig tree is small yet there were many tiny figs that would be fruit by season. They were still raw when we left for home and have ripened recently.
She and her husband have been having smoothies and milk shakes with the fruits. She said she had just finished her lot of the strawberry jam and was looking to make some with the fresh figs. She sent me pictures and the recipe she followed and this post is about the jam she made with her homegrown figs.


I shall be excused for filling the post with more pictures than the recipe for I like the pictures she sent and do not know which of those to discard.

Fig Jam


(Recipe  and pictures from Niki, my daughter, given as received in my mail)
Ingredients:
20 medium sized figs
3/4 cup powdered jaggery
couple of pinches cinnamon
1 tsp lemon juice
1 tbsp butter

Method:
- Prepare a 1 pint jar for canning. Put it in hot water and keep warm.
- Put a ceramic plate in the freezer so that you might try the plate test when the jam is ready.
- Rinse and dry the figs.
- Slice the tops off and remove the peels. The peels give away a bitter taste unlike real ripe fruits we get in the market. If you may, go ahead and use the peel too.


- Pulp the figs (I just did this by mushing them with my hands) to a mush.
- Put them in a heavy bottom pan or a dutch oven and cook them on a medium flame for about 5 to 6 minutes with the lemon juice. 
- Add the jaggery all in one go, and the cinnamon and stir it in.
- Once the jaggery has dissolved, keep cooking till the jam comes together and plates well (about 40 minutes).
- Put the butter in and give it a quick stir.
- Pour the jam into already prepared/sterilized jar and let cool.

Yields 1 pint
She said that the jam had more sweetness and the hint of cinnamon was remarkably good. She felt that she did not taste the fig so much as she would like. Still, she said, the jam tasted good and was of nice spreadable consistency.

Tuesday, August 4, 2015

Beetroot Pesarattu

Normally I plan ahead the menu for the next day, and the next too. There is always a fall back plan, just in case. We cannot have simple cereals for breakfast and get on with the day. My husband needs something hot for his breakfast. Once a neighbour told me that she keeps idli/ dosai batter in her fridge and feels like she has enough savings in a bank account. I am not one who regularly grinds for and stock some batter too. That said, I keep wondering what other than a quickly put together upma to make. Despite all the planning and contingency plans, I end up waking up some morningss wondering what I might put on the table.
One such morning, I randomly pulled out my jar of mung lentils and washed and soaked with the idea of a pesarattu. I prefer the whole green gram pesarattu to the ones made with the husk removed dhal. However, that morning was quite a lazy start. So, it was the dhal washed and soaked. While the dhal was soaking, I had this sudden idea to add some vegetables in the dosai. The regular onions or greens were not appealing that day. Then I spotted a lone beetroot in my refrigerator. I quickly peeled and scraped the vegetable and boiled as whole until it was soft enough to grind along. Automatically more chillis and some ginger were put to grind too. The batter was ready in minutes and gave it about 30 minutes and made the dosais. Even with the regular batter, my husband prefers the soft dosai to the crisp ones. So this was a perfectly soft pesarattu with a nice pink colour. It went very well with some pickle,  sambhar and milagai podi.


Beetroot Pesarattu
Ingredients:
Makes 6 medium size pesarattus
1 cup (heaped) green gram/ mung dhal
1 medium beetroot
3 green chillis
2 dry red chillis
1/2 " piece ginger
Salt to taste
Oil for drizzling


Method:
Wash and soak the dhal along with the red and green chillis for about 20 minutes.
Peel the beetroot off its skin and boil in some water just until about soft.
Retain this water for grinding the batter.
Cut the boiled beetroot in small pieces that your grinder jar would grind without stress of load.
Drain the soaked dhal and grind all the ingredients other than the oil, to a batter that is not very smooth. Mix well.
Heat the skillet, add a few drops of oil and wipe the surface so the oil oil slightly.
Pour the batter and shape into a circular pesarattu. Drizzle more oil around the sides.


Cook for a few minutes until the side has been done well. Flip to the other side and cook. Remove from the skillet and serve hot with desired accompaniments.
Susan - The Well Seasoned Cook's My Legume Love Affair event is now being managed by Lisa as the main hostess. This month is the Edition 86 of the same event and it is being hosted by Shaheen of Allotment 2 Kitchen. This recipe, I would like to send, for the same.

Saturday, August 1, 2015

Ajwaini Aloo Mirch - With Love from Mother

Potatoes are a sure favourite vegetable; but, I do not cook them so often as my husband might like them to be. He would go 7 days a week, 365 days a year on potatoes. Moreover, I think potatoes are such versatile vegetable that anyone will cook no fail recipes with potatoes. I do not share many potato recipes for the simple reason that I may not be making them any differently, worthy to make a post.
This recipe is an exception to my above idea. The other day Niv had shared a photograph of a diary, her late mother had maintained, to write down recipes that might be of interest to her daughter. It was a touching gesture that her aunt and uncle had saved that over these years and handed it to her recently. The diary, Niv says, was a sort of record that her mother maintained when she was too weak to cook. She had copied recipes from everywhere, magazines, television and cookbooks that may interest her daughter.

Picture used with permission from Nivedita -Her mother's recipe diary.

The said photograph had an open page that had part of one recipe and only the list of ingredients of another. There was a tiny note above the list mentioning that it is a dry curry strongly flavoured with carom seeds. It caught my attention as I happened to have on hand all of the ingredients listed there. I had to just roughly work the procedure to make it a dish. I tried it on the same evening and made a mental note of the changes that I would make. Later again for lunch, while I made a single pot dish, this curry was made, this time with my take on it.

      
We liked the flavour of the carom seeds and the crunch from the part cooked bell peppers. Since I did not add garlic and also omitted the tomato ketchup, I added two green chillis and some chilli powder. It was a winner recipe with the potatoes absorbing the flavours and the tomatoes cooked until just about coating the potatoes. It is a must try recipe and a keeper at that.

Ajwaini Aloo Mirch - A Dry Curry
(Adapted from Niv's Mother's Diary)


Ingredients:
Serves 3
2 large potatoes
3 green bell peppers/ capsicums
2 tablespoons oil
1 teaspoon carom seeds/ ajwain
5-6 cloves garlic (optional)
1 teaspoon finely chopped ginger
3 tomatoes/ about 250 grams - grind to a puree
1/4 teaspoon turmeric powder
2 teaspoon coriander powder
1/2 teaspoon red chilli powder
2 slit green chillis (not in the above list found in the picture)
1/2 teaspoon garam masala
1 tablespoon tomato ketchup (optional; I have omitted)
Salt to taste
Fresh, chopped coriander leaves for garnish

Method:
Dice potatoes in slightly big chunks. Boil until you may be able to remove the peel. Toss the potatoes in some salt. Keep aside.
Cut the bell peppers in medium large pieces.
Puree the tomatoes and add to this the coriander powder, turmeric powder and garam masala powder.


Heat oil in a skillet and add the carom seeds. Then add the minced ginger and slit green chillis.
Drop the green peppers and toss them in oil for a few minutes. Do not over cook them so as to loose the crunch.
Add the potatoes and cook further so the carom seeds are coating the potatoes.
Pour the tomato puree in and adjust the salt to desired level. Cook the curry until the tomato puree has coated a dry layer over the vegetables.
I have not used garlic in this recipe. If you like to, you may add it along the chillis and ginger and toss them in oil. If using tomato ketchup, add it along with the puree and cook until almost dry.
Enjoy this as a side dish for rotis and phulkas.
I made a rice dish with chick peas masala and served this curry as a dry side dish for the same.


The above recipe makes a sumptuous serving for two and an extra serving for the potato loving man.


Wednesday, July 29, 2015

Paruppu Podi

It is rare that you do not find a small bottle with some 'podi', to mix with hot steamed rice, in my pantry. Hot rice, a generous spoonful of ghee or gingelly oil and to mix with it a 'podi', can be a 'go to comfort food' for me. 'Podi' is a powdered and spiced mix of dhals or other varieties. I stock up on thengai podi, sambharapuli, dry coriander powder, curry leaves powder regularly. My husband's favourite is though the simple paruppu podi.
Paruppu podi is an awesome mix needing just three or four ingredients other than salt, a roasting of ingredients for few minutes and grinding them down to a powder, is all the labour required
. I have read some recipes that use roasted gram along with the staple thuvaram paruppu/ thur dhal, while there can be an added flavour by adding garlic also. What I make is a simple version with just three ingredients and salt. While I like to eat my rice just with the podi and ghee, my husband likes to add some 'rasam' to moisten the otherwise dry dish. This podi has quite a shelf life and can be stored at room temperature. This is one easy spice mix to make and store.
Paruppu Podi


Yield: 150 grams of powder
Ingredients:
2/3 cup split pigeon peas/ thur dhal/ thuvaram paruppu
2 teaspoons whole black peppercorns
6-8 dry red chillis
1&1/2 teaspoon sea salt (Adjust as required or if using table salt)


 Method:
Dry roast on a medium flame the dhal until it is aromatic and slightly brown. Transfer to the grinding jar and allow to come to room temperature.
Dry roast the chillis until brittle and pepper to heat.
Also roast the salt until very warm to touch.
Add all of the roasted ingredients to the roasted dhal. Take it in a blender or spice mixer and grind to a somewhat smooth powder. It shall not be finely powdered, a little coarse texture is good.
 
Transfer to a storing bottle or jar.
Use as required.
Serve with hot rice and some ghee or gingelly oil.
My Legume Love Affair, the original idea initiated by Susan is now being taken on and hosted by Lisa. This 85th Edition of the same event is hosted by Jagruthi. I would love to send this to the same.