Showing posts with label Sides. Show all posts

Wednesday, June 20, 2018

Moar Canerik Oorugai - Canerik Fruit Pickle

By the beginning of this year, Aparna initiated the 52 WEEKS OF FOOD PHOTOGRAPHY 2018 group on Facebook to have interactive discussions on food photography. Members of the group post pictures under a given theme every week and share it on their social media networking spaces, blog, Instagram and such. I joined the group sometime later and keep sharing my pictures too for weekly themes. One such theme was SEASONAL FRUIT/VEGETABLE. It was around the beginning of summer season, so we had a variety of spring - summer produce to photograph.
On one of my weekly runs to the supermarket here, I found on their refrigerated vegetable aisle, small boxes of a very green fruit. The label read JANEREK. I did not know what the fruit was and quickly clicked a picture of the fruit and label with the phone to look it up later at home. I found that they were Canerik fruits, particularly short seasonal fruits. There was an informative blog post about the fruit that tempted me to purchase a box from the market.


It was very interesting to know that they were a special kind of plum, green in colour and is a native of Asia Minor region. My friend Niv found that they are also called greengage plums. They had a tart taste and were consumed dipping the erik in salt in Turkey, very similar to the Indian gooseberry. They had a firm texture and a brighter green colour, with a plum like seed within. The taste was so similar to the gooseberry and left a cool after feel when you drank some water soon after eating the fruit.
Having bought the fruit that was so sharp in taste that you felt a shock running along the upper jaw right up to your ears, I was left to look for ways to use them. I was discussing this with my mother and she suggested that I could make canerik rice, just like amla rice or lemon rice. That gave me the idea of  making a pickle with the fruit.
When it comes to pickles, my selection is very limited and one of the pickles I really enjoy is the nellikkai oorugai, the Indian gooseberry pickle. One particular way of pickling is to cook the gooseberry to just about soft and add it to curds with other condiments. This way the pickle needs just a day or two for curing. It does not have a long shelf life and has to be finished quickly. So it is always made in small batches unlike the whole amla in brine and the thokku.
I made the rice as suggested by my mother and made this pickle too. I went back to purchase another lot just to make yet another batch soon after I had finished, lest the fruit goes off season.

Moar Canerik Oorugai - you will wonder if it is thayir nellikkai oorugai :)


Ingredients:
(Makes a small batch about 150 grams pickle)
15 Canerik fruits
1/2 cup curd whisked well
3 green chillis
2 tablespoons gingelly oil
1 teaspoon mustard seeds
Salt to taste (I use coarse Himalayan pink salt)

Method:
Wash the canerik fruits well and pat them dry. Let them dry on a spread cloth for a few minutes.
Chop each fruit roughly, leaving the seeds attached to some of the pieces.
Wash, dry and chop the green chillis.
Whisk the curd well and smooth. Keep aside.
Heat the oil in a pan and add the mustard seeds. Once they crackle, add the green chillis and saute them for a while.
Add the salt and the cut fruit pieces. Cook until the fruit is just about soft. When you try to press hard between your fingers, you should feel some resistance before the fruit breaks. Do not cook it to a mush.
Allow this to cool well.
Add the whisked curds to the cooled fruit and chilli mixture and mix well.
Transfer to a clean glass or ceramic bowl or bottle.
Allow a day for the flavours to blend and the pickle is ready.


This pairs well with curd rice.
Try to consume the pickle within a week or can go up to another two days. If the curd gets consumed, you can top it with some more whisked curds to the pickle.

Monday, June 11, 2018

Poondu Mandi Kuzhambu - Spicy Garlic Gravy

On our recent visit to our daughter, we chanced to have lunch in an Indian restaurant that listed many Chettinad type of dishes in their menu. While we all ordered, the staff who served tried to detail to us about their dishes. I had then wanted to try their Poondu Kuzhambu that he suggested to have with steamed rice. That tasted very good and they willingly adjusted the spice level to our liking. Their serving portion was quite large and we packed the same with us.
This was a unique preparation that uses charred tomatoes as base and the water we usually discard after rinsing rice, the 'mandi' or 'kazhuneer' (as in rinsed starchy residue from cleaning rice) to tcook the gravy.
We liked it so much that we wanted to try making the same at home. I checked with a few friends who are from Chettinad, for the recipe. One of them guided me to a blog that had authentic Chettinad style poondu kuzhambu, but it was not the same. I found a video of the preparation, which was nearly the same; it had shallots in the recipe, which was not in the dish we had tasted. I then formulated my own recipe for the kuzhambu and tried to replicate the dish that we had tasted in the restaurant. I share that here today. This may not be an authentic recipe from the region, but a delicious dish, nonetheless.


Mandi is the residual water while rinsing and cleaning rice. Give one brisk rinse in the first round, not removing much starch away. Wash your second and third rinses thoroughly getting as much starch residue as possible. You need to collect this rinse in a bowl. The residue of rice starch will settle on the bottom of the bowl. You may not need all of the water. Carefully, strain some liquid without pouring away the 'mandi’. I will refer to this liquid (kazhuneer) as mandi in the recipe.

Poondu Mandi Kuzhambu


Ingredients:
(makes 400 ml medium thick kuzhambu/ served us 4 good servings)

15 cloves of garlic
3  medium tomatoes
(if possible, char the tomatoes over a low flame and remove the charred skin. Not compulsory, but the taste is enhanced. I used the roti jali as mine had small perforations) (otherwise sauté the tomatoes in a pan to a coarse pulp)
1 medium red onion sliced finely
1 &1/2 cup +1/4 cup mandi (divided)*
2 tablespoons gingelley oil / nallennai
1/2 tablespoon coriander powder
1/8 teaspoon turmeric powder
2 tablespoons raw peanuts (optional and you may replace by cooked chick peas)
Salt to taste

Grinding spices:
Soak in the *1/4 cup mandi the following for 10 minutes and then grind to a paste using the mandi (you may use some more from the 1&1/2 cups, if needed)
4 cloves garlic
4-5 dry red chillis (depending on heat of the chillis) (the kuzhambu is a slightly spicy dish)
1 small gooseberry size tamarind ( if the tomatoes are too sweet, up this a little)

While grinding, half way through, add the coriander powder and the tomatoes. Grind them to a smooth, thick liquid pulp. Keep aside.

Tempering:
 1/2 teaspoon cumin seeds and curry leaves ; no mustard seeds are added
(since the cumin seeds are added in the beginning, it does not require extra oil)
Method:
Heat the oil in a heavy bottom pan. Add the cumin seeds. Toss a bit and add the cloves of garlic and sliced red onion. Sauté until onions are  transparent.
Add the peanuts (or chick peas)
Stir the mandi to mix the sedimented rice starch to a uniform liquid.
Add salt , turmeric powder and 1 cup of the mandi, cover and cook until the garlic are soft.
Add the ground pulpy mixture, adjust the liquid by adding some more mandi.
Simmer the kuzhambu for about 15 minutes so the raw taste of garlic, tamarind and red chillis in the liquid subside. 
Add the rest of the mandi and cook further  until the kuzhambu has thickened.


Add the curry leaves and chopped fresh coriander leaves to garnish.
Serve with hot steamed rice or as a side dish for Dosais and Idlis. This kuzhambu can be kept over and had for another day also. If refrigerated it can be kept for up to three days. To reheat, you may add some more of the rice rinsed water or plain water which will thin the consistency a bit.

Friday, May 18, 2018

Vegetable Shikampuri Kebabs

Few days ago, Aparna had shared in her Instagram feed a picture of few of her cookbooks. She had mentioned that Sheetal bhatt at Route to roots blog had initiated the idea of a virtual food enthusiasts group to cook dishes from our respective collection of cookbooks and share the pictures/ recipes where desired. 
Most of us like to buy cookbooks, but hardly use them regularly. We might cook a few recipes every once in a while and then slowly put the book away and let it gather dust. 
This virtual group will now bring those out and cook dishes twice a month, based on given themes. we would share the picture of the dish in our Instagram feeds with a hash tag 'thecookbookcollective'. We may share them across other social network media also. We might share some of those recipes in our blog also.
The theme for the first dish was 'Regional'. I chose to make Shikampuri Kebabs that are famous in Hyderabad Mughal cuisine. These are rich and delicious with a filling of tender meat or equivalent vegetarian mix. The name literally means 'filled in the middle' as in 'tummy full'.
During one of my stay at The Gateway Hotel, Bengaluru, I found the book titled 'Vegetarian Fare at the Taj' that has so many vegetarian dishes that are cooked in the kitchens of the Taj group hotels across India. The management were generous to let me have that book. 
I had this recipe from that book; this was shared by the executive chef of Taj Krishna, Hyderabad.
The same book has another recipe from the Taj  Falaknuma Palace, Hyderabad that replaces potatoes with Elephant Yam and lentils.
I gave this recipe to my daughter as she had mostly all the ingredients with her. She decided to add lot of young beetroots and made a very pleasantly pink kebabs. 
 
I am giving approximate measures for the outer cover vegetables. I used potatoes, beans and carrots. Because ultimately all vegetables are going to get mashed, you can add any more different vegetables that will not taste off.
I used two large potatoes, boiled until soft and grated. The yield of potatoes was 2 loosely packed cups.
 
Vegetable Shikampuri Kebabs 


Ingredients: 
Makes 8 kebabs
For the outer cover:
2 cups boiled and grated potatoes
1 cup boiled carrots (cut in very tiny bits and heaped cupful of raw carrots)
1 cup boiled beans (same as carrots)
Just about enough bread crumbs to bind the vegetables in a dough like texture.
1&1/2 teaspoon red chilli powder
1/4 teaspoon turmeric powder
1 blade of mace
3 green cardamoms
2 teaspoons caraway seeds/ ajwain
1 tablespoon chopped mint leaves
1 tablespoon chopped coriander leaves
Salt to taste
Oil for shallow frying/ deep frying. (The book has a deep fried version, I used the airfryer by basting a little ghee all around each kebab before placing in the fryer.) (My daughter shallow fried the kebabs and said they tasted good)
 
For the filling
1/3 cup khoya (I boiled 500 millilitres of milk down to get this quantity)
1/2 cup crumbled paneer
1 &1/2 teaspoon oil
1 medium red onion sliced very finely
1 green chilli finely chopped
1/2 teaspoon white pepper powder
1 teaspoon chopped mint leaves
1 teaspoon chopped coriander leaves
A pinch of salt
1/4 teaspoon sugar

Method:
 
Prepare the filling:
Heat oil in a pan.
Add the onions and green chillis. Saute until the onions are transparent.
Add the paneer and khoys and cook until they are soft and pink.
Add salt, sugar and white pepper powder. Toss to mix and turn the heat off.
Drop the chopped fresh leaves and mix.
Allow to cool and divide in 8 small portions rolled in balls.
If the quantity of the filling might feel more for 8 kebabs. You may store them and use in other dishes.

Prepare the vegetable kebabs:
Crush the mace, cardamom and caraway seeds to a fine powder. This is a very aromatic spice powder mix
Mash the carrots and beans ( other boiled vegetables if you are using ) to a pulp with only few bits left to show.
Add the grated potatoes, turmeric powder, red chilli powder, salt and prepared spice powder of cardamom, mace and caraway seeds.
Knead them together to a dough like mass. Add the bread crumbs and knead to a smooth dough. 
Take a small portion and roll and pat to a disc to test if the dough is not cracking. Add little more bread crumbs if needed.
Divide into 8 portions, roll them in smooth balls.
Use little oil or ghee to grease your palms and pat one dough ball in a discs, place one portion of filling, gather the ends and cover the filling with the vegetable dough.
Flatten it slightly to a round disc, like kebabs of uniform thickness of about 1 cm.
 
Repeat with the rest of vegetable dough and filling.
Heat oil in a pan and when hot place the kebabs as many will hold in the pan, not too close to each other.
Cook the kebabs well until crisp and golden all over. Remove from the pan. Transfer to a serving dish.
Repeat with all the kebabs.
While the book has a directions to deep fry the kebabs, I chose to do them in my airfryer and my daughter opted to shallow fry in a pan. Both turned out excellent. So how you want to have them cooked has these options.
 

For my airfryer version, I used a few drops of ghee over each kebab brushing it all over. I cooked them for 10 minutes at 180 degrees C and for a further 2 minutes after flipping them over.
Serve them hot with salad and green chutney or tomato sauce.
If you are planning to do them in more numbers, you may make ahead the kebabs, refrigerate them and fry them at your convenience. My daughter had made the quantity for 8 kebabs, but used only four on the first try. She refrigerated the uncooked kebabs and used them the next day.

Thursday, March 22, 2018

Chinna Vengayam Pulikaichchal

Few days ago I picked up a big bunch of shallots, yes you heard it right, bunch - because the vendors gather them with lot of their dried stem roots still attached to the bulb and make a bunch. That is how they are sold in the local markets here. The shallots made a very colourful subject to photograph. I had just then got a wood carving man to make me a small container of sorts with a piece of broken tree branch. They both made a vibrant combination in the picture.


I shared the same on my Instagram feed and many suggestions were there to use them in delicious dishes. I cooked them in a few and was left with a rather large batch that I cannot finish before leaving for my holiday. I ended up making this pulikaichchal that is more preserve like and would stay fresh for days if refrigerated. It was reminded of this by my sister, who does not like and will not have onions and garlic; she would smell it however much we mask the taste.
My father's clients would bring produce from their farms and crops like groundnuts, tapioca and shallots used to be brought soon as they have been harvested. They will still be wet and soil soaked and fresh. My mother would then simply spread them on a newspaper in the corner of a room and use them in batches. She cleaned them as and when she was cooking them. She would often make this dish because it works well as a side for dosais, idlies, pongal and also rice. Painful as it may seem to peel and cut those fresh pungent shallots, the taste of the dish makes it all worth the effort.
When we did not have a refrigerator also, this dish used to keep good for days together, provided we are not careless in the use of utensils and serving spoons. Cooking it in some stoneware utensil will add to the flavour and one might simply store in the same too. I have, with me here, a very heavy bottomed stainless steel pan that is ideal to cook on even heat and slow cooking happens easily.


Chinna Vengayam Pulikaichchal 


Ingredients:
Makes 300 ml of pulikaichchal

200 grams of shallots/ Madras onions/chinna vengayam
2&1/2 tablespoons tightly packed tamarind bits
1/2 teaspoon turmeric powder
1/4 teaspoon asafoetida powder (or a 1/2 centimeter square of asafoetida dissolved in little water)
1 heaped tablespoon coarse crystal salt (I use pink Himalayan salt) (adjust to taste)

1/4 cup gingelly oil (divided - to saute the onions and for cooking)

For the spice powder:
7-8 dry red chillis (adjusting to the level of heat tolerance and the heat of chillis)
(+3 Kashmiri chillis for the colour, because my red chillis are very brown)
3 &1/2 teaspoons coriander seeds
1 teaspoon channa dhal
2 teaspoons sesame seeds (white or black, cleaned)

For the tempering: 
1 teaspoon gingelly oil
2 teaspoons mustard seeds
1 teaspoon channa dhal
1 teaspoon urad dhal
2 dry red chillis broken in small bits
15 curry leaves washed clean


Method:
Soak the tamarind in water for about 20 minutes and extract the pulp. I repeat the process to extract all the pulp and the last batch of water does not even get the colour.
Dry roast the ingredients given for the spice powder, each separately and on low heat so they are evenly done. Cool them and make a coarse powder. Keep aside.
Peel the shallots and cut them in small pieces.
Heat a few spoons of the gingelly oil and add the onions. Saute them until they are translucent, not very brown.
Add the tamarind extract, turmeric powder and salt. Top up the water just a little more and cook on low heat, to remove the raw taste of tamarind.

When this is simmering, heat the oil for tempering in another pan and add the ingredients listed under there. Once the mustard seeds have crackled and the dhals are golden, transfer this to the simmering mix.
Add the rest of the oil and the spice powder.
Cook for some more minutes blending them well.
Allow it to simmer and the oil will separate forming a layer over the pulikaichchal.
Remove from the stove and let it cool.


Transfer to clean glass bottles or bowls with lids for storing.
Serve as a side dish with dosais, idlis, pidi kozukkattais and arisi upma. You can mix with steamed hot rice and eat as a dish by itself too.


Monday, July 24, 2017

Pachchai Milagai Elumichchai Chutney

When we intended to have a garden in our home in Coimbatore, we arranged with a landscape outfit to help us. Once we had put some plants and a small vegetable patch, we were enjoying some home grown beans, greens and few other vegetables. Soon we moved to a project in Qatar and hence hired a gardener to take care of the garden. Just before leaving home, while emptying stuff I dropped some chilli seeds from the pack of dry red chillis I had, in a small patch. Those have grown and were yielding when I visited last month. I plucked out about half of a kilo of green chillis.


After sharing some, I wanted to bring them and use here.
I shared some pictures on Instagram and took suggestions from friends on many ways to use them. Pickles seem to be a favourite. I made the milagai gojju and some pachchai milagai chutney.
While I spoke to my mother, she gave me this simple recipe for a chutney that did not need a curing period more than a couple of days. She suggested that if I had some limes in brine, they can be used for immediate use. Otherwise, it takes about three days when the lime pieces absorb the flavours and the chutney can be used.
This is a very simple recipe that can be combined in few minutes.

Pachchai Milagai Elumichchai Chutney
Makes about 150 ml


Ingredients:
30-35 fresh green chillis
6 small size limes
1/3 tablespoon salt (to be adjusted according to heat of the chillis)
1 teaspoon sugar

Method:
Wash the chillis and dry them on a towel. Remove their stalks.
Cut the limes and partly squeeze their juice into a bowl. Add the sugar and keep aside.
Cut the limes in small bits and mix the salt.
Blend the chillis in a blender to a smooth paste using the lime juice.
Transfer to the bowl and add the lime pieces to this.
Mix well and store in a clean glass or ceramic jar.
Keep the chutney at room temperature for a few days, giving it a stir twice or thrice a day.
In a couple of days, the lime bits will soften and lose any bitter taste.
The chutney is ready to serve.


This stays well at room temperature for about a week, in refrigeration for a month.
This can be served as pickle with rice or as chutneys with idli, dosai and such.

Notes:
If you have available some lime/lemon that has been cured in salt, you may substitute them for the lime bits. Thus, the chutney can be enjoyed immediately.
The heat and humidity in my country is high this summer that the chutney was fermenting by the fourth day even as the limes were still crunchy. I had to refrigerate the chutney then.


Sunday, July 9, 2017

Sundaikkai Gothsu - Turkey Berries and Onions Stew

It had been many years ago that I may have last tasted some of the vegetables that we had often been given in our childhood and until little older too. Most times greens, spinach and few other vegetables were grown in the home garden. Some yielded abundantly and my grandmother would share with the neighbours. They encouraged us to help around; we have helped making trellis for the beans and spinach, water the plants and such.The home patch yielded few varieties of vegetables that were locally easy to grow and many flowers. It now seems like ages ago and I had lost touch with such pleasures. Once we had a huge turkey berry plant and I remember that my mother cooked the berries in a stir fry kind of dish with lot of coconut and condiments.
When we set our house in Coimbatore, we laboured a bit and have a garden to show. The area has fertile soil and hence the garden thrives. few of the neighbours have fruit trees and flowering plants all in their glory. One of them has the turkey berry planted nearer to their front wall and thus as we pass by we get to see bunches of them in the plant. They have generously shared those with any of us who would cook them.
During the few months, I slowly settled in, the neighbours have pampered me to the point of being spoilt. Sometimes, most unexpectedly, someone would send me piping hot food just so I can cook only rice and such. That was when one of them sent me this tangy and spicy stew. It was lip smacking, finger licking delicious.
You might well imagine my delight when the other evening I spotted in the shop assistant's trolley these small packs of these berries labelled green eggplant. I read up later that these are the same family.


I picked up one pack and soon as I reached home, I shot a message to the lady to share her recipe. She promptly messaged the next morning and I waited for today to cook them.
I was chatting with my mother and gave her the small details in the recipe. she then informed me that her grandmother would cook the berries in similar dish adding her touch. That has to be another day and post to share that.

Sunadaikkai Gothsu
Recipe: Mrs. Padma Balu, my neighbour 


Ingredients:
Serves 4

1 cup / 250 ml Turkey berries/ Sundaikkai
1 cup finely chopped onions
6 tablespoons thick tamarind extract
Salt to taste
1/2 teaspoon turmeric powder
2 tablespoons coriander seeds
1 teaspoon cumin seeds
6-8 dry red chillis
4 tablespoons fresh coconut scrapes
1&1/2 teaspoon powdered jaggery
1&1/2 teaspoon white sesame seeds
3 tablespoons gingelley oil or any cooking oil (divided)
2 teaspoons mustard seeds
Few fresh curry leaves
Coriander leaves ( I did not have any, so had not added)

Method:
Wash the turkey berries, place them in a plastic bag and give a few vigorous taps with a rolling pin. Alternately, place them in a stone mortar and crush the berries. they will break open and few seeds will be strewn. transfer the berries to a colander and clean wash the seeds away under running water.
In a heavy pan, dry roast the sesame seeds until golden brown and they start to pop. Cool and make a fine powder. Keep aside.
In the same pan dry roast the red chillis, cumin and coriander seeds until well roasted.
Add this to the coconut and grind to a slightly coarse paste. Keep aside.


Keep reserve about 2 teaspoons of the oil for the tempering. Add the rest of the oil to the cooking pan and heat. When the oil is hot, add the sliced onions and the berries. Cook them until the onions are transparent and the berries change to a pale green colour. Add the salt and turmeric powder and cook a bit longer.

Add the tamarind extract and cook on low flame until the raw taste of the tamarind subsides.
Add the jaggery and let it cook fora further 3 minutes.
Dilute the ground paste with some water and add to the stew.
Mix well, adjust the water and cook until a thick gravy is obtained.
Transfer to a serving dish.
To temper heat the reserved 2 teaspoons oil, add the mustard seeds and allow them to crackle. Toss the curry leaves and add the tempering to the gothsu.

 
Sprinkle the roasted sesame powder on top. This enhances the flavour.
Garnish with curry leaves and coriander leaves if you have  them.
serve the hot gothsu with steamed rice. It makes a good side for adai and venpongal also.


Monday, May 1, 2017

Maa Inji Oorugai - Pickled Mango Ginger

One can put it very generally that Indians love pickles, no matter which part of India one is from and this may be true also. With seasonal produces and a combination of spice blends pickles seem to form an essential part of a meal. They can be had with any dish if one chooses so.While I do not recall my mother going on a pickle curing ritual, I know my aunt does, each year after one. As I type this, I am wondering if she has already done with her vadu mangai, avakkai oorugai for this summer. If mangoes are for summer winter brings a whole variety of other produce. Though nowadays pickles can be picked up from any store, home made pickles have their charm.
I have a vague memory of walking down the streets in the evening with my uncle in Trichy to pick up tender Makali Kizhangu, which it is famous for. There would be vendors who spread their ware over neatly placed gunny bags in mounds. the light from a petromax lamp will light these mounds in a warm glow. In the later years while the scene has only slightly changed, I have been enchanted with the trade in Mylapore market in Chennai.
My mother always made the elumichchangai oorugai, Indian lime pickle at home. When on rare occasions we did get good quality gooseberries they were also done. Otherwise we had those 'ready to use immediately' manga oorugai mostly. Very rarely did we get the manga inji in our town and whenever we did, my mother treated it as a rare find. She would scrape the peel with the blunt edge of a small plate so carefully that the fleshy immediate part will not be wasted. She was disappointed once when I used a peeler and shaved off a bit of the ginger along with the peel.
Between my husband and myself, we are not keen on pickle. If we can put it on a scale I would fare under 4 and his would go in the negative. I keep stock of one tiny bottle purely not to disappoint someone who would like to have with their meal. However, I may have been dreaming pickle when I spotted fresh manga inji in the store the other day. I picked up some and the fresh peppercorns. Now they have been pickled, though in quantity they will last a week. Thus, they are not made with utmost care to last over many days. This is almost for instant use.
Mango ginger, is a part of the ginger family and related to turmeric.The rhizomes are similar to ginger and these have a milder mango like taste. they have some medicinal properties as is common with herbs. These can be made in a variety of pickles. The pickle i have put here today can stay good for a week at its maximum and needs refrigeration.

Maa Inji Oorugai - Pickled Mango Ginger


Ingredients:
Makes 2 cups

A dozen mango ginger rhizomes of 2" length each
1 &1/2 teaspoon crystal sea salt
1/4 teaspoon turmeric powder
1 tablespoon lime juice/ juice from one large lime
1/2 teaspoon asafoetida
1 &1/2 tablespoons gingelly oil
1 teaspoon mustard seeds

Method:
Wash the mango ginger clean. Remove the peel. If the ginger is tender, I have been able to just slide my hand over giving some pressure and it peels off.
Cut thin slices and place them in a glass or ceramic bowl.
Add the turmeric powder and salt.
Squeeze the juice out of the lime and add to the bowl.
Heat the gingelly oil in a pan, add the mustard and allow them to crackle. Switch off the heat and mix the asafoetida.
Transfer this tempering to the pickle.

With the tender ginger the pickle is ready to consume immediately.
Allow a few minutes for the flavours to blend and serve.
Refrigerate after use.
Stays well for a week.
I add it to my salads and thus it gets consumed quickly.


Tuesday, October 6, 2015

Yet Another Milagai Podi pairs Dosais and Idlis

We are  heavy breakfast, moderate lunch, an evening snack and a light dinner routine family. Idlis and dosais can be made in varieties for the morning and the batter helps plan something for dinner too. Most likely, I might eat my idlis and dosais with a freshly made sambhar or some chutney. While that is the to-go accompaniment for them, apart from a quick tomato masala, I keep stock of idli milagai podi also. My mother's pantry never runs short of supply of  her  milagai podi. Stock in mine and my sister's though, seems one batch stays forever. Just the other day I used up all of the podi I had in stock and was wondering if I could have a recipe other than my frequently used ones.
My paternal cousins, my sisters and I are always a WhatsApp message away from each other. So that was the best forum to get a recipe and I put out my request. Not surprisingly, each one had a recipe, however little they varied in terms of ingredients or proportions. Thus, be warned, I shall be posting a different podi recipe soon as one stock gets finished.
The recipe I share today is from a cousin who follows her mother-in-law's. I did not make any tweaks or changes on my whim, though a lot of discussion happened, about more wholesome additions.This recipe is quite adaptable to such tweaks and one may try variations.

Milagai podi for Idlis and Dosais - Version 3


Ingredients:
All measures are 125 ml cup
Yield: Fills a 450 ml jar/ 280 grams

1 packed cup dry red chillis broken in small bits
1 cup urad dhal
1/2 cup channa dhal
1/3 cup white sesame seeds
1 1/2 tablespoon powdered jaggery (for flavour only, so you may adjust accordingly)
Salt to taste
2 drops caster oil to fry chillis (optional)


Method:
Rub in the oil on the chillis and roast the chillis in a heavy bottom pan until brittle and brown without burning them.
Transfer to a largish plate and keep aside.
Dry roast each separately, the urad dhal and channa dhal until the lentils are golden and aromatic.
Transfer from heat.
Roast the sesame seeds until they pop and add to the dhals.
Finally toss the salt (I use coarse sea salt) in the heat of the pan and keep aside.
Transfer the dhals and sesame seeds to the jar of your spice grinder/ blender and pulse to a coarse powder.
Add the chillis and salt and grind further until almost fine.
Finally add the jaggery, pulse to mix and transfer to a dish.


Allow to cool and store in an airtight jar.
Keeps well for months at room temperature.
Serve this podi as side for idli and dosai along with sesame oil/ ghee.

Friday, August 7, 2015

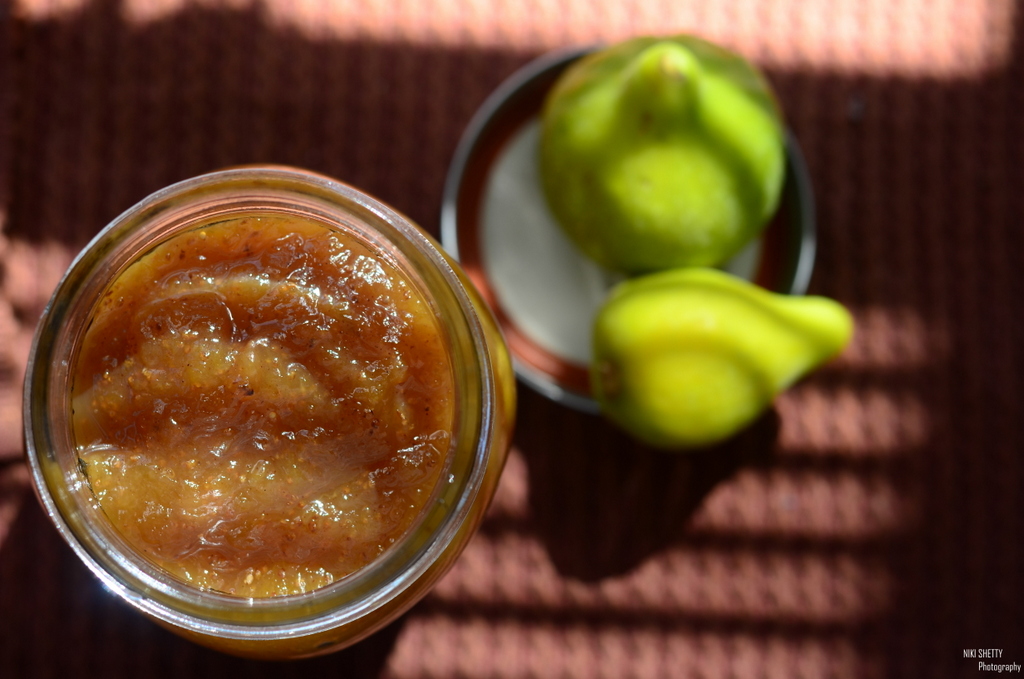
Fig Jam

My daughter has a small home garden that they tend with lot of care. They grow, in a small space, many rose plants, few vegetables according to the season and berries in their garden. The kitchen herbs are in small pots. They have cherries and figs all growing in small trees that may someday be really big and bear lot of fruits. She just sent me a picture of the lavender that she removed from the garden.


The fig tree is small yet there were many tiny figs that would be fruit by season. They were still raw when we left for home and have ripened recently.
She and her husband have been having smoothies and milk shakes with the fruits. She said she had just finished her lot of the strawberry jam and was looking to make some with the fresh figs. She sent me pictures and the recipe she followed and this post is about the jam she made with her homegrown figs.


I shall be excused for filling the post with more pictures than the recipe for I like the pictures she sent and do not know which of those to discard.

Fig Jam


(Recipe  and pictures from Niki, my daughter, given as received in my mail)
Ingredients:
20 medium sized figs
3/4 cup powdered jaggery
couple of pinches cinnamon
1 tsp lemon juice
1 tbsp butter

Method:
- Prepare a 1 pint jar for canning. Put it in hot water and keep warm.
- Put a ceramic plate in the freezer so that you might try the plate test when the jam is ready.
- Rinse and dry the figs.
- Slice the tops off and remove the peels. The peels give away a bitter taste unlike real ripe fruits we get in the market. If you may, go ahead and use the peel too.


- Pulp the figs (I just did this by mushing them with my hands) to a mush.
- Put them in a heavy bottom pan or a dutch oven and cook them on a medium flame for about 5 to 6 minutes with the lemon juice. 
- Add the jaggery all in one go, and the cinnamon and stir it in.
- Once the jaggery has dissolved, keep cooking till the jam comes together and plates well (about 40 minutes).
- Put the butter in and give it a quick stir.
- Pour the jam into already prepared/sterilized jar and let cool.

Yields 1 pint
She said that the jam had more sweetness and the hint of cinnamon was remarkably good. She felt that she did not taste the fig so much as she would like. Still, she said, the jam tasted good and was of nice spreadable consistency.

Sunday, July 19, 2015

Not quite the same, Sepen - Tibetan Hot Sauce

In one of the food discussions, in a group, on facebook, someone suggested the Sepen, a very hot Tibetan sauce. It is interesting to know that while Tibetan cuisine is mild in spices and it is very common that the Tibetans partake many of their dishes with a generous dollop of hot sauces. The sauce counters the otherwise nearly bland taste. In the comments thread under the same discussion, someone also shared two links to recipes. They got me hooked to try the sauce.
Both of the recipes were similar because one was adapted from the same author as the other. One used just chillis and Sichuan / Szechuan Peppercorn while the other had tomatoes and celery added. Now I was in a fix as neither did I find the right peppercorn nor the celery. I decided it was to try my own take on the recipe with tomatoes, chillis and the mighty black pepper. Thus the emerging dish was not authenic sepen, just quite near imitation of the original. However, the taste of the sauce and colour were really good. That is reason enough to share a recipe, isn't it?

Tibetan Hot Sauce -Sepen


(Adapted from NYTimes 
http://www.nytimes.com/2012/02/22/dining/sepen-or-tibetan-hot-sauce-recipe.html?_r=2 
and,
Experience the joys of Tibet culture
http://www.yowangdu.com/tibetan-food/tibetan-hot-sauce-tomato-based.html


Ingredients:
Makes 250 millilitres medium thick textured sauce
8 medium size tomatoes
3-4 dry red chillis
5 fresh green chillis
1/2 tablespoon black pepper corn crushed coarsely
7 pods of garlic crushed
1" piece ginger chopped very fine
2 table spoons oil
Salt to taste
2 tablespoons fresh coriander chopped (optional)/ few leaves for garnish

Method:
Wash the tomatoes clean and drop them in very hot water for a minute.
Remove the peel, cool and puree in a blender.

Grind both the chillis together to a coarse paste. Let the seeds of the chillis remain whole. Add to this, the crushed garlic, peppercorns and the ginger.
Heat oil in a heavy pan. Add the combined paste and saute'  for a few minutes on low heat to remove the raw taste.
Add the pureed tomatoes adjusting the water and the salt. Bring to one boil and simmer for 30 minutes, very slowly so the flavours come out strong.
Continue to simmer to achieve desired thickness of sauce.

Just before removing from the heat, add chopped coriander.


Remove from heat. Allow to cool and transfer to storing jar.
This sauce can stay outside of refrigeration up to three days and in the fridge for about ten days if stored well.


As is evident from the above picture, my sauce was not very thick while it was neither of runny texture. I cooked it to this level of thickness as I was cooking noodles with the sauce later.
Serve small portions of the very hot sauce with milder dish like momos and noodles and to dunk other stuffed breads in.
We relished this with steamed rice noodles.


Thursday, July 16, 2015

Strawberry Jam

I mentioned that we went strawberry picking while holidaying with our daughter and son-in-law. It was so much fun to visit the vast farm and trying to pick and pick and pick.there was no restrictions so we kept eating as we picked. Not for a fleeting minute did either of us care that we are consuming not-so-clean fruits. Fresh from the plant seemed to take over any such idea. We kept going until we spotted that the shopping crates we had carried from home were filling up quickly. The whole purchase weighed to about 6lbs. Brought the strawberry loot home and stored them in the freezer all the while keeping aside for consumption as fresh. It was not hard to think of dishes to use them up before the next weekend visit to the farm.
My daughter made the strawberry ice cream that had a wonderful flavour and beautifully natural colour from the fresh produce. Meanwhile, on a visit to a bookstore, we came across a book on jams, jellies and preserves. Curious about the contents, we bought the book. Now was time to put to use the book and the berries we thought. However, cooking from the book did not materialise and we decided to rely on the internet. I had also picked up a small pack of pectin just to try. So, with some guidance from various sites on the internet and the book, we tried our recipe for the strawberry jam.At first attempt we let it sit in the heat a wee little longer and the jam was not flowing into prepared canning jars. We were careful the second try and we had perfect textured jam. Niki made this delicious jam and I carried it back home for my father. He seems to be eating it with anything he can pair it with.

Strawberry Jam
(Recipe adapted from various internet sites)
Makes 2X475 millilitres jars full.

Ingredients:
2 &1/2 cups crushed fresh strawberries
1/8 cup (30 ml) juice of lemon/lime
1/2 tablespoon powder pectin
3&1/2 cups granulated sugar
1 tablespoon butter at room temperature


Method:
Heat water in a largish bowl in which you will be able to drop the glass jars that will store the jam.
Gently immerse the two canning jars in the simmering water. Keep them very warm until ready to transfer the hot jam.
Crush the strawberries with the back of a ladle to almost pulpy.
In a heavy bottom large bowl, add the pulp and the lemon juice and combine. Gradually add mix the pectin in.
Place the bowl on heat and bring the mixture to a full rolling boil.
It should boil down so much that the mix cannot be stirred down. Do this over high heat while constantly stirring the mixture.
Once the mix has thickened, add the entire sugar. Allow it to dissolve and cook back to full rolling hot again.
Add the butter and stir again, leaving it just for a minute on the stove. The butter eliminates the possibility of foam that might collect over the top.
You may do the plate test to check for doneness.


Remove the jars from the canning bath and quickly transfer the jam into them, leaving some space at the neck of the jars.
Store well with tight lids.
Enjoy with as many dishes as you wish.