Showing posts with label Savoury. Show all posts

Monday, August 20, 2018

Mangalore Pundi

The other day, I watched a cookery show where the host was making this dish, though she mentioned it as Undi, and a side dish to eat it with. I thought it was very similar to the pidi kozukkattai or the Arisi upma kozukkattai I make often. She ground some soaked rice with coconut and cooked the dish with that. I was mentioning that to my husband and he said that at home they used to make pundi or pundi gatti. I told him that I have never had it at his parents' home in all of these years. He said that I would not know, because his mother thought it was a huge effort to make these for breakfast. He also mentioned that they will taste good only if the texture is right. Many times they have ended up with somewhat hard pundis that will refuse to soak in the side dish, the gravy they make.
It is curious that I have lived in Mangalore, have had friends who taught me a few simple specific Mangalore dishes, but nobody suggested this. So, I launched my "operation pundi" and went to read recipes/ watch vidoes of making this recipe. The search got me more confused because each person suggested different rice, different ratios of the two main ingredients.
I decided to go with the video that set me on this project and made the dish.  It turned out well and my husband gave his validation. I wanted to convince myself that this was indeed the recipe. We messaged my husband's uncle requesting his wife to share the recipe. She called me and over the conversation suggested using pounded rice or store bought coarse rice powder and what not. In the course of our chat, she suddenly decided to tell me exactly how she makes them. Wasn't I waiting for this only? It was a simple recipe that I did not have to write it down, but thought of having a record lest I do not make it for another n number of years.

MANGALORE PUNDI


Ingredients:
(Makes 15 dumplings)

1/4 cup (heaped) Idli / dosa rice
!/4 cup raw rice (Sona mansuri/ Kolam rice)
1/3 cup fresh grated coconut
2 tablespoons of coconut oil
Salt to taste

For tempering:
(pundis can be made plain also without any extra condiments)
2 teaspoons mustard seeds
1 teaspoon urad dhal
1/8 teaspoon asafoetida powder
3-4 Byadagi variety (or any mildly spiced) dry red chillis broken in bits
Few fresh curry leaves

Method:
Wash both the rice clean and soak them together in water for a few hours.
Drain the soaked water and add them to the grinding jar. Add the coconut and grind them together to a coarse, thick paste. Add little water  during the grinding process.
Transfer to a bowl, rinse the grinder jar with about 1/2 cup of water and add it to the ground batter.
Add the salt and mix well.
Heat the oil in a heavy bottom pan. If you are tempering the pundis, add the mustard seeds. When they crackle add the rest of the items listed under tempering, saute until the urad dhal is fried to a golden shade.
Add the batter to the pan, lower the heat to a minimum and cook the batter stirring constantly.
The batter will cook and gather in a dough like mass.
Wet the tips of your fingers, take a small amount of the dough and roll between fingers to test the consistency.
If you are able to roll well in a smooth looking ball, the batter has been done.
Switch the fire off and prepare a steamer ready to steam the dumplings.
Divide the cooked dough in small portions and roll them in desired shapes. Some make cylindrical shape and some make them rounded balls or, you may shape them as I did, slightly thick discs with a dent in the middle.
Place them in the steamer separator and steam the dumplings for 12-15 minutes.
Remove from the steamer to the serving dish.


Serve them hot with coconut chutney, some vegetable stew or chutney of choice.

Some points to have in mind for perfect pundis:
The rice and coconut have to be ground only coarsely, more like large semolina. Grinding it to a smooth batter will make the pundis hard.
The mixed proportions of the idli rice and raw rice work well. Originally, the aunt asked me to use raw rice; I tried making the ratio that worked well for me.
The pundis can be made without adding any other tempering ingredients and they will look beautifully white.
Do not over soak the rice or steam longer than necessary.


Monday, June 11, 2018

Poondu Mandi Kuzhambu - Spicy Garlic Gravy

On our recent visit to our daughter, we chanced to have lunch in an Indian restaurant that listed many Chettinad type of dishes in their menu. While we all ordered, the staff who served tried to detail to us about their dishes. I had then wanted to try their Poondu Kuzhambu that he suggested to have with steamed rice. That tasted very good and they willingly adjusted the spice level to our liking. Their serving portion was quite large and we packed the same with us.
This was a unique preparation that uses charred tomatoes as base and the water we usually discard after rinsing rice, the 'mandi' or 'kazhuneer' (as in rinsed starchy residue from cleaning rice) to tcook the gravy.
We liked it so much that we wanted to try making the same at home. I checked with a few friends who are from Chettinad, for the recipe. One of them guided me to a blog that had authentic Chettinad style poondu kuzhambu, but it was not the same. I found a video of the preparation, which was nearly the same; it had shallots in the recipe, which was not in the dish we had tasted. I then formulated my own recipe for the kuzhambu and tried to replicate the dish that we had tasted in the restaurant. I share that here today. This may not be an authentic recipe from the region, but a delicious dish, nonetheless.


Mandi is the residual water while rinsing and cleaning rice. Give one brisk rinse in the first round, not removing much starch away. Wash your second and third rinses thoroughly getting as much starch residue as possible. You need to collect this rinse in a bowl. The residue of rice starch will settle on the bottom of the bowl. You may not need all of the water. Carefully, strain some liquid without pouring away the 'mandi’. I will refer to this liquid (kazhuneer) as mandi in the recipe.

Poondu Mandi Kuzhambu


Ingredients:
(makes 400 ml medium thick kuzhambu/ served us 4 good servings)

15 cloves of garlic
3  medium tomatoes
(if possible, char the tomatoes over a low flame and remove the charred skin. Not compulsory, but the taste is enhanced. I used the roti jali as mine had small perforations) (otherwise sauté the tomatoes in a pan to a coarse pulp)
1 medium red onion sliced finely
1 &1/2 cup +1/4 cup mandi (divided)*
2 tablespoons gingelley oil / nallennai
1/2 tablespoon coriander powder
1/8 teaspoon turmeric powder
2 tablespoons raw peanuts (optional and you may replace by cooked chick peas)
Salt to taste

Grinding spices:
Soak in the *1/4 cup mandi the following for 10 minutes and then grind to a paste using the mandi (you may use some more from the 1&1/2 cups, if needed)
4 cloves garlic
4-5 dry red chillis (depending on heat of the chillis) (the kuzhambu is a slightly spicy dish)
1 small gooseberry size tamarind ( if the tomatoes are too sweet, up this a little)

While grinding, half way through, add the coriander powder and the tomatoes. Grind them to a smooth, thick liquid pulp. Keep aside.

Tempering:
 1/2 teaspoon cumin seeds and curry leaves ; no mustard seeds are added
(since the cumin seeds are added in the beginning, it does not require extra oil)
Method:
Heat the oil in a heavy bottom pan. Add the cumin seeds. Toss a bit and add the cloves of garlic and sliced red onion. Sauté until onions are  transparent.
Add the peanuts (or chick peas)
Stir the mandi to mix the sedimented rice starch to a uniform liquid.
Add salt , turmeric powder and 1 cup of the mandi, cover and cook until the garlic are soft.
Add the ground pulpy mixture, adjust the liquid by adding some more mandi.
Simmer the kuzhambu for about 15 minutes so the raw taste of garlic, tamarind and red chillis in the liquid subside. 
Add the rest of the mandi and cook further  until the kuzhambu has thickened.


Add the curry leaves and chopped fresh coriander leaves to garnish.
Serve with hot steamed rice or as a side dish for Dosais and Idlis. This kuzhambu can be kept over and had for another day also. If refrigerated it can be kept for up to three days. To reheat, you may add some more of the rice rinsed water or plain water which will thin the consistency a bit.

Friday, May 18, 2018

Vegetable Shikampuri Kebabs

Few days ago, Aparna had shared in her Instagram feed a picture of few of her cookbooks. She had mentioned that Sheetal bhatt at Route to roots blog had initiated the idea of a virtual food enthusiasts group to cook dishes from our respective collection of cookbooks and share the pictures/ recipes where desired. 
Most of us like to buy cookbooks, but hardly use them regularly. We might cook a few recipes every once in a while and then slowly put the book away and let it gather dust. 
This virtual group will now bring those out and cook dishes twice a month, based on given themes. we would share the picture of the dish in our Instagram feeds with a hash tag 'thecookbookcollective'. We may share them across other social network media also. We might share some of those recipes in our blog also.
The theme for the first dish was 'Regional'. I chose to make Shikampuri Kebabs that are famous in Hyderabad Mughal cuisine. These are rich and delicious with a filling of tender meat or equivalent vegetarian mix. The name literally means 'filled in the middle' as in 'tummy full'.
During one of my stay at The Gateway Hotel, Bengaluru, I found the book titled 'Vegetarian Fare at the Taj' that has so many vegetarian dishes that are cooked in the kitchens of the Taj group hotels across India. The management were generous to let me have that book. 
I had this recipe from that book; this was shared by the executive chef of Taj Krishna, Hyderabad.
The same book has another recipe from the Taj  Falaknuma Palace, Hyderabad that replaces potatoes with Elephant Yam and lentils.
I gave this recipe to my daughter as she had mostly all the ingredients with her. She decided to add lot of young beetroots and made a very pleasantly pink kebabs. 
 
I am giving approximate measures for the outer cover vegetables. I used potatoes, beans and carrots. Because ultimately all vegetables are going to get mashed, you can add any more different vegetables that will not taste off.
I used two large potatoes, boiled until soft and grated. The yield of potatoes was 2 loosely packed cups.
 
Vegetable Shikampuri Kebabs 


Ingredients: 
Makes 8 kebabs
For the outer cover:
2 cups boiled and grated potatoes
1 cup boiled carrots (cut in very tiny bits and heaped cupful of raw carrots)
1 cup boiled beans (same as carrots)
Just about enough bread crumbs to bind the vegetables in a dough like texture.
1&1/2 teaspoon red chilli powder
1/4 teaspoon turmeric powder
1 blade of mace
3 green cardamoms
2 teaspoons caraway seeds/ ajwain
1 tablespoon chopped mint leaves
1 tablespoon chopped coriander leaves
Salt to taste
Oil for shallow frying/ deep frying. (The book has a deep fried version, I used the airfryer by basting a little ghee all around each kebab before placing in the fryer.) (My daughter shallow fried the kebabs and said they tasted good)
 
For the filling
1/3 cup khoya (I boiled 500 millilitres of milk down to get this quantity)
1/2 cup crumbled paneer
1 &1/2 teaspoon oil
1 medium red onion sliced very finely
1 green chilli finely chopped
1/2 teaspoon white pepper powder
1 teaspoon chopped mint leaves
1 teaspoon chopped coriander leaves
A pinch of salt
1/4 teaspoon sugar

Method:
 
Prepare the filling:
Heat oil in a pan.
Add the onions and green chillis. Saute until the onions are transparent.
Add the paneer and khoys and cook until they are soft and pink.
Add salt, sugar and white pepper powder. Toss to mix and turn the heat off.
Drop the chopped fresh leaves and mix.
Allow to cool and divide in 8 small portions rolled in balls.
If the quantity of the filling might feel more for 8 kebabs. You may store them and use in other dishes.

Prepare the vegetable kebabs:
Crush the mace, cardamom and caraway seeds to a fine powder. This is a very aromatic spice powder mix
Mash the carrots and beans ( other boiled vegetables if you are using ) to a pulp with only few bits left to show.
Add the grated potatoes, turmeric powder, red chilli powder, salt and prepared spice powder of cardamom, mace and caraway seeds.
Knead them together to a dough like mass. Add the bread crumbs and knead to a smooth dough. 
Take a small portion and roll and pat to a disc to test if the dough is not cracking. Add little more bread crumbs if needed.
Divide into 8 portions, roll them in smooth balls.
Use little oil or ghee to grease your palms and pat one dough ball in a discs, place one portion of filling, gather the ends and cover the filling with the vegetable dough.
Flatten it slightly to a round disc, like kebabs of uniform thickness of about 1 cm.
 
Repeat with the rest of vegetable dough and filling.
Heat oil in a pan and when hot place the kebabs as many will hold in the pan, not too close to each other.
Cook the kebabs well until crisp and golden all over. Remove from the pan. Transfer to a serving dish.
Repeat with all the kebabs.
While the book has a directions to deep fry the kebabs, I chose to do them in my airfryer and my daughter opted to shallow fry in a pan. Both turned out excellent. So how you want to have them cooked has these options.
 

For my airfryer version, I used a few drops of ghee over each kebab brushing it all over. I cooked them for 10 minutes at 180 degrees C and for a further 2 minutes after flipping them over.
Serve them hot with salad and green chutney or tomato sauce.
If you are planning to do them in more numbers, you may make ahead the kebabs, refrigerate them and fry them at your convenience. My daughter had made the quantity for 8 kebabs, but used only four on the first try. She refrigerated the uncooked kebabs and used them the next day.

Thursday, March 22, 2018

Chinna Vengayam Pulikaichchal

Few days ago I picked up a big bunch of shallots, yes you heard it right, bunch - because the vendors gather them with lot of their dried stem roots still attached to the bulb and make a bunch. That is how they are sold in the local markets here. The shallots made a very colourful subject to photograph. I had just then got a wood carving man to make me a small container of sorts with a piece of broken tree branch. They both made a vibrant combination in the picture.


I shared the same on my Instagram feed and many suggestions were there to use them in delicious dishes. I cooked them in a few and was left with a rather large batch that I cannot finish before leaving for my holiday. I ended up making this pulikaichchal that is more preserve like and would stay fresh for days if refrigerated. It was reminded of this by my sister, who does not like and will not have onions and garlic; she would smell it however much we mask the taste.
My father's clients would bring produce from their farms and crops like groundnuts, tapioca and shallots used to be brought soon as they have been harvested. They will still be wet and soil soaked and fresh. My mother would then simply spread them on a newspaper in the corner of a room and use them in batches. She cleaned them as and when she was cooking them. She would often make this dish because it works well as a side for dosais, idlies, pongal and also rice. Painful as it may seem to peel and cut those fresh pungent shallots, the taste of the dish makes it all worth the effort.
When we did not have a refrigerator also, this dish used to keep good for days together, provided we are not careless in the use of utensils and serving spoons. Cooking it in some stoneware utensil will add to the flavour and one might simply store in the same too. I have, with me here, a very heavy bottomed stainless steel pan that is ideal to cook on even heat and slow cooking happens easily.


Chinna Vengayam Pulikaichchal 


Ingredients:
Makes 300 ml of pulikaichchal

200 grams of shallots/ Madras onions/chinna vengayam
2&1/2 tablespoons tightly packed tamarind bits
1/2 teaspoon turmeric powder
1/4 teaspoon asafoetida powder (or a 1/2 centimeter square of asafoetida dissolved in little water)
1 heaped tablespoon coarse crystal salt (I use pink Himalayan salt) (adjust to taste)

1/4 cup gingelly oil (divided - to saute the onions and for cooking)

For the spice powder:
7-8 dry red chillis (adjusting to the level of heat tolerance and the heat of chillis)
(+3 Kashmiri chillis for the colour, because my red chillis are very brown)
3 &1/2 teaspoons coriander seeds
1 teaspoon channa dhal
2 teaspoons sesame seeds (white or black, cleaned)

For the tempering: 
1 teaspoon gingelly oil
2 teaspoons mustard seeds
1 teaspoon channa dhal
1 teaspoon urad dhal
2 dry red chillis broken in small bits
15 curry leaves washed clean


Method:
Soak the tamarind in water for about 20 minutes and extract the pulp. I repeat the process to extract all the pulp and the last batch of water does not even get the colour.
Dry roast the ingredients given for the spice powder, each separately and on low heat so they are evenly done. Cool them and make a coarse powder. Keep aside.
Peel the shallots and cut them in small pieces.
Heat a few spoons of the gingelly oil and add the onions. Saute them until they are translucent, not very brown.
Add the tamarind extract, turmeric powder and salt. Top up the water just a little more and cook on low heat, to remove the raw taste of tamarind.

When this is simmering, heat the oil for tempering in another pan and add the ingredients listed under there. Once the mustard seeds have crackled and the dhals are golden, transfer this to the simmering mix.
Add the rest of the oil and the spice powder.
Cook for some more minutes blending them well.
Allow it to simmer and the oil will separate forming a layer over the pulikaichchal.
Remove from the stove and let it cool.


Transfer to clean glass bottles or bowls with lids for storing.
Serve as a side dish with dosais, idlis, pidi kozukkattais and arisi upma. You can mix with steamed hot rice and eat as a dish by itself too.


Monday, March 12, 2018

Kalasida Avalakki

In general it would be easy for our friends to assume that I might have picked up traditional dishes from Managalore - Udupi cuisine having been married to a Mangalorean for 30+ years. Even more so because I have spent a good few years living with his parents. Sadly, that is not to be. On the contrary, they had adapted to living in Coimbatore and other than an occasional neer dosa and shavige, on special weekends, I had not known traditional fare in that household.
We were at our friends' place one evening when she had made this for tea and while serving mentioned that it may not be new to us and both my husband and myself would have had it many times. I did not even recognize the name of the dish, even when they gave other names by which people call it. Mangalore masala avalakki, avalakki oggarane, and so on....nope none of which I had heard of. My husband went on to discuss how it used to be a teatime snack in his office in Mangalore and I still drew a blank. However, it was one very tasty snack and I loved the crunch with so little oil added in the snack. My friend showed me how thin is paper avalakki and told me to find them in Bangalore where most stores stock them.
I bought some red paper poha online and brought it here. I messaged her to share the recipe. In a few minutes my phone notified me with her message and that very evening, as luck would have it, having all the ingredients I tried the recipe. We enjoyed it and I promised myself that I need to post the recipe here, for my repository.


I looked up for more information on this dish and found that in the Udupi region it is called Bajil and mostly paired with sajjige as a filling breakfast during weddings and ceremonies. When I read out bajil, my husband said that he vaguely remembered that his father would mention it but he had never tasted the combination.
It is a quick and easy recipe to make. The sweet and spice flavours mingle so well that one cannot resist picking just about a spoon more and more. Keeping the recipe basic, one can find ideas to serve this dish.

Kalasida Avalakki
Recipe by my friend Ms. Lalitha Burde


Ingredients:
For 4 to 5 servings
2 cups Paper thin poha/ aval /beaten rice flakes
2 tablespoons roasted peanuts
1 tablespoon coriander seeds
 4-5 dry red chillis that are low - medium in spice level (Byadagi or Kashmiri chillis)
Salt to taste
Jaggery powder to taste
1/4 teaspoon asafoetida
1/4 teaspoon turmeric powder
2 tablespoons cooking oil
1 &1/2 teaspoon mustard seeds
2 teaspoons urad dhal
Few curry leaves
2 - 3 tablespoons fresh grated coconut

Method:
Dry roast the coriander seeds, two of the dry red chillis, few of the curry leaves until aromatic. Crush coarsely and reserve.
heat the oil in a pan and add the mustard seeds, allow them to crackle.
Add the peanuts and toss around so they are roasted to a crunch.
Add to these the urad dhal and allow it to brown until they are golden.
Quickly add the rest of the red chillis (broken in small bits), curry leaves, turmeric, asafoetida and salt.
Add the crushed coriander mix.
Toss them for a couple of minutes more and switch off the heat.
Transfer this to a serving bowl and add the coconut and jaggery powder. Mix with your hand slightly crushing them so the flavours combine.
Put in the paper avalakki and sprinkle some water. Bring them all together so the spices coat the avalakki while not crushing hard. Adjust the water, salt and jaggery according to taste.
Serve this with hot tea.

This dish stays fresh for another day also at room temperature. If you find it too dry by then, Sprinkle some water and heat just a bit in a microwave.
A very delicious snack to go with tea is ready with just about ingredients from your pantry.
You may sprinkle mint chutney  and top with some sev or pretty much serve like bhel.


Monday, January 29, 2018

Narthangai Gojju

At home, along with other pickles we had a stock of salt soaked and sun dried citron pickle, always in store. This was because, the fruit is said to have among many health benefits, high vitamin C content. Citrons are used to treat sickness, nausea and many more minor ailments. A small piece of the dry pickle is given with directions to chew and suck the juice in. This pickled citron pieces were dark brown in colour and leather like in texture. They preserved well as they were dry. So keeping stock of them was easy.

We were home in December when all my paternal uncles and aunts were also with us for ceremonies held at home. One aunty from the extended family had sent a few pickles and preserves for my mother sometime ago. Some powdered curry leaves that were added to other spices and rolled, Indian sarasaparilla root pickle and narthangai gojju/ citron preserve were all in bottles on the table handy. With every meal, I watched my aunts enjoying generous servings of the narthangai gojju. My curiosity was piqued and I tasted a small spoon of it. The blend of tangy tamarind, the slight bitterness from the citron rind, heat from the chillis and the sweet from the jaggery were all quite favourable.

My aunts were asking my sister to fetch the recipe as she was visiting the person who sent it. She relayed the recipe to all of us and I had a mental note of it.
When I returned to Accra, where you can pick citrons from every street vendor, I bought just one, medium fruit to try this recipe. I have used only part of the fruit in this recipe because we rarely consume pickles. I have used mostly the zest and rind having removed most of the pulp and all of the seeds.

Gojju is a dish in which certain vegetables like ladies finger/ okra, capsicum, onions, tomatoes and even green chillis. When I picked up loads of green chillis from my home garden I made the milagai gojju.
Gojju is a sweet-sour and spice blend dish with any of these vegetables and few others too in it. It is often had as a side dish and goes well with kozukkattais, adai, dosais and also steamed hot rice with a generous spoonful of ghee or gingelly oil.

Narthangai Gojju 


Ingredients:
Makes 1 and 1/2 cups gojju

1 cup finely chopped citron
7-11 dry red chillis (depending on the heat and level of spice required)
3 green chillis
1 tablespoon tightly packed tamarind
4-5 teaspoons of powdered jaggery
1 &1/2 teaspoons coarse sea salt (I use Himalayan salt. You may use table salt also.)(adjust to taste)
1/4 teaspoon asafoetida powder
1/2 teaspoon turmeric powder
5 tablespoons gingelly oil

For tempering:
1 teaspoon gingelly oil reserved from the above
1 teaspoon mustard seeds
10-12 fresh curry leaves

Method:
Wash the citron fruit well and pat it dry. Cut and squeeze out the juice which can be used in other cooking or making a drink. Remove seeds and some of the juice sacs. Chop the rest of the fruit finely to get 1 cup full of zest and rind.
Reserve one teaspoon of gingelly oil for tempering later.
Place a heavy bottomed utensil on heat and add 2 tablespoons of oil. When the oil is hot, drop the citron pieces and cook them, tossing them at regular intervals until they are soft and you are able to crush a piece to almost a pulp between fingers. Add the tturmeric powder and asafoetida powder.
While the narthangai is getting cooked, pulse the tamarind, salt, dry red chillis and the green chillis to a fine powder in a spice blender.When the narthangai is soft, the oil might separate. At this point add the powdered spices blend and top up with another tablespoon of oil. Cook this for a further 7 - 10 minutes in the oil. Then add half a cup of water and cook on low heat allowing it to simmer. The raw taste of the spices should go.


Meanwhile, dissolve the jaggery in little water and strain out the impurities.
Add this jaggery water to the cooking narthangai.
If required, add some more water, just so not to burn the mass.
When the gojju has thickened, add the rest of the oil and cook until oil separates and floats on the top.
Remove from the heat.
In another bowl, heat the reserved one spoon of oil. Add the mustard seeds and when they crack, add the curry leaves. Toss them a bit and transfer this tempering to the gojju.
Allow the gojju to cool down and transfer to a clean storing bottle or bowl.


This gojju stays well outside of refrigeration for a fortnight to 20 days and inside the fridge for longer.
Enjoy this hot, sour and sweet gojju just as you would any chutney or pickle.


Wednesday, August 16, 2017

Ready To Make - Moar Kuzhambu - Powdered Mix

Sometimes when I travel and my husband has to manage his meals, I try to make it easier for him to fix something, lest he skips his meal. I had tried part cooking and freezing foods which seemed quite handy. Then he found that if I post instructions, that might help him cook a few dishes. Thus, my counter top and refrigerator door would be filled with notes. He had managed very well that he would even grind his batter, make dhal and sambhar.
While I wrote some recipes for my daughter, she still had to juggle time with the demanding coursework and assignments; it was getting harder to cook something elaborate. Soon both of my nephews were also going away from home and were left to manage cooking for themselves.
It was then, my mother tried to coax us to make some ready to cook meals ideas. We had found that making the packaged dosa, upma mixes were easy to make at home. It took us some trials and misses to make them have longer shelf life. Thus, our puliogere ready mix and adai mix took shape. Little more experimenting lead to moar kuzhambu mix and  an 'all - in - one - sambhar mix'. This moar kuzhambu mix is a very quick dish that you cook the vegetable and mix this powder to the whisked curd. Give it a boil and add some tempering. So easy!

Update: (Updated on 7th May 2018)
This powder stays fresh over a year even at room temperature. We had made this batch last year in May and I had carried with me a portion. i just finished my last tablespoon full ready mix powder today.

Ready To Make - Moar Kuzhambu - Powdered Mix

Ingredients:
Makes 5 standard cups of powder
200 ml / heaped 3/4 cup+1 tablespoon fresh grated coconut
125 ml / heaped 1/2 cup raw rice
250 ml / heaped 1 cup / 250grams pack channa dhal / Bengal gram / split chickpeas
250 ml / heaped 1 cup / 250 grams pack thuvar dhal / split pigeon peas
70 ml / heaped 1/4 cup cumin seeds
30 ml/ 2 tablespoons coriander seeds
16 -20 dried green chillis* (1&1/2 inches long and slightly high on heat)
60 ml / level measured 1/4 cup salt
5 ml / 1 teaspoon asafoetida
About 1/3 cup dried curry leaves**

Method:
*To get dry green chillis, wash them, remove the stem and pat them dry. Spread them on a very flat dish / paper / cloth and leave them to dry for a few days. Once they are dry, they become brittle, but the green colour is just about faded. They stay well for over a month and will retain the spice level.

** The curry leaves can be dried after separating them, washed and spread between layers of cloth in the sun. Or you may choose to oven roast dry leaves until they are brittle.

To make the powder, dry roast over a low the coconut until the moisture is gone and the coconut is dry. Do not roast it to turn shade over the white. transfer to a dish and allow to cool.
Then dry roast separately over low - medium heat  the dhals, rice, coriander seeds and cumin seeds until they are just about hot. Take care that they do not over roast. (When grinding for moar kuzhambu normally the ingredients are soaked and ground raw, so we do not over do the roasting here).
Transfer them to another dish.
Finally roast the sea salt until it turns pink and transfer to this dish.
Allow them all to cool.
Pulse all the said ingredients leaving out the coconut until they are a coarse powder, add the coconut and grind further to a powder that is not very fine.


Cool this and store in airtight containers. You may refrigerate this powder if the quantity is more. Usually, the mix stays well for two moths outside of refrigeration.

To make Moar Kuzhambu:
2 tablespoons of above powder
3 - 4 tablespoons thick, slightly sour curd
Vegetable of choice
2 teaspoons ghee /coconut oil for tempering
1/2 teaspoon mustard seeds
Few fresh curry leaves and fresh coriander leaves

Cook the vegetable and keep ready.
Mix the powder to the curd and whisk to blend them. Add another 1/3 cup of water.
Add the cooked vegetable and bring the moar kuzhambu to a boil.
Remove from the stove.

Heat the ghee / coconut oil in a small pan and add the mustard seeds. Allow them to crackle and add the tempering to the moar kuzhambu.

Let the kuzhambu cool down a bit before adding the curry leaves and the coriander leaves.
Enjoy the kuzhambu with steamed white rice or as a side dish for ven pongal.


Tuesday, December 29, 2015

Masal Vadai

Festivals and food go hand in hand in any culture. Our household is no different. I cook dishes that are specific for the festival and often cooked fare includes a payasam and a vadai. While certain dishes are made as offering on specific occasions, payasam and vadai are made almost on every occasion. In many households feast is synonymous to a variety of dishes that without fail will include the two. I make the softer textures ulundu vadai/medhu vadai and the paruppu vadai which is otherwise known as aama vadai in Southern India.
Many restaurants include the medhu vadai in their breakfast menu along side fluffy idlies, the paruppu vadai is most likely a snack. Most eateries, even pushcart ones, on the roadside might serve the paruppu vadai with addends like onions and fennel seeds which then becomes masala vadai. Onions are avoided on festivals in food; thus, masal vadai is an occasional snack that is consumed as is without any need for accompaniments like chutneys or sauces.
I use the split yellow  peas, known as pattani paruppu in Tamil for this along with the usual channa dhal/ bengal gram when I can find this dhal. These peas have a slight bitter taste and are harder in texture. It gives an extra crunch to the vadai. The crunch and the taste of deep fried onions and extra spices makes this a popular snack.
I stumbled upon this dhal quite accidentally. Few years ago, I found it in the store and mistaking it for another dhal, picked a pack up, only to find it would not cook to desired softness and the taste was a put off. To use up the purchase, I looked up cookbooks and found that they yield a good texture to vadais. I do not find it very often here, when I did, I picked up a packet, promising my husband that he will have masal vadai.

Masal Vadai


Ingredients:
Makes 20 vadais

1 cup Split yellow peas/ pattani paruppu/ muttar dhal
1 cup Bengal gram/ kadalai paruppu/ channa dhal
2 large onions sliced fine
10 -12 dry red chillies
6 green chillies
1 tablespoon fennel seeds
A fistful curry leaves chopped
2 tablespoons chopped coriander leaves
Salt to taste
Oil for deep frying

Method:
Wash both the lentils separately until clean. Soak them separately for an hour.
While they are soaking, chop the onions and the fresh leaves.
Once the lentils are soaked enough, drain the water completely.
Grind them along with chillies and salt to a coarse, dough like consistency adding as little water as possible. The resultant dough should be such that you are able to gather in a ball and flatten without being runny.

To the dough add the onions, chopped leaves and fennel seeds. Mix well.
Divide the dough in small portions.
Heat oil in a heavy pan.
When the oil has attained optimum heat, slightly wet your palms and roll one portion of dough in a slightly thick circular disc and slide it in the oil.
Flatten some more, as many as the pan can fry without crowding them.
Deep fry initially until half done. Remove from the oil with a slotted ladle and work on the rest of the dough.
Once all of the dough has been used up and are partly done, drop the vadais back in the oil in batches and fry further until they are crisp on the outside. The double frying gives it the desired crispness.

Enjoy them as snack along with tea and coffee. You may opt to serve with a chutney though it is not required. .

Wednesday, September 3, 2014

Vazhai Poo Vadai - Banana Blossom Fritters

I was pleasantly surprised to find that the lone banana tree in the far end of the house showed signs of bearing fruits. We have been here for 18 months, and the tree was just there adorning the garden, nothing much. The gardener has never tended to the plant and I have also not been very caring, other than slicing off leaves whenever I needed.
The Heavens above have been kinder to these and the plant is being forgiving of my neglect. Soon as I spotted the tiny leaf that sprouted, which will eventually shield the blossom and later fruits, I took a little more care of the plant. With so much neglect, I am grateful that there will be about twenty fruits on final count. Meanwhile, the blossom had started to drop a few layers indicating that it is ready for use and these will not become fruits. I do not know what variety of banana this would be nor did I know if the blossom will be good enough to cook. I removed it from the tree and it was a fresh and nice one. So I acted upon it quickly chopping the blossom.


There were many layers within that I have had to reserve half of it for later use. With the fresh first half I made these vadais. I had read two different recipes in two cookery books I have; however, when I did cook them, I followed neither of them; this one is a recipe that I mixed and matched ingredients from the lists in both, added some others on a hunch, and the resultant vadais turned out quite nicely. They were more kebabs/ cutlets textured, slightly crisp on the outside and a softer inside.

Vazhai Poo Vadai:
The following recipe yields 12 vadais 


Ingredients:
1 cup chopped banana blossom *(cleaning and chopping tips given below)
1/4 cup roasted gram (pottukadalai/ porikadalai)
2 tablespoons channa dhal

1/4 teaspoon turmeric powder
1/4 teaspoon asafoetida powder
1/3 cup fresh and grated coconut
1 medium red onion chopped finely
1"piece ginger chopped
4 numbers fresh green chillis chopped finely
3 dry red chillis
1 teaspoon fennel seeds
2 sprigs curry leaves
A small bunch of fresh coriander leaves
Salt to taste

Oil for deep frying


Method:
Preparing the banana blossom: *(Cleaning and chopping)
The pink violet banana blssom is actually not a flower by itself. It contains many layers of neat rows of small yellow flowers. Each row is protectively covered by petals that change in colour from a deep pink to tender yellow as it gets closer to the core. 
This vegetable tends to have an astringent taste inclining towards bitterness, yet very delicious when cooked.
You might apply oil on your fingers and the knife, use a paper to protect your board unless you are prepared to work hard removing the black and sticky stain that the vegetable will leave behind.
Keep a bowl with water that has some curd / yoghurt mixed to it to drop the chopped vegetable in. The yoghurt prevents discolouring of the cut mass.
Remove first three to four layers of petals and the mature flowers on the top and discard.


The following inner layers hold many tiny flowers. Remove them gently and give a gentle brush on the top to open them up. You will spot the stamen in there. Pull it out from each of the flower. These may cause your end product to become bitter if left within.


Once the stamen has been removed, chop the remaining flowers and drop them in the bowl of water.
As you work deeper into the flower, the colour turns pale and yellow, the stamen is not as hard, still present. Remove them as many as you can. leaving a few of these inner most are okay as they do not taste bitter.
Keep the chopped blossom well immersed in water - yoghurt solution. They oxidize pretty quickly when exposed.
Once done with the chopping, rinse them thoroughly,in few changes of water. Place them in a cooking bowl with little water and turmeric powder, Steam until the vegetable is just about done. Drain the water and keep aside.
Meanwhile wash the channa dhal well and soak in water for about 30 minutes.
Reserve half of the chopped onions and green chillis to add to the batter later.
Take the soaked dhal, red chillis and roasted gram in the jar of the mixer-grinder and pulse to a coarse paste. Add to this, the steamed vegetable, ginger, coconut, the other half of onions, and green chillis.
Grind all of them together just until combined. Use water only if absolutely necessary. The resultant batter shall be rather stiff than soggy.
Transfer from the grinder jar to a bowl. Mix the onions, green chillis that you reserved earlier, salt, asafoetida, fennel seeds, chopped curry leaves and, chopped coriander leaves. Mix well whisking with your hand. The batter now will be thick enough to hold by hand and roll in a soft ball that can be flattened. It is alright if cracks appear as you flatten. Gently press the batter around the cracks and smooth them out.
Keep the oil for frying on the stove.
When the oil is hot, bring the heat to medium high and slide two or three of the flattened vadais in the oil.
Deep fry tossing them around in the oil until well done all over. Remove from the oil using a slotted ladle onto kitchen tissues to drain residual oil.

Serve paired with sauce or any preferred chutney. Though they are best eaten hot, they taste good consumed few hours later also. The kebab texture is more recognised when eaten later.
I personally like the vegetable cooked as paruppu usli combined with lentils, but these were surely a very welcome change to be consumed warm on a dull and wet with rain day.


Monday, July 18, 2011

Banana Chips


Years ago, during my working days in Coimbatore, we had to walk past a pushcart chips shop, every morning to work and evening back. The man used coconut oil to deep fry the chips and the heady aroma of the oil will hit you few yards ahead. Though he sold potato, tapioca and sweet potato chips too, the banana chips were something else all together. Fresh from the pan to bamboo basket and then packed in a paper bag, made the chips a real treat. Later, many shops have come up selling these. With the development, the push cart shop has gone and has been replaced by a famous outlet.
Now, I get good raw bananas that are suitable for making crisps and make them at home. The deft and ease with which the man used to make them can never be achieved by me, but the attempt is worth. These days we enjoy safe home made crisps once in a while.
With about half a dozen large raw bananas and oil to deep fry those, you have crisps that keep for a few days, given the fact that you can resist them.


Wash and wipe the bananas. Peel them just lightly so there is a thin layer of the peel intact. Keep them immersed in cold water.
Place the oil in a pan and put it heat.
When the oil is almost smoking, hold the chips slicer above the oil and quickly slice the banana, dropping the slices in the oil.
However, beware of the steam that will assault as soon as the slices hit the oil. If you are not comfortable, slice the bananas on a flat dish and then drop the slices in the oil.
Allow the slices to fry well, tossing them in oil.
Remove, drain the excess oil and sprinkle generous amount of salt.
Cool and transfer to air tight containers.


I have tried making the sweet chips also. For these, I make a very thin sugar syrup, slice the bananas on a flat dish and toss them in the syrup before deep frying. The addition of the sugar gives the chips a deeper colour, not yellow any longer but crossed over to the brown side.

Notes: The shop man kept a bowl of water in which he had dissolved salt and turmeric powder.
He would sprinkle this water at intervals while the chips was being deep fried.
This way, there would not be a coating of salt on the crisps. I have never tried that, all because I am wary of the heat and wasting the oil.

Sunday, August 15, 2010

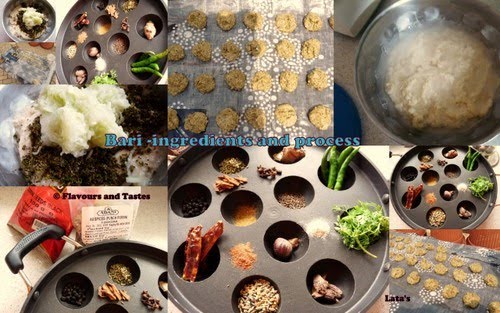
Baris- dried lentil dumplings for the Indian Cooking challenge


Srivalli could not have chosen a more not-so-suitable month for us to attempt something that requires lot of sunshine. I was apprehensive to go ahead with the challenge of making Baris otherwise popularly known as Punjabi wadiyan, which when lightly fried and added to certain dishes just gives an extra taste to it, when the rains are upon us and the sun is playing peek-a-boo, even here in Ghana.

The recipe, How to make Bari - Dried Lentil Dumplings?
Bari or Badi or Barian
she had adapted from Mamata's kitchen called for so many ingredients I thought might not be available in Ghana. That made me check out more web pages on this recipe. The ingredients were more or less the same in all of them, that I went looking for them in the Indian grocery stores, where I did find them.
The only hope was that there will be enough sunshine for just about a day to dry the baris. Then I read yet another recipe @ Kichukhonn where the baris were oven-made!


Please spare me repeating the recipe found in the sites ( many other web sites/ blog spots have the same recipe) and take some time to visit these two sites as well as my fellow members who took the trouble of writing them for you.

I have tried to do this in my pictures, so enjoy the visual tutorial.


I have made only 1/5 th of the recipe given by Mamata. I had some sunshine for few days in a row. But the baris do not dry to what is called bone-dry within a day. Well, switch on your oven and try baking them on a low temperatue for a really long time, say about 2 hours or more on 100 Degrees Centigrade, you have them ready for use that very day.

The spices that go into the baris are sure to make them very spicy and in the recipe I found that salt was missing. I have added salt to the dough and replaced the ash gourd with bottle gourd.

I thought I shall share with you a light moment...I instructed my security guard to keep an eye on the sun-drying baris. As I was speaking quite fast, he mistook that if the birds came to peck on them, he should allow them to have it:) He was confused why I came out every now and then, each time to shoo the bird away.

You might find some recipe posts that might be using baris to 'lift' taste to use the term Srivalli has given, coming up in this site in the near future.

They were some what similar to the kuzhambu karuvadam found in Tambrahm homes, that find their way into some kootus and vendhya kuzhambus, to 'lift' the quantity and quality.
These are easy enough to make and can be stored for a long time.

Monday, November 30, 2009

Uppappam for Karthigai


Today the 30th of November, tomorrow and the day after are the karthigai deepam festival days this year. The Barani deepam is lighted today, tomorrow is the sarvaalaya deepam, when in all Hindu temples numerous lamps will be lit and celebrated.
This day usually conjuncts with the full moon in the star of Krithigai and is believed to be the day that Lord Shiva appeared in the form of light which neither Vishnu nor Brahma could find the beginning or the end of.
At many homes lamps are lit and arranged in beautiful patterns, just as how Deepavali is celebrated in most northern states of India.
As per family traditions the neivedhyams made and offered to the Lord. In my parents home it is Adhirasam, pori urundai, godhumai appam sweet and savoury appam- uppappam. I follow this tradition as my mother-in-law does not cook any of these. She lights lamps and offers fruits.

I had a very hectic week, last week as we hosted the weekly Vishnu sahasranamam chanting at home. I took it a bit easy this morning without realising today is the festival. When I opened my mail box there was a mail to share this recipe. I follow S. Meenakshi ammal recipe but my mother makes it differently. So before sharing the recipe I wanted to confirm with her if store bought rice flour will work well and wanted her recipe too. This is what she gave me and I think the result with store bought flour was equally good.

Traditionally, rice is soaked and pound to a flour or ground to a thick batter with the Urad dhal and the appams are fried in oil like the vadas. For those who want to make it without deep frying, you may use the appam pan and make them. Since I wanted to try with one tweak, I did not venture the other. I have made them fried in oil. These appams will sure ooze oil, so make them and share as many, so you may eat less and be free of guilt.


Now the recipe ( Makes 12 appams):
Ingredients:
Rice flour 200 ml
Urad dhal 2 tablespoons
Channa dhal 2 teaspoons
Moong dhal 2 teaspoons
Fresh coconut scrapes 1 table spoon
Green chillies 2 chopped
Ginger 1cm long piece
Slightly sour curd 1/3 volume measure of the rice flour
Curry and coriander leaves few chopped
Salt to taste
Oil for frying ( keep less and fry one at a time)

Wash and soak urad dhal in water. Grind to a smooth paste as for idlis.
Mix the rice flour, salt, urad dhal paste and the curds to a lump-free batter. Add some water to obtain a thick batter.This should be as that of thick idli batter.
Wash and soak the moong and channa dhal in water for a few minutes, drain and add to the above.
Leave this aside for a few hours.
Just before frying add the chopped chillies, curry and coriander leaves and the coconut scrapes.
Mix well adjusting that the batter is of pouring consistency.
Heat oil in a deep pan until it smokes. Reduce heat to medium and pour a ladle full of batter in the hot oil.
The appam will slowly rise to the surface and fry. Using the ladle toss some hot oil on the upper surface as it cooks. Turn once and when the appam is golden on both sides remove with slotted ladle. Drain on absorbent tissue.
This appam can be made using the appam pan. Make the batter as that of idli batter, a tad bit rarer than the above.
If you are not offering as neivedhyam, you may replace the curd and urad dhal by a big ladle full of left over idli batter. This results in very soft appams.
Wish those of you who celebrate, a very happy festival of lights!

Tuesday, November 24, 2009

Bhel puri


Having been advised, and sometimes disciplined about eating anything selling at street stalls, we were in for our biggest treat while visiting our uncle in Bombay. Most likely, he decided that at 17 and 15 we would be manageable even if we fell ill. He bought us pani puris and bhel puris selling @ Chowpati beach :)

That was the first time I ever tasted something khatta-meeta-thikka all in one dish. But that was only once. Back home we were to forget even looking at street vendors. We were allowed generously, to purchase any item that sold in the college canteen. So we indulged ourselves in the puffs and cream rolls that were prepared at the college's very own bakery under strictly hygiene conditions.

Later with a group of boys and girls who were friends of a nephew, I treated myself to a Kaiyendhi bhavan style bhel puri in the X-cut road - Ghandhipuram market corner while working in Coimbatore. Then it was a Thursday evening treat from my husband to drive to Bur-Dubai from Khor Fakkan before exploring the many shopping options that Dubai has to offer.

The time I purchased a few cookbooks, my sister's neighbour had taught her to make the puris. That is all we needed. Now it is a regular chat affair at home. Two days ago we met with a friend to celebrate her daughter's birthday. It was meant to be a Pani puri and junk food party but the junk part was a whole lot of health ones.

That reminded me of the fact that I have in pictures the Bhel puri I made for my husband's birthday in July, yet in my picassa album. So, I put aside all procrastination this afternoon and am typing.

Bhel puri my style:
For puris: (Source: Mallika Badrinath's 100 snacks special)
3/4th of a cup Fine variety semolina
1/2 cup All purpose flour
2 teaspoons roasted and powdered urad dhal
1/4 teaspoon salt
2 tiny pinches baking powder
Ice cold water or sparkling soda water to knead a stiff dough
Oil for deep frying
Method:
Mix all the dry ingredients, salt and the baking powder well. Using the ice cold water or the soda water, make a stiff dough. Knead repeatedly yet stiff.
Cover with a damp cloth and keep aside for 10 minutes.
Knead again until dough is elastic.
Make small puris and deep fry on low fire as and when you have rolled them. Let them not dry in the air. This may result in the puris not puffing enough.
The puris should be rolled neither too thick nor too thin. The fire also has to be medium to low. The puris have to be fried very crisp.
These can be made ahead and stored upto a fortnight.

Ompodi or sev for the bhel puri:
1 cup Gram flour
1 tablespoon rice flour
Salt to taste
Oil for deep frying
Mix the flours with water and salt to make a smooth dough that can be pressed over hot oil using a very fine perforated fitted plate in a murukku press.
Heat oil and deep fry the pressed sev.
Keep reserve.

Mint Chutney and Sweet chutney:
Grind the following:
A fist full of fresh mint leaves
A tiny bunch of coriander leaves
A marble size ball of tamarind soaked in warm water
1/2 teaspoon cumin seeds
2 teaspoons jaggery powder
Black salt to taste
2 or 3 dry red chillies Adjust as per requirement
Juice of 1 lime
Pass this through a strainer and add another cup of water to this juice.
Soak the following in water for 1/2 an hour and grind to a semi thick paste:
A big lemon size ball of tamarind
3 table spoons powdered jaggery
10 numbers dates seeds removed
2 table spoons raisins
4 red chillis
A little amount of salt.

Other Ingredients for Bhel puri:
2 tablespoons grated carrots
2 tablespoons grated cucumber
1/2 of a raw mango grated
1 big potato boiled and mashed
2 tablespoons green peas cooked till tender
1 red onion sliced very finely
2 teaspoons coriander leaves chopped
1 tomato chopped finely
1 cup puffed rice

Keep all the ingredients ready and before seving, mix them well and serve garnished with additional ompodi and grated vegetables and coriander leaves.
This goes to RCI - Event started by Lakshmi of veggiecuisine, currently held @ Lakshmi's Kitchen Chronicles celebrating RCI- Mumbai.


Wednesday, October 7, 2009

Badam Halwa and Arisi Vadai - My 100th post!

I have been contemplating whether this is indeed a milestone post or not. The numbers mean as many recipes??? Well, nearly. I pat myself, aha! I can cook this many, great. But what these few months of blogging has given me is much, much more. It has been lovely and lively interacting with loads of blogger friends, some with a little more attachment and so on. It is worth celebrating then, don't you think?
To post a recipe to mark this was a task. There are a few posts to see the light of blog sphere, most of them are in pictures, write-up pending. So I took the suggestion of the two people who have been eating these most part of their lives...my husband and daughter. They came up with the idea of putting up something I cook and collectively we relish, which in itself is a difficult task. My husband used to be a pick and choose eater until recently. So it could have been a potato dish if he had his way. Niki is fine with most veggies and such. They came up with the two dishes for this post and here I am posting it for them.
Badam Halwa:


At home, when we were young, our grandmother and mother would indulge the three of us with different sweets prepared for different festivals. They used to make our choicest of the lot.
It used to be wheat halwa for Bhoghi, obbattu for Ugadi ans so on. Somehow, they never made badam halwa.
There was one Arya Bhavan near the Rajaganapathy temple in Salem. Appa used to buy this from there, just like bakes from Henry and Woolsey the famous bakers of Salem. The halwa used to come in tiny packets, wrapped in butter-paper, sweet and in a nice yellow colour. We love them.
Later I learnt from few cookbooks to make badam halwa.
Now this recipe works well for me and hope you will enjoy this too.
Ingredients:
1 cup almonds
1 cup sugar
1/2 cup milk (toned for low fat version)
Few strands of pure saffron
1/4 cup ghee
Method:
Soak almonds in hot water for about 20 minutes. Blanche them and using the milk grind to a fine paste.
Dissolve sugar in some water and boil until you achieve a thick syrup.
Mix the strands of saffron in some milk and dissolve them.
When the syrup consistency has been achieved, add the almond paste to it and stirring continuously allow it to blend well. Add the dissolved saffron too.
Cook the mix well adding the ghee in small portions until they come well together and start leaving the sides. Switch the fire off immediately. The halwa will still be semi solid but will thicken as it cools. Let the halwa reast in the same utensil for some minutes.
Transfer to a different container to store.
Garnish with roasted cashew nuts. You may also add cardamom powder for flavour but not necessarily.
Use of milk for grinding is optional, though that helps reducing quantity of ghee. Also as almonds have some fat content, ghee can be adjusted accordingly.
I usually serve this hot by heating small portions in the microwave.That makes it very indulgent, finger-licking good :)

Arisi Vadai:


This is the one vadai most of my mom's family memebers (my maternal grandma's daughters and daughters-in-law) make for Saraswathy pooja without exception.This is yet another very indulging dish from my grandmother's kitchen.
This year one of my cousin's wife, Priya manni sent this dish to Radio mirchi and won the first prize!!!
My mother makes them coin size and we just grab in fistfulls no end! We had our friend over for dinner the night of this year's Saraswathy pooja and he tried to take these with rice instead of vegetables:) I guess that I have piqued your interest enough that I should get to the recipe now.
Ingredients:
2 cups rice flour ( prepared by soaking rice and pounding it; you may use store bought flour too)
2 level cups water
2 tablespoons thuvar dhal
1/4 cup yoghurt
3 tablespoons fresh coconut, scrapped finely
6 green chillis
1 tablespoon channa dhal
2 teaspoons mustard seeds
few fresh curry leaves
2 teaspoons oil for tempering
Salt to taste
Oil for deep frying
Method:
Soak thuvar dhal for an hour, drain and grind coarsely along with coconut and chillis.
Soak channa dhal in some water for some time. Drain and keep aside.
Heat the oil for tempering in a heavy bottomed kadai, temper with mustard seeds and curry leaves. Add the channa dhal and toss for two minutes before adding the water.
Add the yoghurt, salt and the thuvar dhal paste, stirring well.
When this starts boiling, reduce heat to lowest and add the rice flour. Blend them well to form a lump that a small portion of it rolls between your fingers.
Take off the fire. Cool and knead well to obtain a lump-free, smooth dough. Make small balls and flatten them like discs. Small and medium thin discs that do not crack at edges should be the correct texture. You might sprinkle some warm water if necessary, but exercise caution, more water results in oily vadais.
Heat oil in a kadai and deep fry the prepared discs over medium heat, turning them around. Remove with a slotted ladle once the vadais are crisp and golden brown.
These vadais will stay crisp for few hours turning soft and chewy later. But both ways they taste just as good.


Friday, August 14, 2009

Janmaashtami -Sri Krishna comes to our homes!


When righteousness is endangered the Lord descends. One of such avathaars is that of Krishna.
Krishna is probably the most endeared child to the hearts of many a hindu because He is the child in you. We easily relate to all His pranks and mischievous deeds and enjoy ourselves reading and listening to them.
The Krishna Janmaashtami celebrates the birth of Lord Sree Krishna. It falls on the eighth day after the full moon of the Hindu calendar month of Sravana; the Rohini star will conjunct with the ashtami thithi normally; sometimes it might differ by a few days.
Celebrating the birth of a child brings much happiness, needless to say, it multiplies in the birth of The Almighty Himself !


Homes are decorated with kolams and thorans to welcome the Lord. Special dishes that are most favoured by children are prepared and offerred. The prayers are performed by late evening as it is believed that Krishna was born late into night in a prison cell where His uncle had imprisoned His parents.Take a look at the celebrations at my home yesterday. You may all have celebrated well too. I shall post related recipes in later posts. For now, I think pictures will do justice.


We offer aval, butter, payasam, dry fruits, fruits and many savoury dishes.


May the choicest blessings of Sri Krishna be on all of you.

हरे कृष्ण ! हरे कृष्ण !